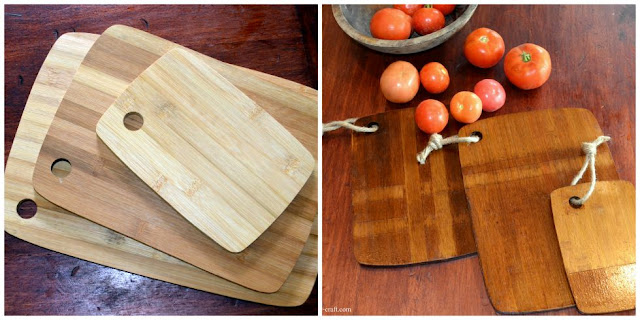
Recently, I was asked to be part of The Great Craft Swap sponsored by Wayfair and well, to be honest with you, they had me at craft swap. I was in! I was given four super fun products to chose from, and immediately, the ideas started coming with each of them. I ultimately settled on the 3 piece bamboo cutting board set because I had a plan A and a plan B.
Can I just tell you, that sometimes things don't go as planned with a project and you need a plan C. That's the fun of the learning process though. More on that later!
The fun part of the project was that I wasn't crafting for myself, but instead I was crafting for another crafter who I had never met before. I love that!
After I finished crafting the cutting boards, I mailed the package off and not even two days later, a package arrived in the mail for me! I love getting mail. Especially handmade mail. It's the bestest!
Here's a little peek of the boards that I gave and the tea towels that I got. I love them!
I've even got a full tutorial just for you on how I updated the 3 bamboo cutting boards.
DIY Creating a Stained Cutting Board
So, these beauties arrived in the mail and are perfectly awesome just as they are. And at a price of only $7.99 {yes for all of them!} you can't beat it! But I had an idea of how I wanted to make them my own, so I set to work.
Like I said, I had a plan A and a plan B and ultimately ended up on my plan C.
My plan A was to use this special stain that I had been wanting to try. Well...I wanted to try it so badly, that I didn't read all of the directions fully and could have saved myself time since it isn't recommended for us on bamboo. Anywho, I tried it. It didn't work. I moved on.
Plan B involved some painters tape and some stain {Minwax Polyshades in bombay mahogany} that I had leftover from our DIY plank {removable} table top cover project. If you haven't seen it, go check out how cool it is that I can pull off the cover on my kitchen table and have a work surface underneath that I don't mind messing up.
I used the painters tape to create a cool pattern on each of the cutting boards {front and back} and then painted my Minwax stain on top. I used two coats of it and then once it was dry, I pulled off my painters tape to find out that the lines weren't nice and crisp like I had hoped, but instead, they had bled through.
I was counting on some crisp lines but I shook it off and tried plan C. This plan involved a few more layers of stain, this time I just painted on the raw wood that I had originally thought I would leave alone in plan B, but now, plan C brought a new idea. What if, I stained the whole cutting board {front and back} and because the few layers of stain I already put on were already painted, would the pattern still stay?
Spoiler alert, it did! And I really liked how it came out! I call those happy accidents. Good thing, because plan C is usually where I quit and say lots of four letter words.
I had some twine left over from my twine wrapped pumpkin project and cut off a little to use either to hang them or for some extra texture.
This was such a fun project and I'm so happy at how it turned out. I was a little worried there for a minute!
And you guys!!! How much fun are these tea towels?! They make me want to cozy up with a hot cup of a tea and a good book.
I had so much fun being part of the Wayfair Great Craft Swap!
Just sayin' but you could totally tuck these ideas in the back of your mind for some great homemade gift ideas for the holidays.


No comments
Post a Comment