Showing posts with label how to. Show all posts

Monday, February 1, 2016

Valentine's Day framed button art

**this project was first seen as a guest post on DebbieDoo's. I thought you might enjoy it too in case you missed it.**

Red is my absolute favorite color. I just love the energy that it brings and how it automatically livens things up a bit. Maybe that's why I gravitate towards all things hearts and Valentine's.  I created this Valentine's Day framed button art with a clearance frame, some striped scrapbook paper and some buttons I had collected in my button jar.


Monday, January 25, 2016

Horn turned into a necklace creating wearable art


Last August I went on one of the most amazing trips ever. I spent a few days after a visit in Uganda in the Masai Mara wildlife reserve in Kenya. I had always dreamed of going on safari before, but didn't know that it would be something that I would ever be able to do. You can read more about my experience on safari here and here.

While we were at one of the local safari camps, I acquired an Impala horn. It was found in the dried scat of an animal and looks to be that of a small Impala that was a yummy dinner for one of the bigger animals in the Mara. However, it's pretty darn small, so I'm now second guessing if it's an Impala or a Topi.  Whatevs, it doesn't really matter. It's awesome.

I brought it home, not sure what I would do with it, but just this past weekend, I decided to try making a necklace out of it and the end result is fantastic! I love it! And I love that it reminds me of a such a special place in this world.


Monday, January 18, 2016

how to make your own handmade leather passport cover from vintage leather

I have a love affair with leather. Not just any leather--that soft buttery leather that just feels right when you touch it. That kind of leather is hard to come by, but when I found a piece of it at a garage sale this past summer, I couldn't pass it up. 

It wasn't in the best shape, but it was the smoothest leather you have ever felt and it was nearly 100 years old! It was an old book cover with a hand painted Indian on it that was falling apart. Boy if that thing could talk! The stories it could tell and the places it had been!  So, I kept that book cover that was falling apart tucked away in my closet until I decided what to make with it. 

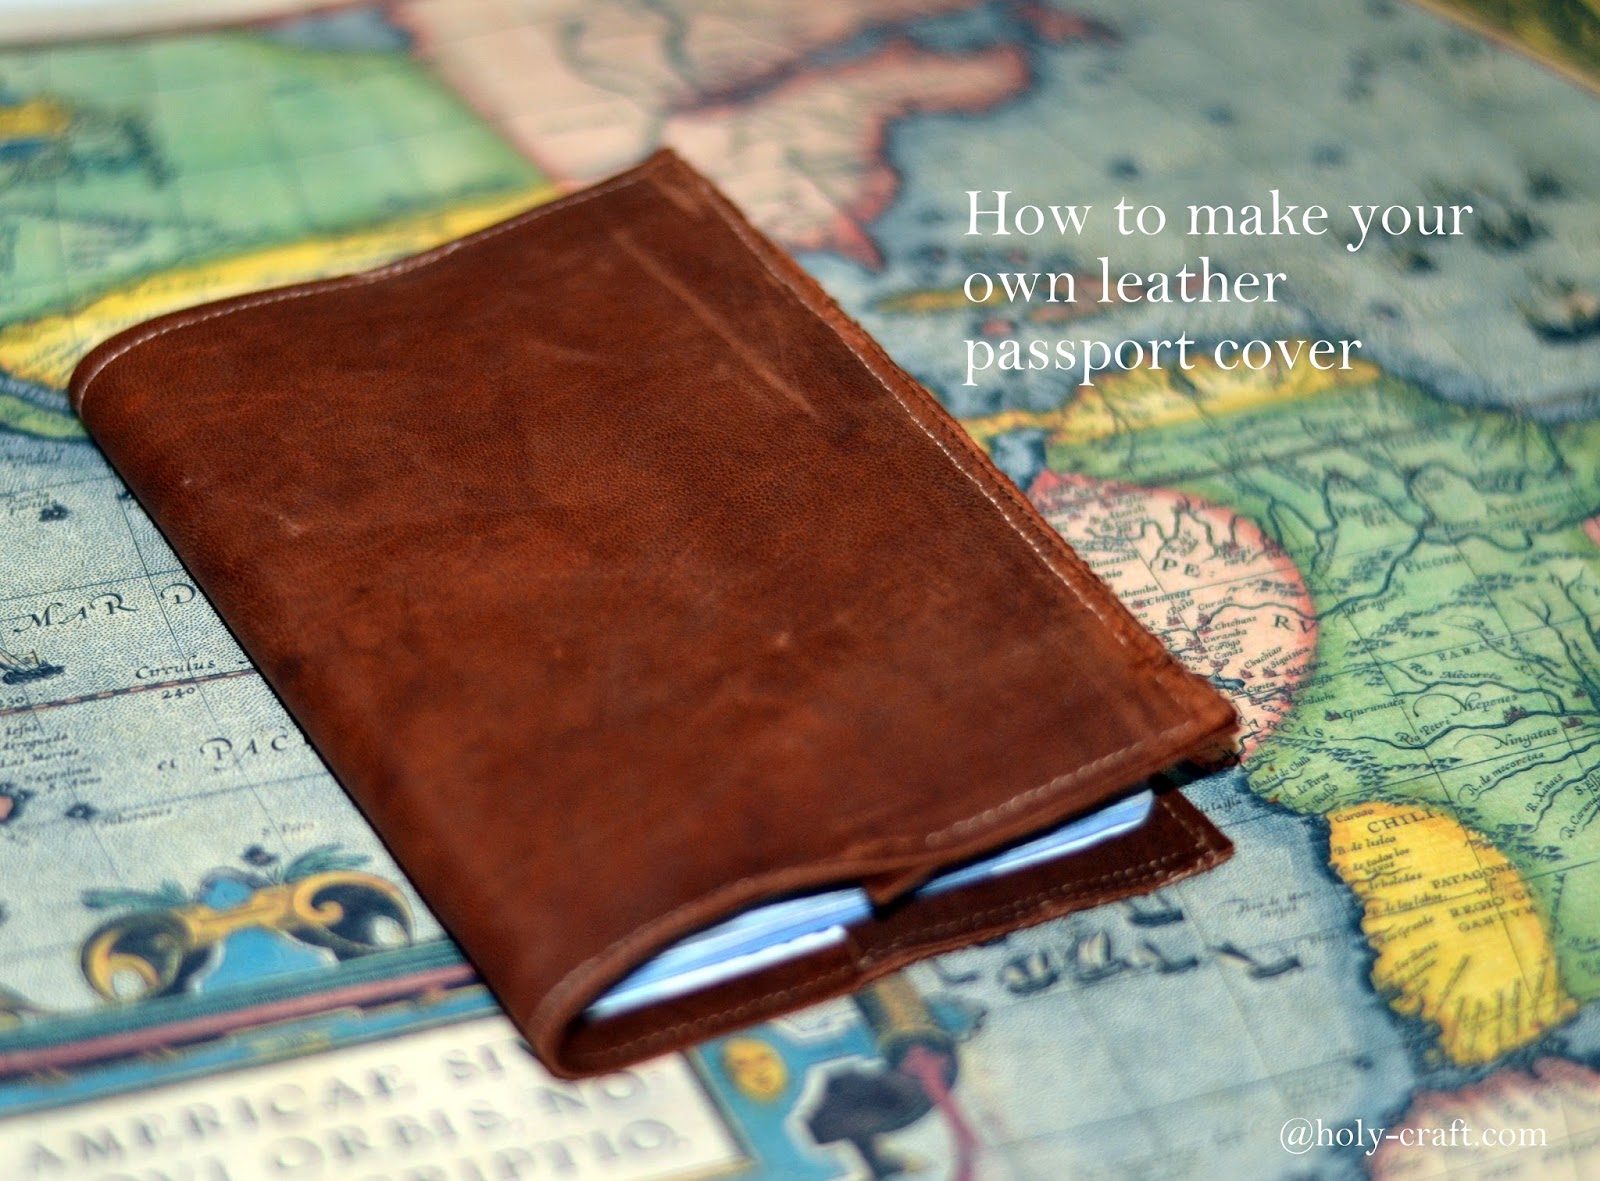
I finally decided to make a leather passport cover. Our whole family has passports and in a drawer, they all look the same.  I knew I wanted something that would set it apart from the others and have a fun story to tell.

Lately, my passport has become one of my favorite possessions. I love the stories behind the stamps and the amazing places that it's taken me. Travel to me, is one of the greatest gifts.  I love my passport now even more with this handmade leather cover made from an old treasure I picked up at a garage sale.


You don't have to use a vintage book cover, you can use any piece of leather that you have. Maybe an old coat or a scrap from a project. It took me less than twenty minutes to make. Come see how!


Wednesday, January 13, 2016

Easy to sew, easy to give beginners pajama pant kit with free downloadable directions file

My niece is eight and when she asked her mom recently for a sewing kit, my sister in law was at a loss. She wasn't quite sure something like that existed or really what she was looking for, so when I got the questioning text, I messaged back "I got this!".

I ended up taking one of my readers favorite tutorials and creating a pajama pants kit that had pre-cut materials inside to make a beginners sewing project. 


I'm sharing with you the file, so that you can create a sewing kit for some of the beginner seamstresses that are in your life.

Friday, January 8, 2016

The secret to keeping your New Year's Resolution

Every January it's the same old thing. The gym that I frequent is always busy, the racks at the stores are full of workout gear and there are ads all over for weight loss this and diet secret that. 

I was one of those New Year's resolution makers that said I would start hitting the gym. I was 29...about to hit 30. I had three small kids at home and I was skinny but I wasn't fit. I had heard that your metabolism changes at 30. I had fears that my nightly bowl of ice cream and my dessert snacking were going to catch up with me, so I took advantage of one of those 3 weeks free gym trials and I started to work out. I switched gyms once I found out how much the fees were, but I did start a healthy habit that I have actually kept for eight years now.

But I must confess, I hate this time of year. I hate the people who show up at my gym and make me shift my normal routine. Faces I see for a few weeks before they drop off again. The workout clothes that get bought with good intentions, but that only get worn after February to run errands in.

Trust me. It's gotten harder and harder for me to sometimes find the time to fit workouts in, but I think I might have the secret for you so that you can keep your New Year's resolution to live a healthier lifestyle.


Friday, December 18, 2015

Snow and Christmas trees to make a fun holiday decoration

Last year, one of my favorite Christmas crafts that I made were these die cast cars with snow and mini Christmas trees. They were huge hits at my local craft bazaar last year, so I kept my eyes peeled this year as I did garage sale and thrift store shopping for more things that I could add faux snow and trees to.


I found a few things, and this time, they were even bigger than the little die-cast cars I used last year!

Thursday, December 17, 2015

Vintage tablecloth turned into Christmas tree skirt

I love Christmas! I love decorating for Christmas and I love unpacking my Christmas boxes every single year. Every year I add to the boxes with handmade ornaments like I featured all last week in my six days of handmade. Sometimes, I add big items, sometimes I add small items.

This year, one of the new items I added to my Christmas decor was a new tree skirt. But not just any tree skirt. It's a tree skirt that I made out of a pretty amazing vintage round tablecloth that we got from my husband's grandmother's estate just after she passed away this summer.

I actually see round tablecloths like this at garage sales and estate sales quite often, so in case you are like me, you can pin this or tuck this away and remember when garage sale season starts back up again to keep your eyes peeled for a round tablecloth to make a no sew Christmas tree skirt.


It took me under 5 minutes and I promise, there is really no sewing to make this tablecloth into a Christmas tree skirt. Want to see how?

Friday, December 11, 2015

Handmade clay antler ornament

Welcome back to day five of the six days of handmade ornaments.

In case you missed it, check out the scrabble tile ornamentstypewriter keysChristmas tree in a jar and woodland diorama ornament
Today, I will be sharing with you a handmade clay antler ornament.

Thursday, December 10, 2015

Deer and Christmas tree ornament

Welcome back to day four of six days of handmade ornaments. I hope you have enjoyed seeing all of the fun homemade ornaments so far. In case you missed it, check out the scrabble tile ornaments, typewriter keys and Christmas tree in a jar.


Today, I will be sharing with you these snow globe diorama ornaments.

I had a half a dozen of these adorable little deer that I bought for a quarter a piece. They were floating around in the bottom of my purse just waiting for glitter, when my purse got stolen from a Starbucks parking lot. So some bad guy probably has some deer they are making diorama ornaments from too.


These were really easy and fun and the possibilities for them are endless! Let's get started!

Tuesday, December 8, 2015

Handmade typewriter key ornament


Welcome to day two of six of Holy Craft's six days of handmade ornaments. Yesterday I shared with you the handmade Scrabble tile ornament.  Today, I will be sharing with you a round typewriter key ornament. 


There are so many ways to personalize these ornaments for your family and friends. I picked this 5 since there are five people in our family. They are super easy to create. Let me show you!

Wednesday, November 25, 2015

How to survive when you hand your keys over to your teen driver

We did it. We survived teaching and driving with a 15 year old.  Our oldest son Aidan was dying to drive for years and as a parent who has navigated the waters, we get asked often what some of our best tips are.

I won't say that we have all of the answers, but we do have some experience. These are a few of the ways that we survived teaching our son to drive.

Monday, November 2, 2015

7 Tips for How to Take Your Own Family Christmas Pictures for a Photo Christmas Card


It's closing in on my favorite time of the year...Christmas card season! I love love love Christmas, but my favorite part by far is the steady influx of Christmas cards in my mailbox. It usually starts on the first day of December {some loyal college friends are known for being card number one every.single.year} and it lasts until the start of the new year.


As a family, we get excited to get those cards.  We pray over every one of them at the dinner table, we use their Christmas letters {and Facebook} to fill in the details of that family’s life over the past year, and we proudly display those cards on our walls and on our mantels. The kids anxiously fight over who gets the mail and they tear into the envelopes with reckless abandon. We then pray over the cards we receive that day at the dinner table and we usually share a story or a detail or two about that family before we proudly display those cards on our walls or on our mantel.


Because I so very much cherish every single one of the cards from friends and family near and far, I take great care in making sure I send out a Christmas card that is one to cherish. 


I don't know when the switch happened but it did. When we were first married a zillion years ago, I would go to the store and pick up a few boxes of those stock Christmas cards. I would write a personal message inside each one and we would include our family Christmas letter.  About ten years ago though things started to change. At first we just got a few photo cards at Christmas, and then it was more like half and half and then last year, BAM! Getting a card with no photo was a rarity.


Ten years ago, I sent out our first family photo card. Our youngest son was a newborn and we dressed up our two other kids to look like Mary and Joseph. How adorably cute are they?! That first picture started a new tradition.  My husband would be in charge of writing the Christmas letter {ours doesn't suck} and I would take on the task of getting a photo for the Christmas card.


Some years it was a no brainer. There were a few years that we had professional photos taken, so I included those images, but professional photos are expensive, and well, I just didn't have it in the budget to hire a photographer every year.  But I loved the look of a professional photo.


About three years ago, I got smart. Perhaps I'm the only one that hadn't had the ah ha moment yet, but I thought, we have a camera and that camera has a self timer, lets just go to the park and take a family picture. 


There was no scheduled day or time. No hoping that the weather would cooperate on the day that we had scheduled, no long drawn out posing session with a stranger.  We set our own day and made up our own time. We showed up. And you know what? It's worked out great for us.  So I have a few tips for you in case you want to try taking your own family pictures for your Christmas card.


Friday, October 30, 2015

Using scrapbook paper to create a journal with a pocket

I'm a lover of a good print. It could be a good print on fabric or a good print on paper, I don't play favorites.  Lately, though I have found some pretty amazing scrapbook paper prints that have been screaming for me to create with them!

If you are local, my most favorite craft store is Artco in Tacoma, WA.  It's locally owned and while it's more expensive and doesn't have 40% off coupons like those other craft stores, it does have some pretty awesome items in stock.

I picked up a plain spiral bound notebook for $1 and these two pieces of coordinating scrapbook paper.  It took me all of five minutes to make something I love that would cost five times as much at those specialty paper stores!  Wait until you see it!


Monday, October 26, 2015

How to cut heat transfer vinyl like a pro!

Follow my blog with Bloglovin

One of my favorite things to do with my Silhouette machine is to cut heat transfer vinyl {HTV}.  HTV is the iron on material that can be cut to create any letter, shape or design to make a custom creation for any occasion.  I'm a sorority girl, and my husband likes to joke that it's not really an event unless there is a t-shirt to document the occasion!  Over the years I've made dozens and dozens of t-shirts for our family 5k Turkey Trot Thanksgiving morning. I've created stockings and pillows and custom bags, not to mention gifts for family and friends.

I've learned a lot of things about heat transfer vinyl over the years and while I'm not an expert, I do have a few tricks up my sleeve!


Friday, October 23, 2015

How to make embroidery floss tassels

I'm a huge fan of this tassel trend that is happening right now, so when I found some embroidery floss at a garage sale recently I knew I had to whip up some tassels of my own!  It's super easy and I can't wait to show you how!


Monday, October 5, 2015

DIY infinity scarf with snaps--a Lululemon vinyasa scarf knockoff tutorial


It's fall. My least favorite time of the year. Don't get me wrong, I totally understand why the rest of you love it. I used to love it too when I lived in the Midwest, but now as a pacific northwest transplant, fall marks the start of our rainy season and nine long months of doom and gloom. But I digress. 

Fall means cooler weather, dressing in layers and scarves. Lots of scarves! One of my favorite scarves of all time is the Lululemon Vinyasa scarf.  I received it last Christmas as a gift and love the tutorial on how to wear it 10 ways, though I really only wear it one or two of those ways most of the time.

I'm too cheap to buy another at the $48 price tag so I used my current scarf as a guide to sew a knockoff that I love.


Friday, October 2, 2015

Driftwood succulent planter


It's no secret that I am crushing hard on this succulent trend. I bought a whole huge flat of succulents at a garage sale this summer and they have done so well that many of them are growing new blooms. I needed somewhere to plant these new shoots and happened to have a large piece of driftwood that I found on the beach this summer.

With a little help from my handy husband, I was able to make a driftwood planter for my succulents that I am in love with!  The best part is, it cost me next to nothing!


Want to know how?


Monday, September 21, 2015

Going beyond "fine" how to get your kids to really talk

So your kid walks in the door after school and the first thing out of your mouth is "how was your day." It's instinctual.  My guess is the response you get is "fine." No long deep discussion and no clue as to what happened during those six plus hours that they were away from you.

My oldest son is a senior this year. Everyday this is our conversation when he walks in the door.

Mom: How was school today?
Aidan: Fine.
Mom: What did you do?
Aidan: Oh, you know things.
Mom: What kind of things?
Aidan: Stuff.

It's sort of our little running joke now. Things and stuff are his one word responses to anything that I ask about school. I guess it could be worse.

There are times when we all fall into the "I'm fine" trap for an answer, but there are days when we know our kids have a little bit more going on in their head than they are letting on to. I've found some surefire ways to get kids to talk after school so that we can open up the lines of communication with them and get just a little glimpse into their day.


Wednesday, September 16, 2015

How to save hundreds of dollars at the salon and color your hair at home-a step by step guide

It all started when I was 15. I was out with my best friend shopping at Target with money to burn{those were the glory days!}. Somehow I ended up in the hair dye section and picked up a box. 

I was walking the aisles of my daughter's jr. high a few weeks ago and man, I'm telling you, that time of life is full of experimentation with one's looks.  So it's not surprise, that I started playing around and started changing the color of my hair.

I can remember only two times in my life that I have actually paid someone to dye my hair for me and each of those times I couldn't believe how dang on expensive it was. 

Now instead of experimenting with my look and changing the color of my hair, I am dying my hair to cover the grey. 

Either way, with 22 years of experience and probably thousands of dollars saved, I am here to offer my expertise and give you a step by step guide on how you can dye your hair at home. I promise, it's not that scary!


Monday, September 14, 2015

The Great Craft Swap with Wayfair-patterned cutting board

Recently, I was asked to be part of The Great Craft Swap sponsored by Wayfair and well, to be honest with you, they had me at craft swap. I was in! I was given four super fun products to chose from, and immediately, the ideas started coming with each of them.  I ultimately settled on the 3 piece bamboo cutting board set because I had a plan A and a plan B. 

Can I just tell you, that sometimes things don't go as planned with a project and you need a plan C. That's the fun of the learning process though.  More on that later! 

The fun part of the project was that I wasn't crafting for myself, but instead I was crafting for another crafter who I had never met before. I love that! 


After I finished crafting the cutting boards, I mailed the package off and not even two days later, a package arrived in the mail for me! I love getting mail.  Especially handmade mail. It's the bestest!

Here's a little peek of the boards that I gave and the tea towels that I got.  I love them!


I've even got a full tutorial just for you on how I updated the 3 bamboo cutting boards.