
Showing posts with label silhouette. Show all posts
Showing posts with label silhouette. Show all posts
Monday, December 28, 2015
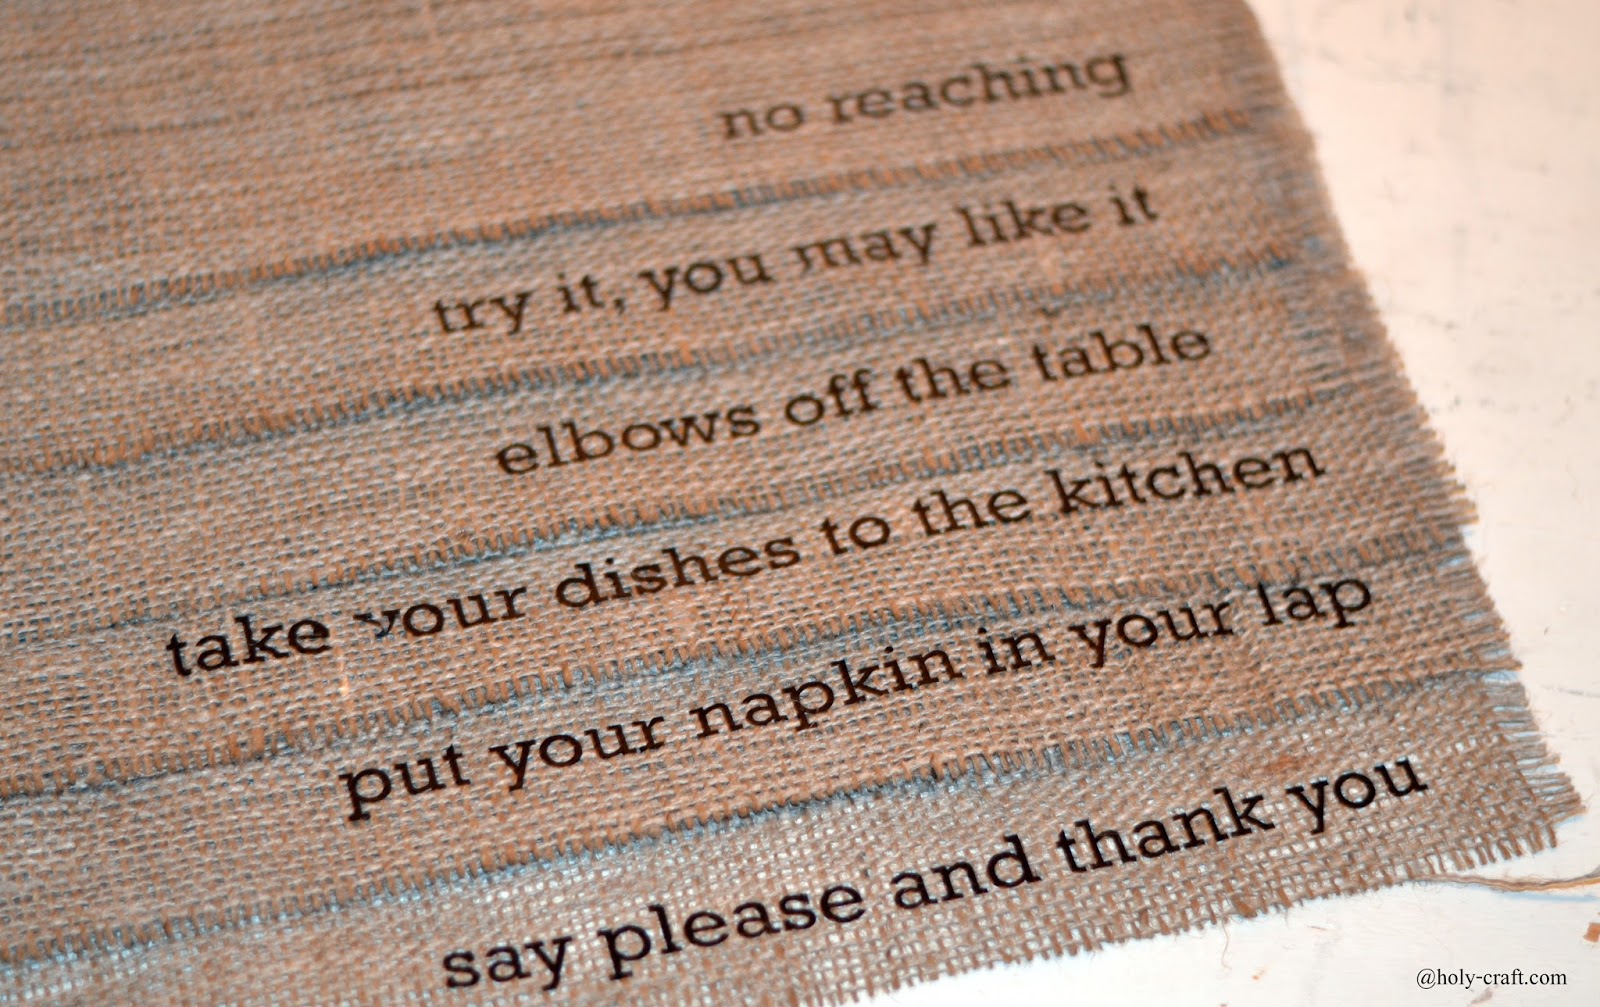
Vinyl sayings on burlap placemats

Wednesday, December 23, 2015
Last minute crafty gift ideas
I know, I know, Christmas is in two days, but I couldn't help but squeeze in a few last minute gift ideas that you can make in case you have a few last minute presents to whip up.
I actually had all of these supplies on hand, so no special trip was required to a craft store. But I am a craft supply hoarder, so perhaps you are much more organized and less in need of craft supply intervention than I am.
Regardless, these gift ideas can all be whipped up in under an hour and most of them can be made in under twenty minutes.
Tuesday, December 15, 2015
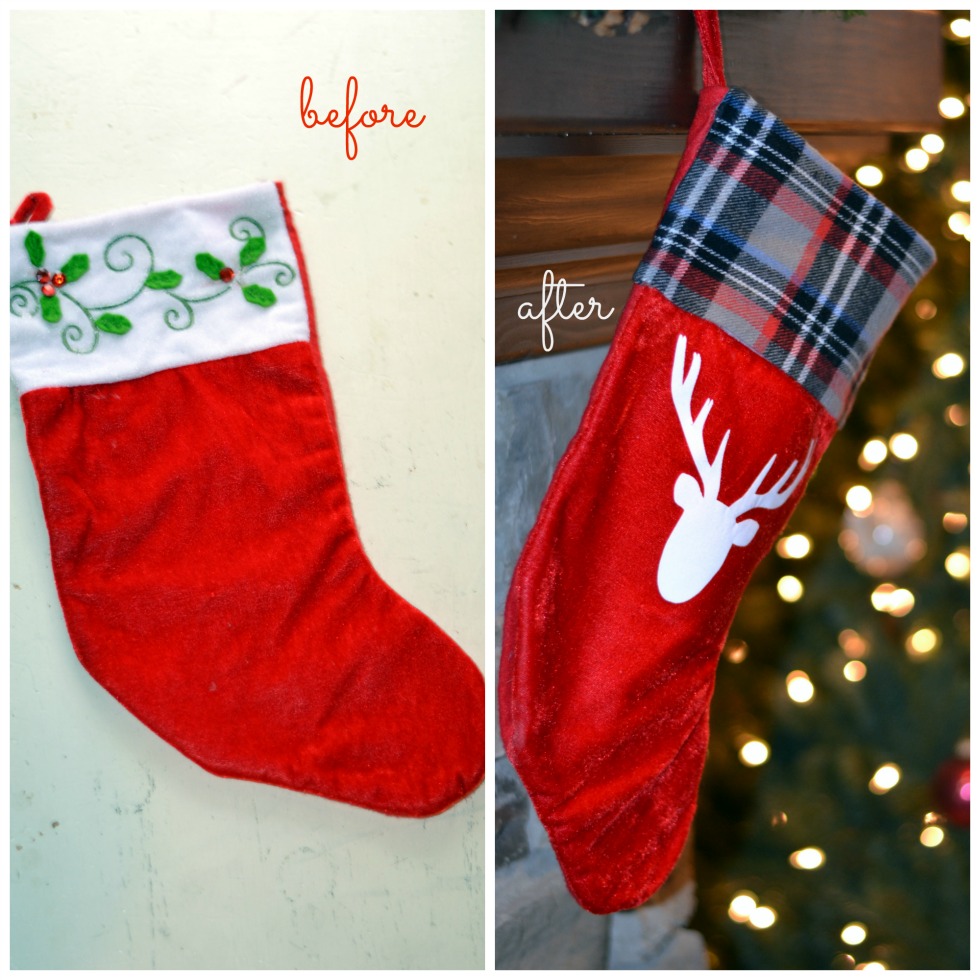
No sew stocking update plus an Expressions Vinyl giveaway!!!
I love decorating for Christmas. It's my favorite time of the year. The twinkling lights on the trees and every surface covered with something festive! Unpacking boxes is so much fun for me. I pull out ornaments that I got as an infant, village houses that I have decorated with for decades and special plates and wreaths my kids sweet little hands made when they were toddlers.
But not every decoration stands out year after year. And for that reason, I like to get creative!
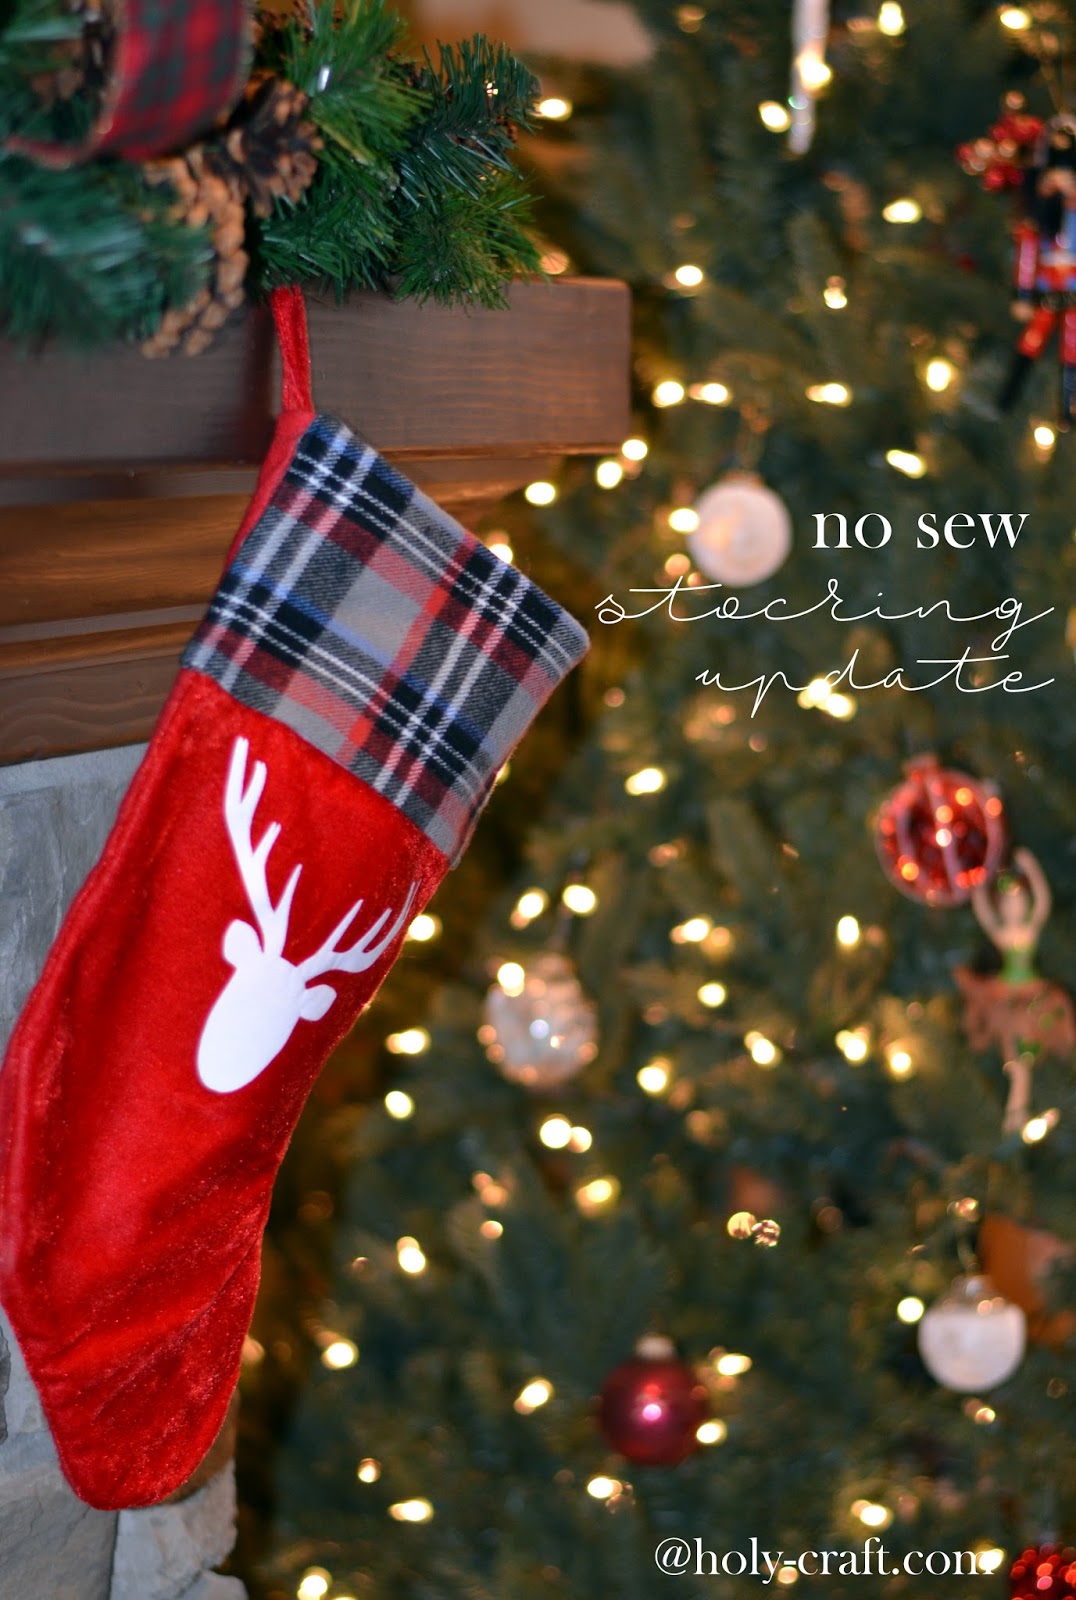
Take for example this crushed red velvet stocking. It's seen better days. The bedazzled jewels on the felt holly leaves are coming off and, well, it's just not holding it's own against the red plaid woodland vibe that I am gravitating towards this year.
Instead of throwing away a perfectly good {though hideous looking} stocking, why not update it? I've got the perfect no sew solution for you in case you find yourself with some stockings that really aren't fit to be hung anymore!
Friday, November 20, 2015
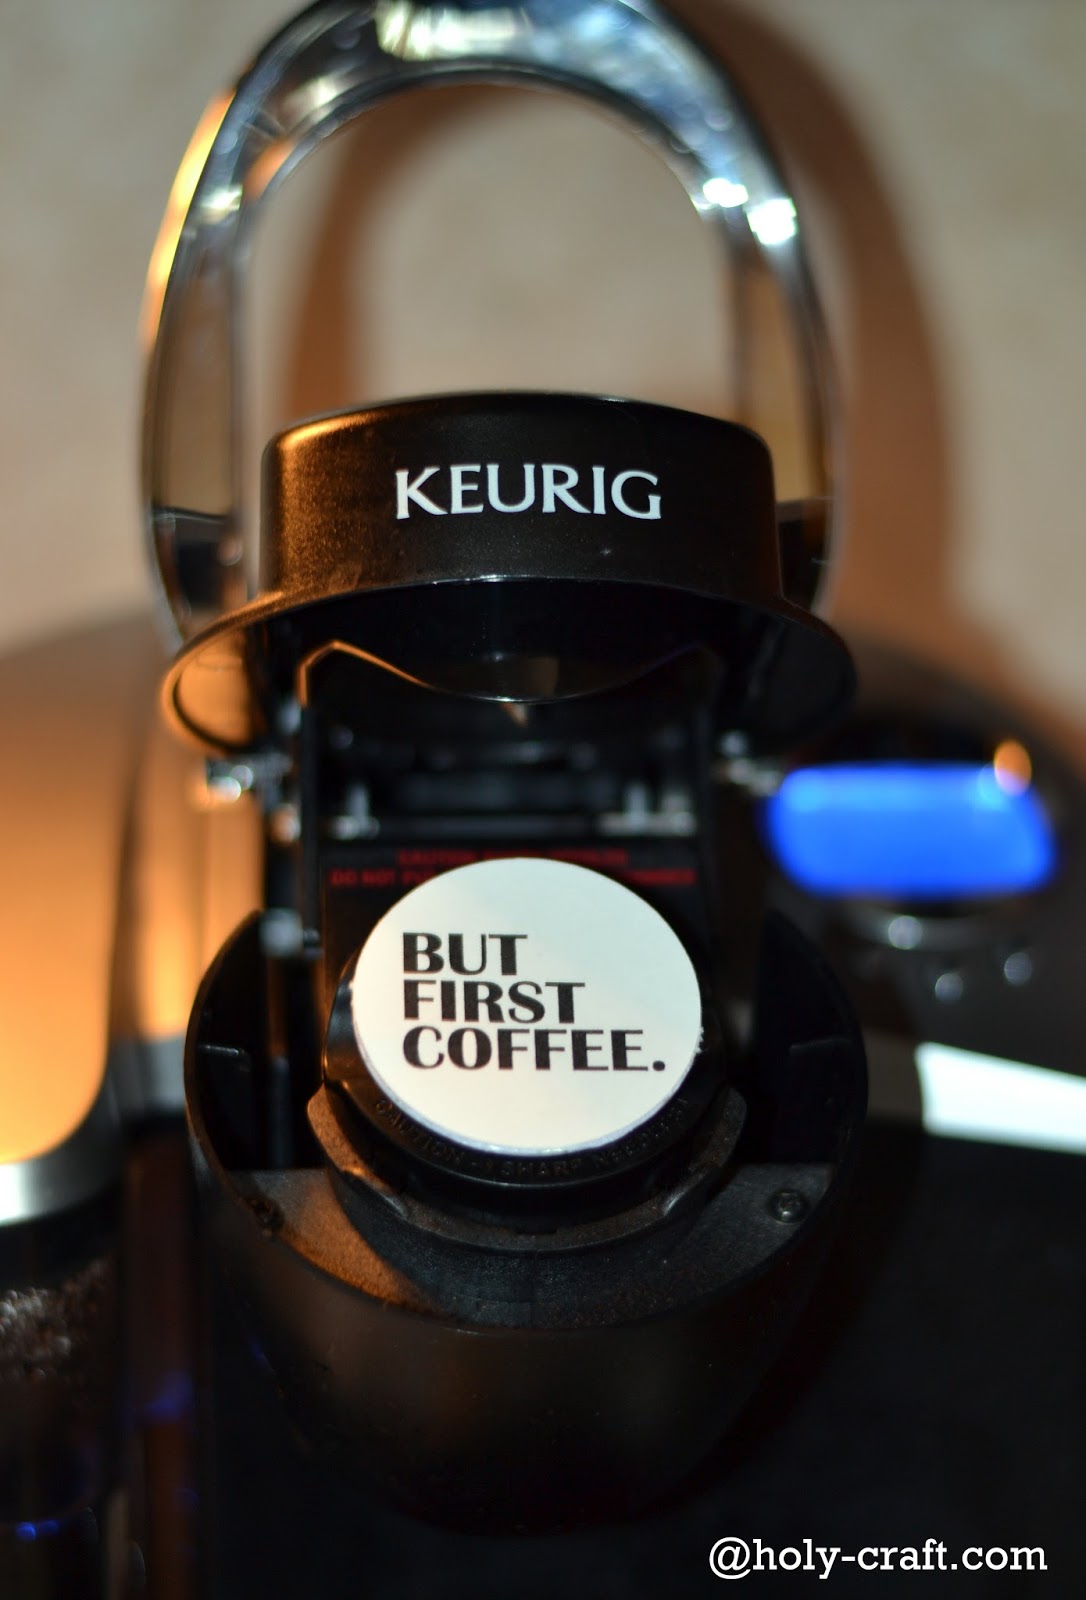
Free printable for your Keurig K cups
I don't know about you, but I am slightly obsessed with my Keurig. I'm not a "give me a whole pot of coffee" kind of gal, so one cup here or there serves me just right most of the time, which is why I love popping in a K cup here and there.
But those K cups need some personality, don't you think? I like pretty things and I like witty sayings. Combine the two and you have a winner in my books.
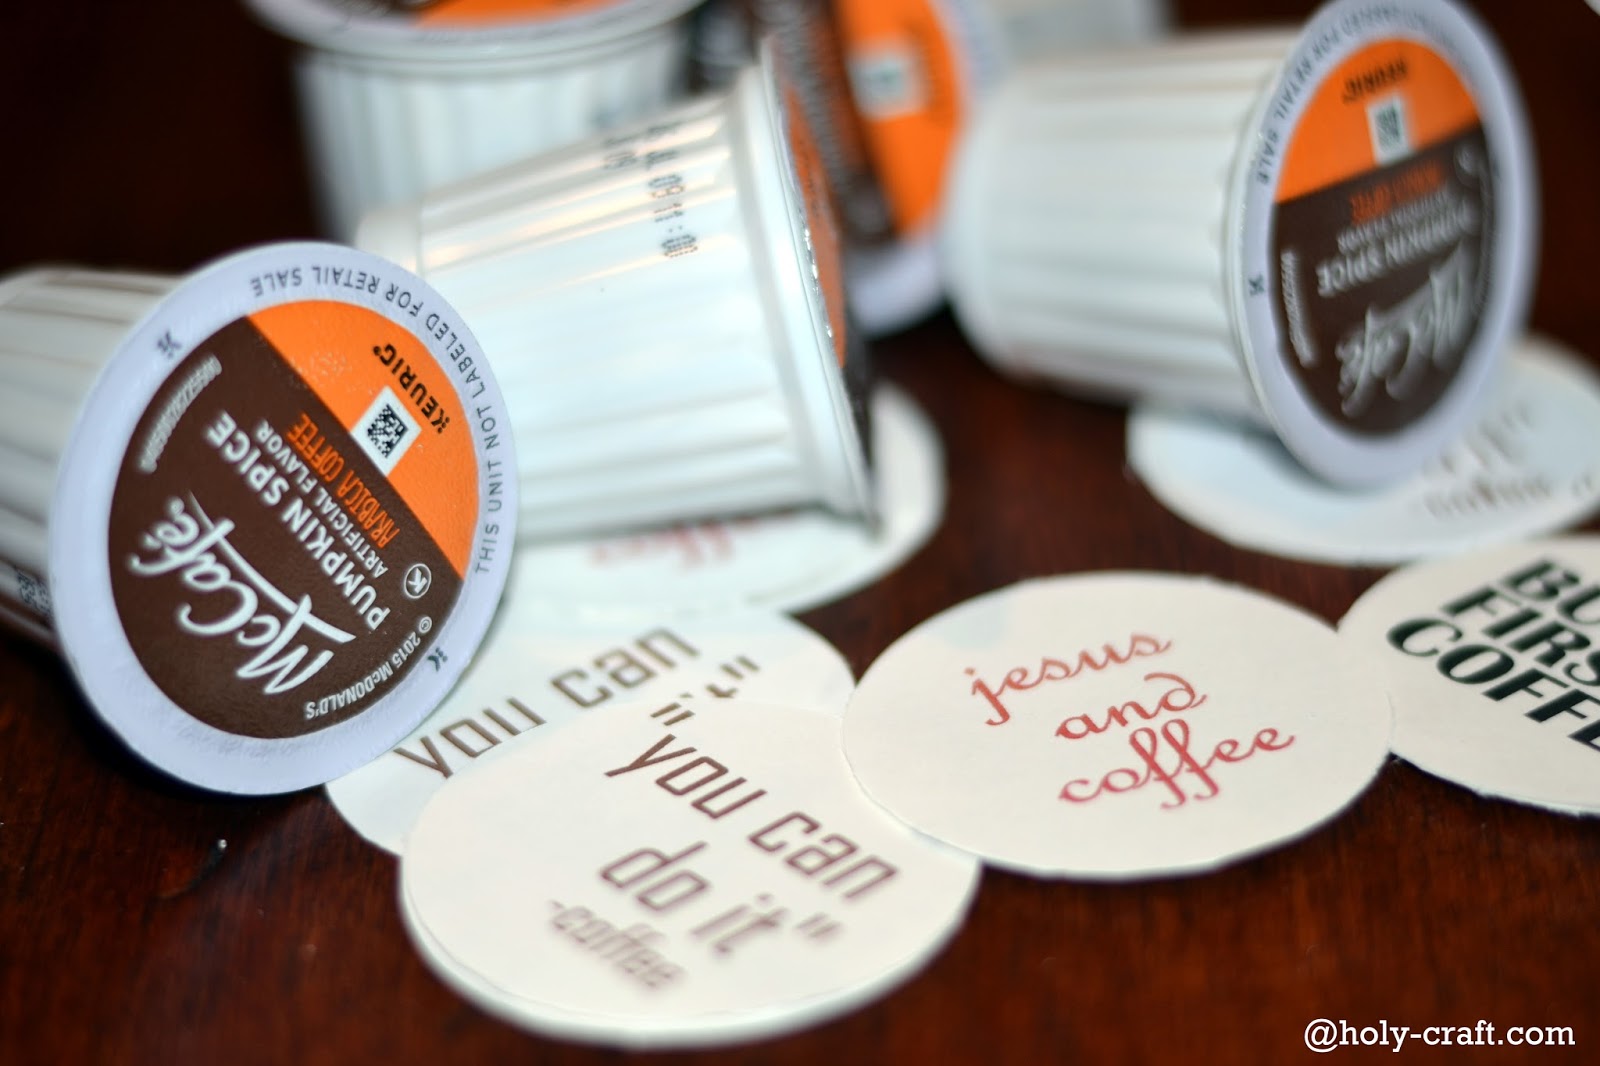
I decided to create a little printable that I could put over the top of my K cups. They make me happy when I use them in the morning. And lucky for you, I'm giving you a free printable, so that you can make some yourself too!
Friday, November 13, 2015
I am thankful for...a free printable paper chain
I'm a sucker for a beautifully set table. Though I have a confession. This is the first time I've taken out my great aunt's silver since I've had it and I only have one of these place settings, though I do love this pattern on the plate don't you? I also don't have enough matching glasses for our whole family. Hostess extraordinaire I am not!
Though if I could, I would set the dining room table like this and leave it. But right now it looks silly with only one place set. I digress...
Thanksgiving is the perfect time to set a fancy table complete with napkin rings. I love taking the time to reflect on the things that we are thankful for. I created a free printable for you that can double as a napkin ring for your fancy table and that can later on be made into a paper chain to display all of the things that you and your family are thankful for.

Monday, October 26, 2015
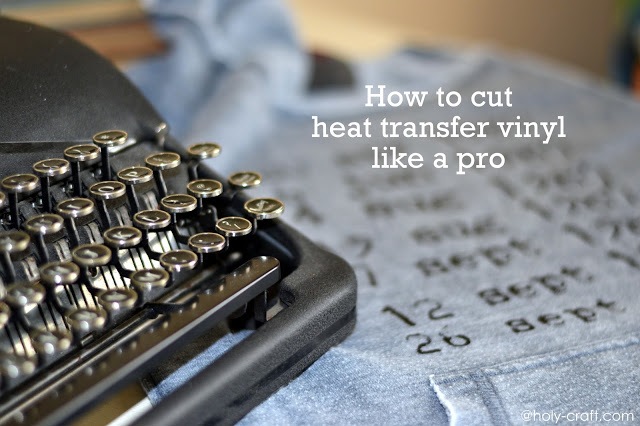
How to cut heat transfer vinyl like a pro!
Follow my blog with Bloglovin
One of my favorite things to do with my Silhouette machine is to cut heat transfer vinyl {HTV}. HTV is the iron on material that can be cut to create any letter, shape or design to make a custom creation for any occasion. I'm a sorority girl, and my husband likes to joke that it's not really an event unless there is a t-shirt to document the occasion! Over the years I've made dozens and dozens of t-shirts for our family 5k Turkey Trot Thanksgiving morning. I've created stockings and pillows and custom bags, not to mention gifts for family and friends.
I've learned a lot of things about heat transfer vinyl over the years and while I'm not an expert, I do have a few tricks up my sleeve!
Friday, May 15, 2015
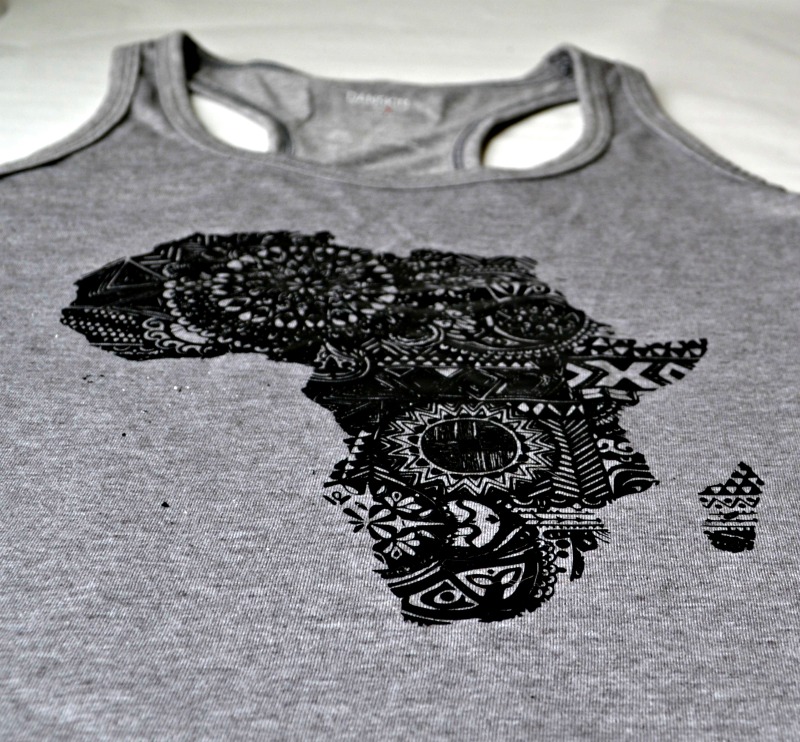
Graphic t-shirt using heat transfer vinyl
Graphic t-shirts are hot this summer! You can find them everywhere, but why grab one at the store when you can make one? While I was at SNAP conference last month, I picked up some Expressions Vinyl. I have been digging these racer back t-shirts from Wal-Mart of all places {can't beat the $4.97 price tag!} and now I've been embellishing shirts til my hearts content. I love making custom t-shirts, and nothing is more custom than one you create on your own. Heat transfer vinyl is so easy to use that you will be whipping shirts out like a pro in no time!
Wednesday, April 29, 2015
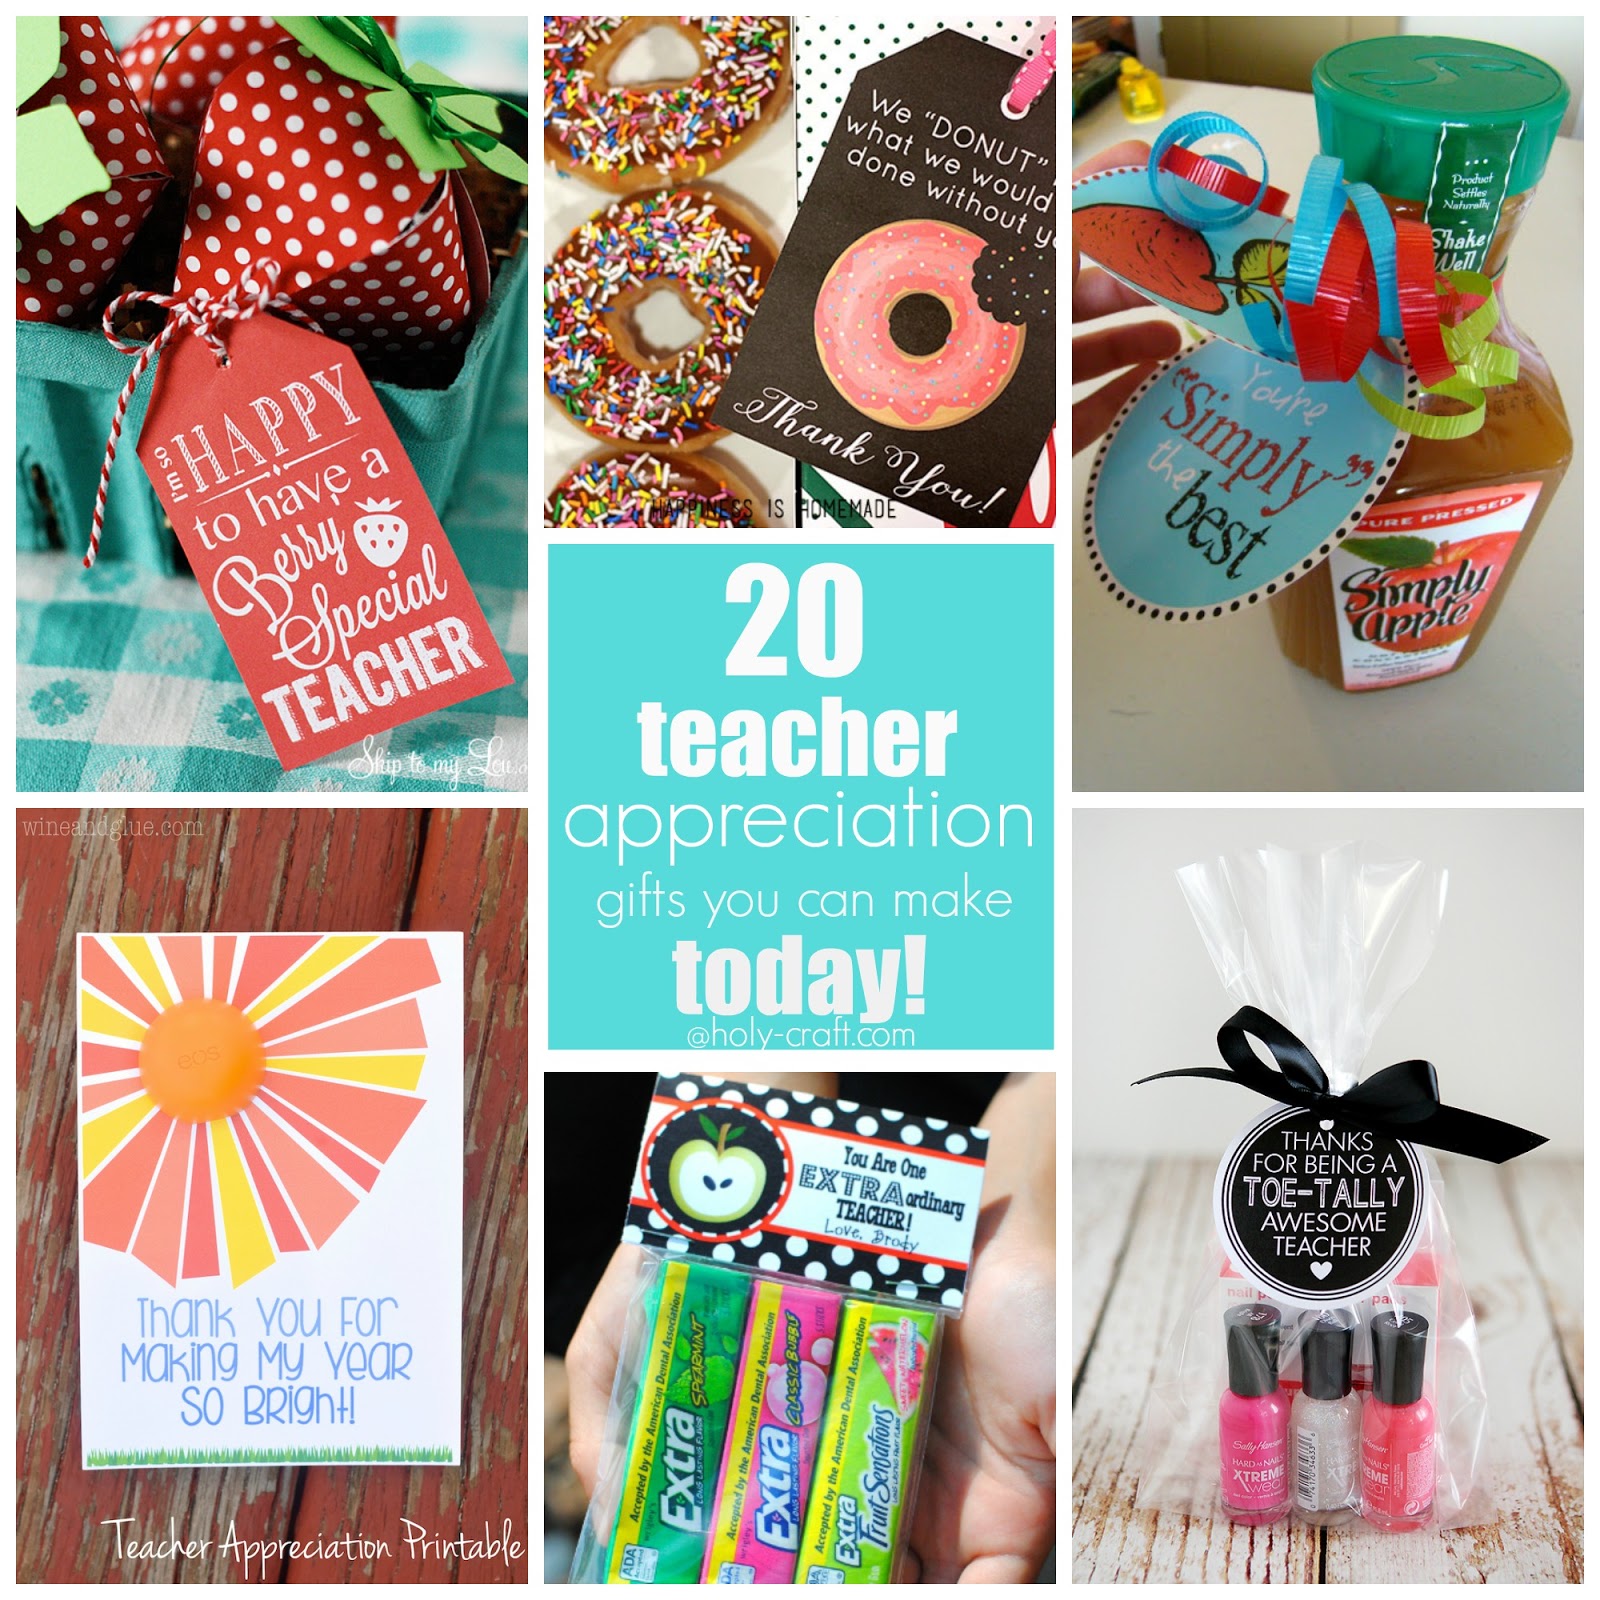
20 Teacher appreciation gifts you can make today!
Friday, April 17, 2015
Vinyl zippered travel bag
I have been doing a lot of traveling lately. In fact, I am pretty sure I've spent more nights sleeping in hotel beds than in my own bed this year! Don't get me wrong, I love it! Travel is one of my most favorite things ever. I've actually gotten quite good at packing. My favorite travel item are these zippered pouches. They are even better now that I personalized them a bit.
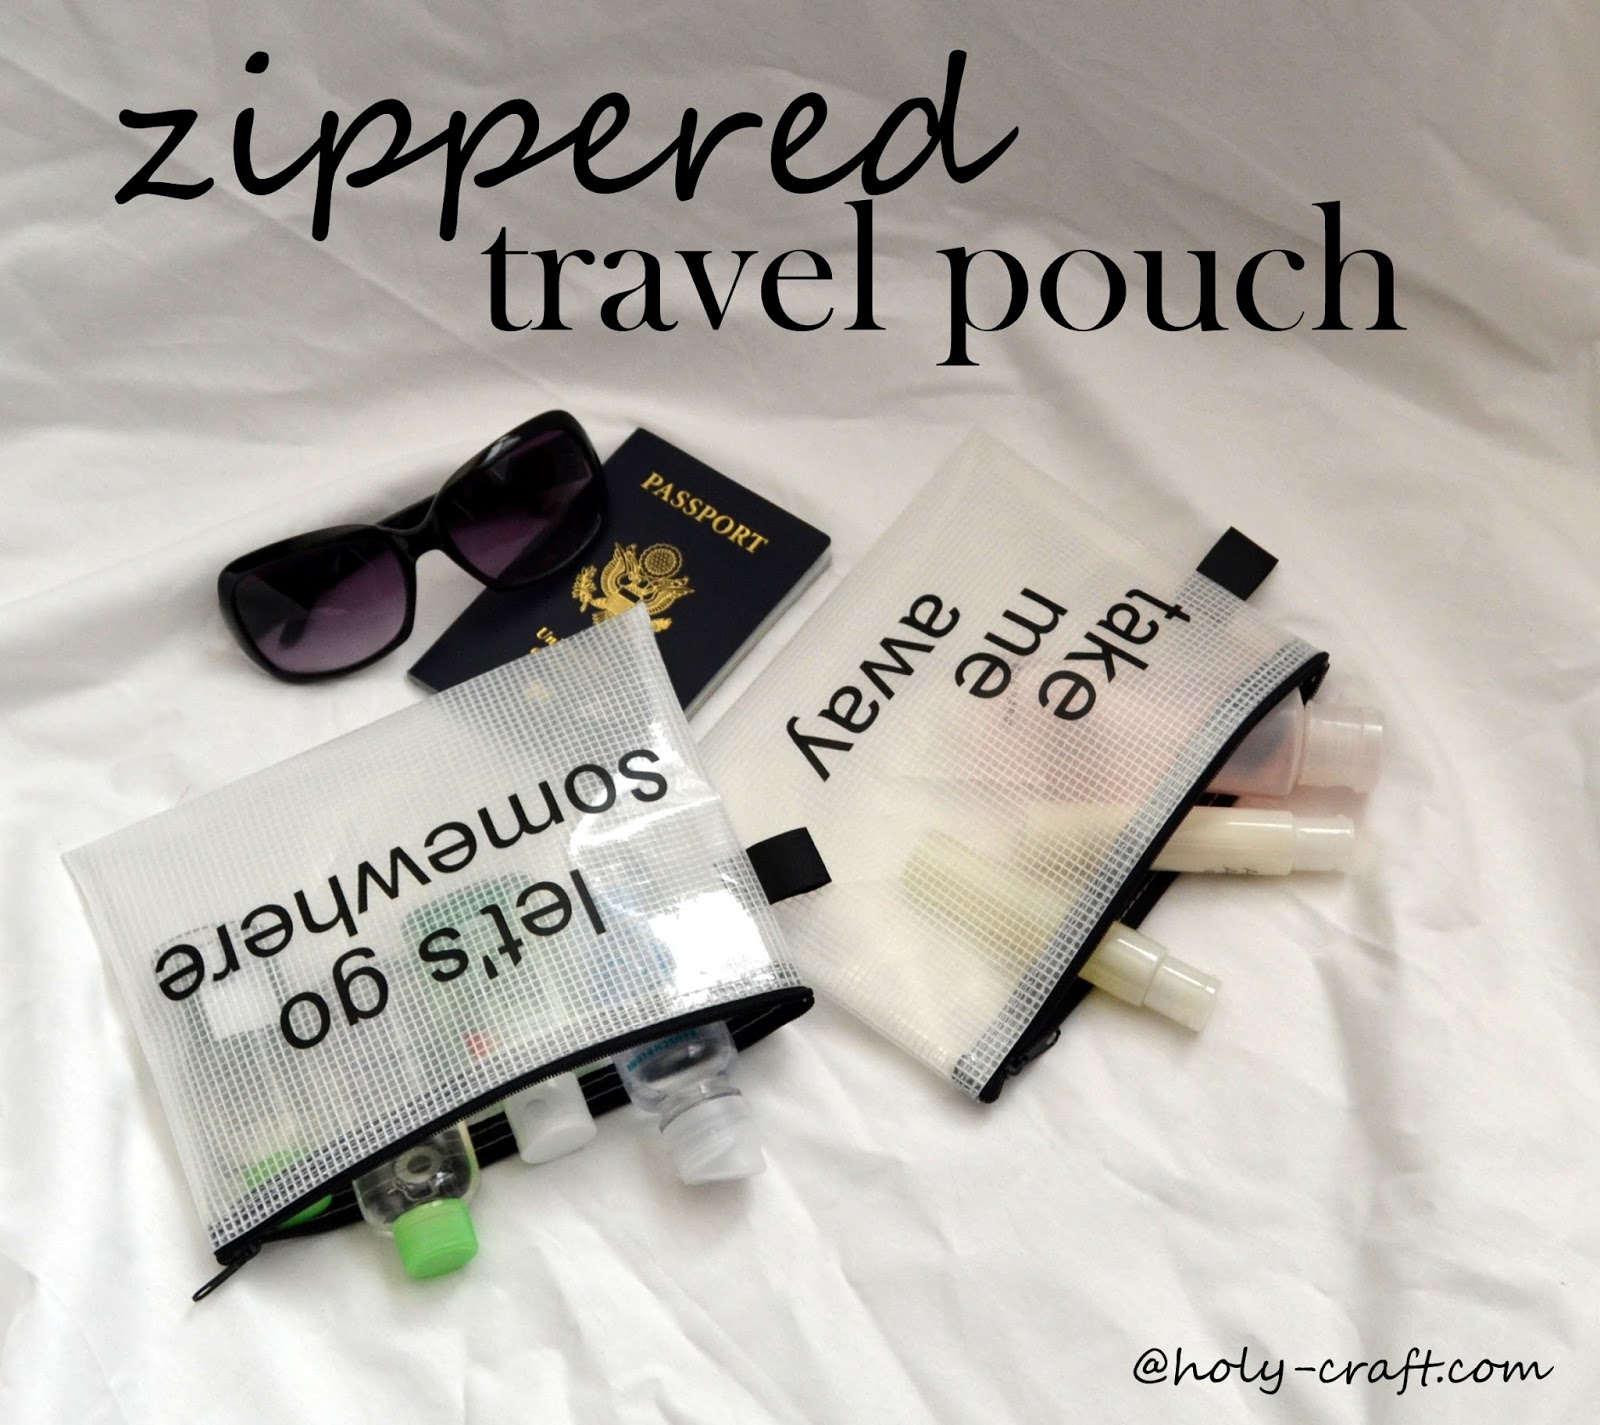
Do you have a Diaso store? You all know how much I love the Dollar Store, well Daiso is the Japanese version except everything is $1.50 {exchange rate and all yo}. I haven't been in there for months, so I thought I would pop in this week and I was glad that I did. I found these super awesome zippered travel pouches that are perfect for putting liquids or wet or dirty clothes. Only problem is, they were super boring. Plain Jane. Lucky for me I have a vinyl cutter.
Friday, March 6, 2015
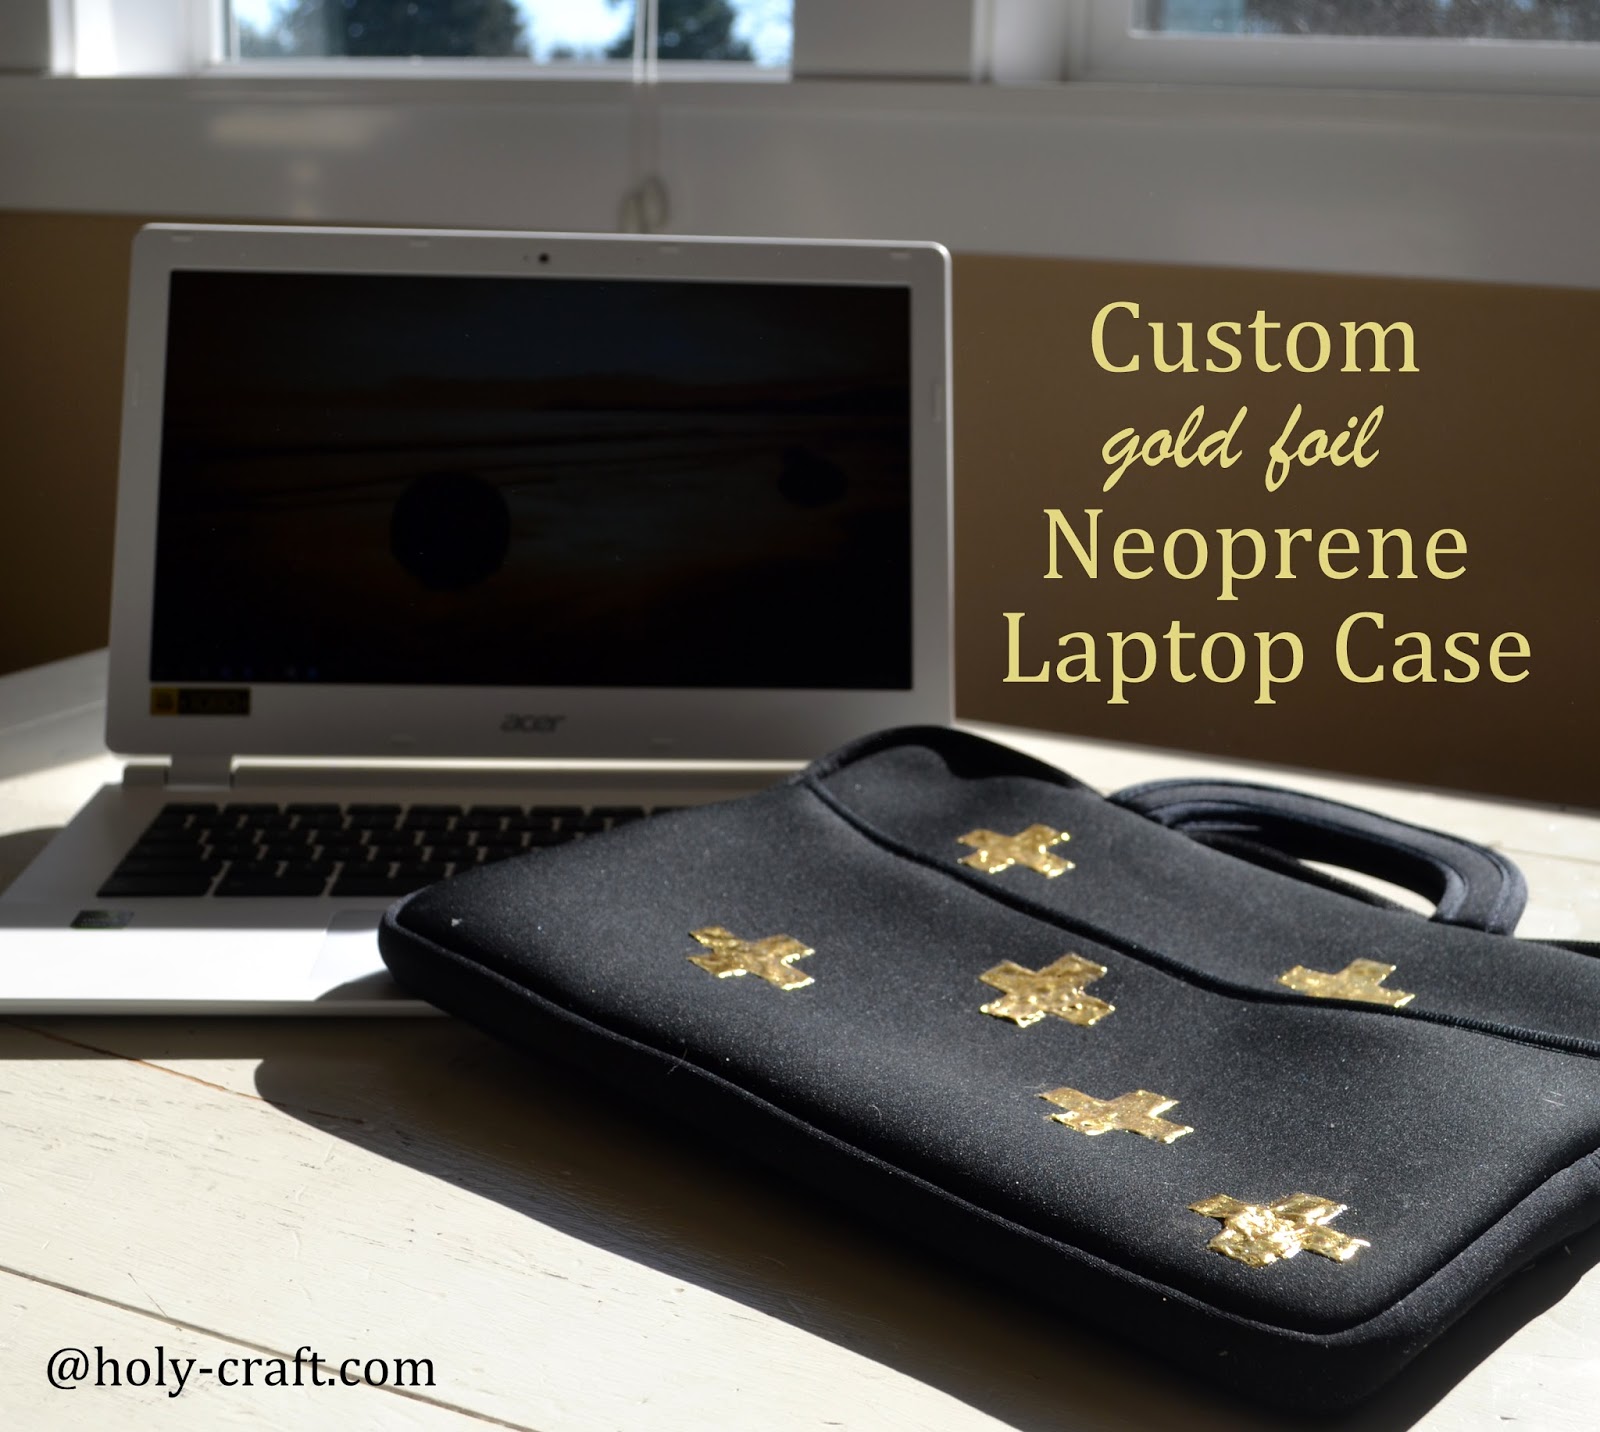
Custom gold foil neoprene laptop case tutorial
I've survived blogging for five years without feeling like I need a laptop, but the need has become real, and we ordered a chrome book for me to use for blogging just a few weeks ago.
I have several trips coming up for blogging in the next few months and it's getting harder and harder for me to keep up with blogging from my PC. While I still very much prefer the old school ways of sitting in my den typing on my computer, I have started to get used to being portable.
My husband {with the consult of several computer guru's} questioned me on what I needed a laptop to do and then they decided on the best computer for me. Because to be quite honest I walked into a store, started playing around with laptops and could have bought any of the the ones that were placed in front of me and been quite happy. I'm thankful for people that know more than me and are willing to do the research because plainly, I just don't care.
My sweet husband also started clicking on accessories for me {a mini mouse that I have yet to use} and a black neoprene laptop case. Not one for plain, I decided to fancy up my new laptop case with some custom gold foil geometric shapes and I'm here to share the tutorial with you.
Wednesday, January 21, 2015
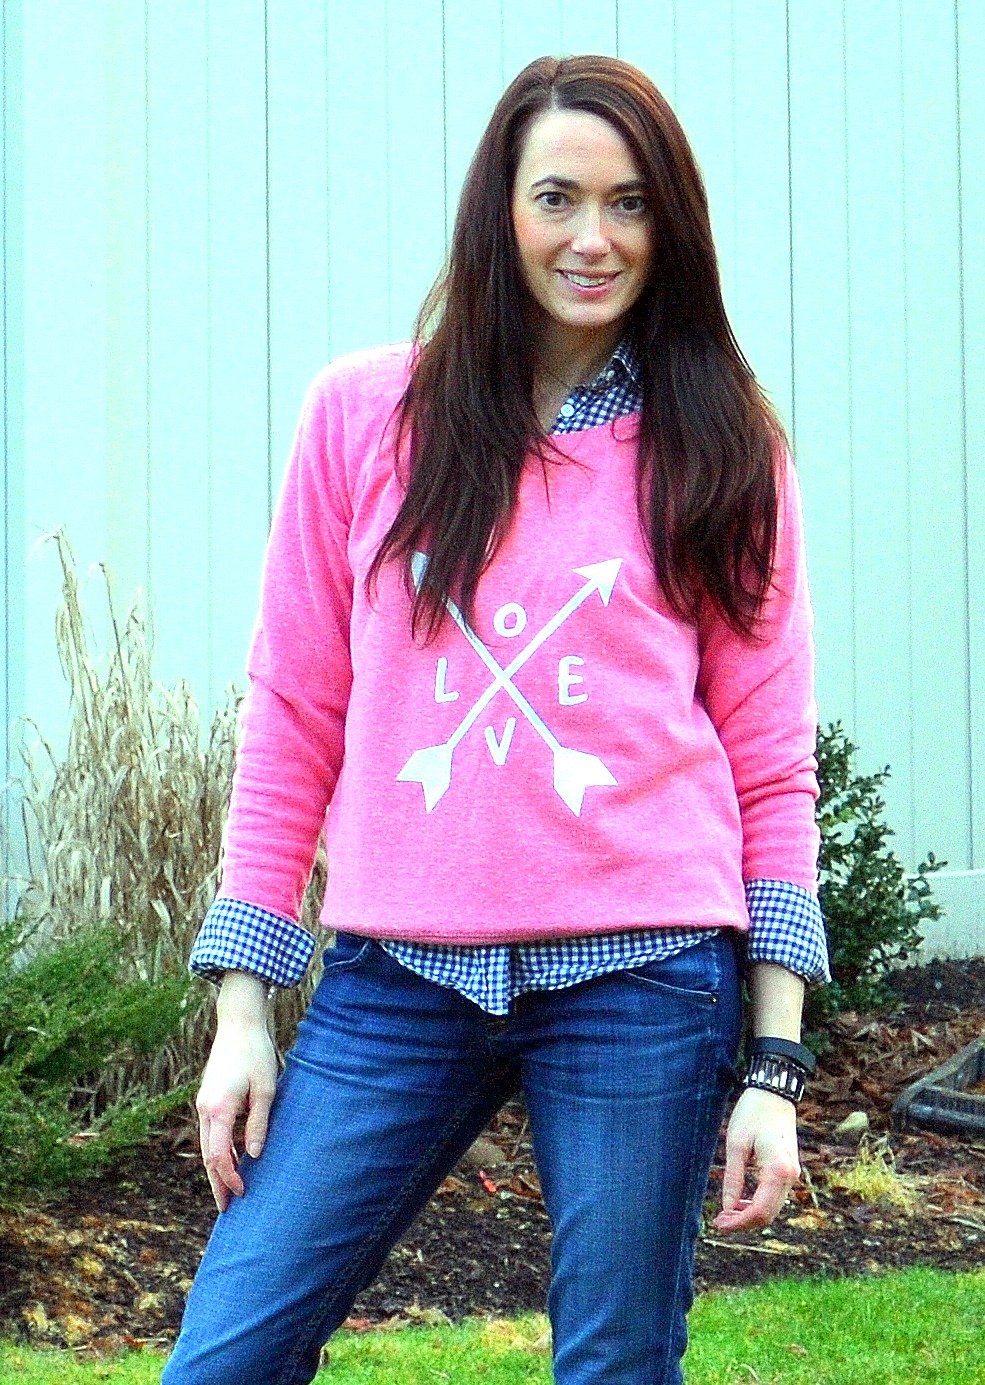
Custom LOVE sweatshirt
I bought this H&M sweatshirt for $1 at a garage sale this summer knowing I wanted to put my own spin on it. I don't know about you, but I tend to hoard craft supplies until I have the perfect craft, and even then, I go back and forth with ideas second guessing myself.
Friday, December 19, 2014
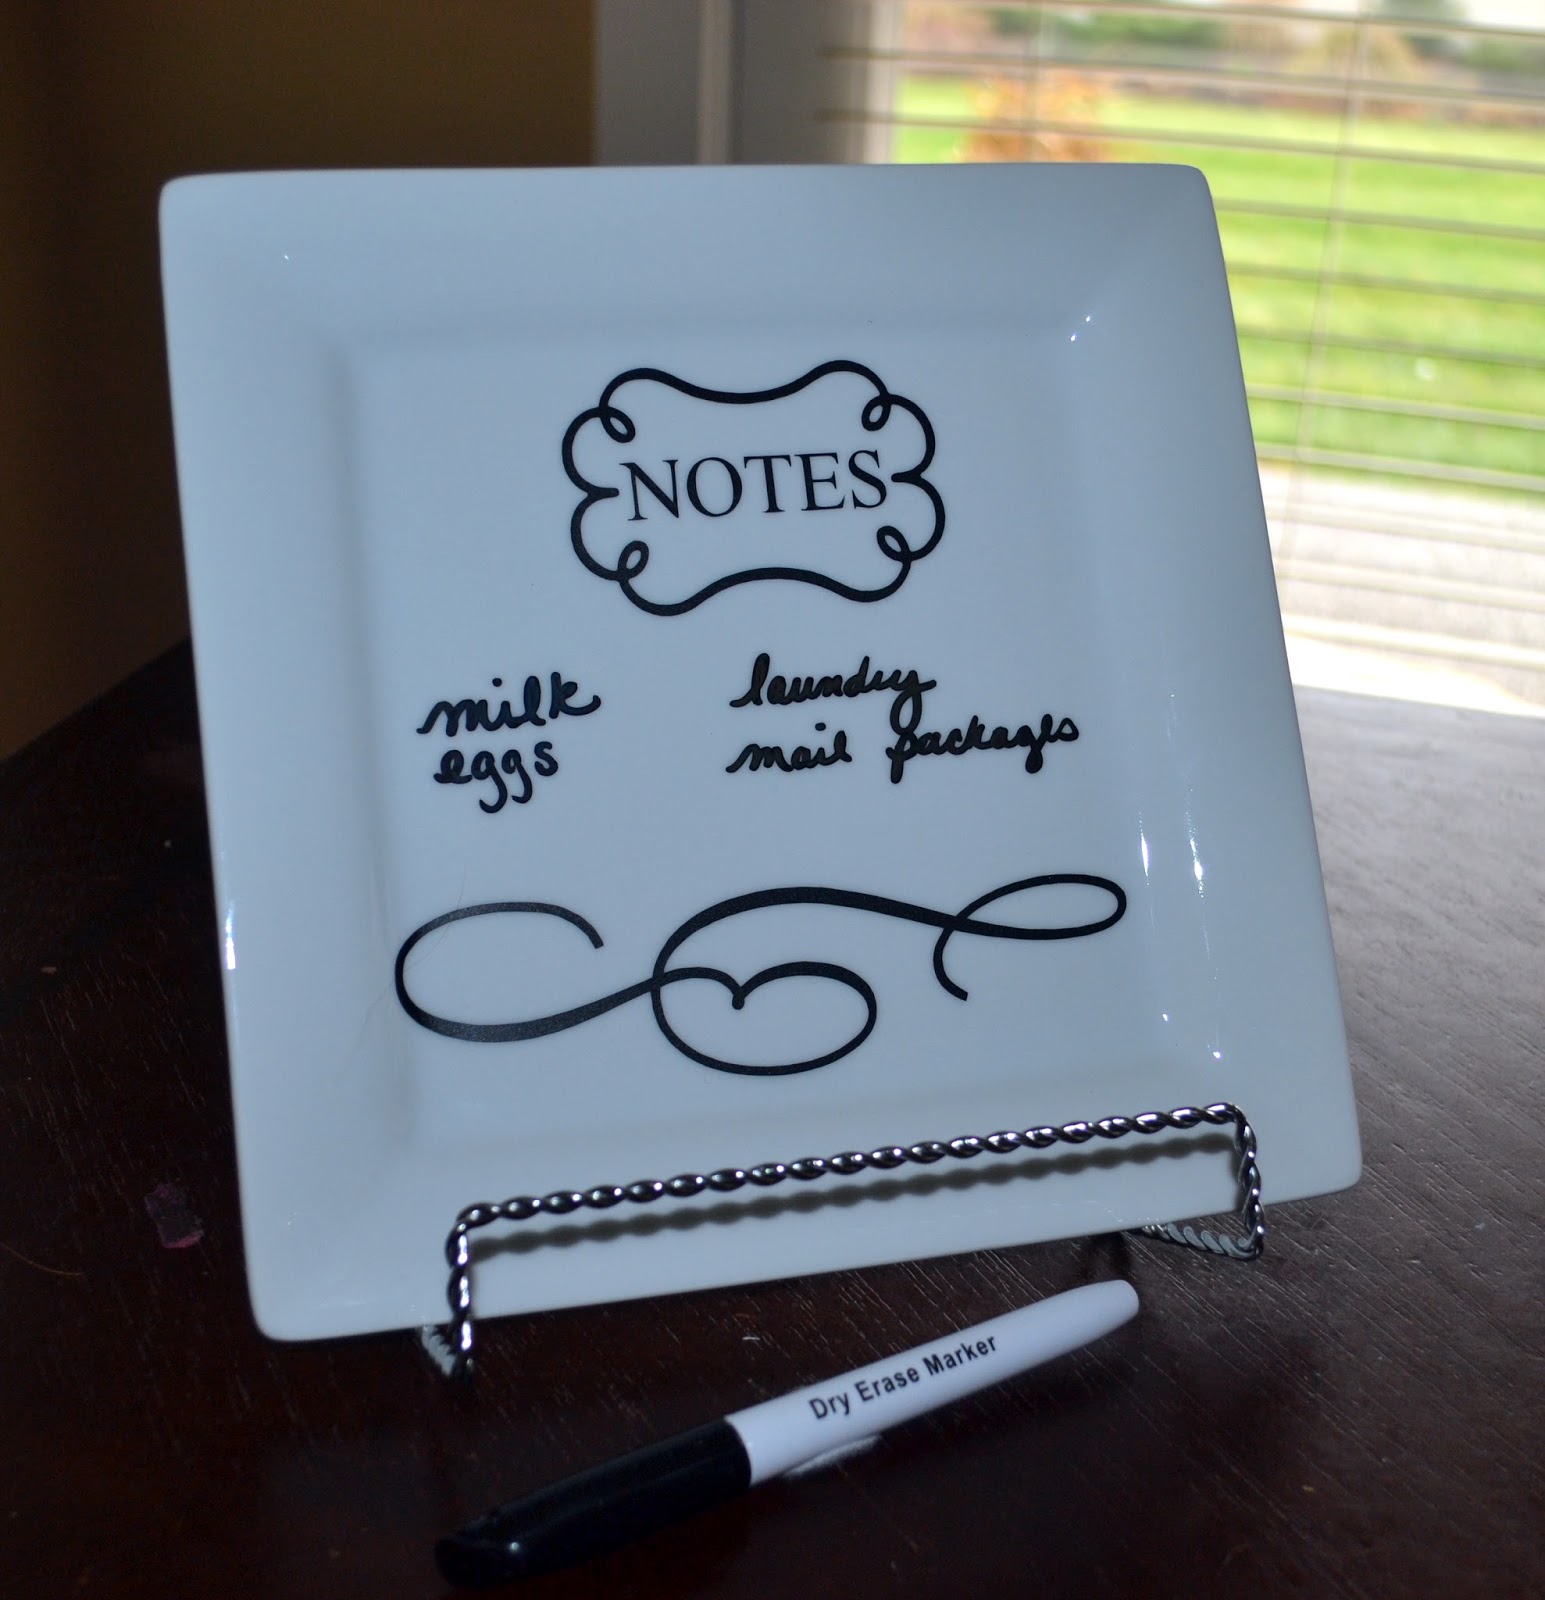
Dry erase notes-perfect handmade gift for under $5!
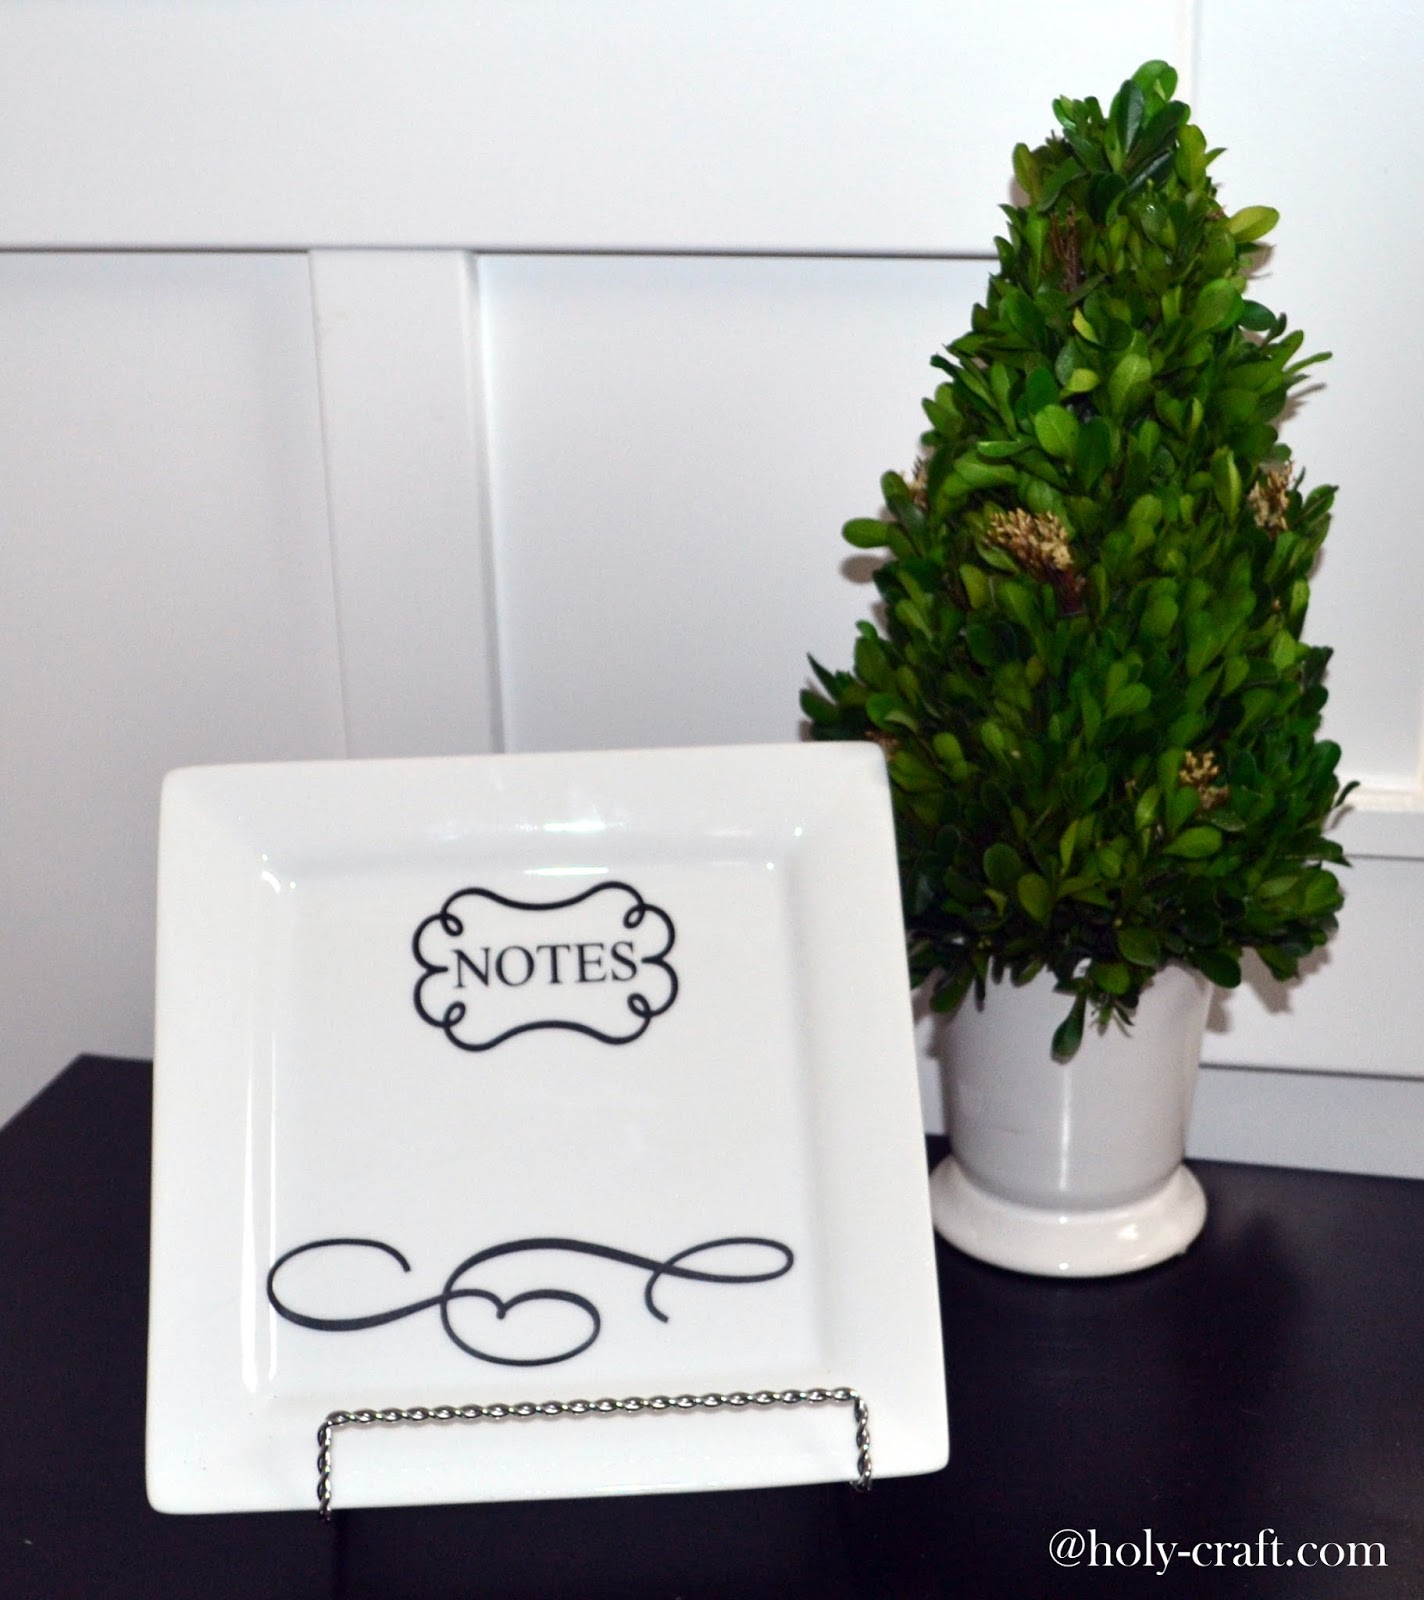
While on the hunt for a gift idea that a group of elementary school kids could make, but that wasn't too expensive, I ran across an idea for a dry erase plate from House of Smiths.
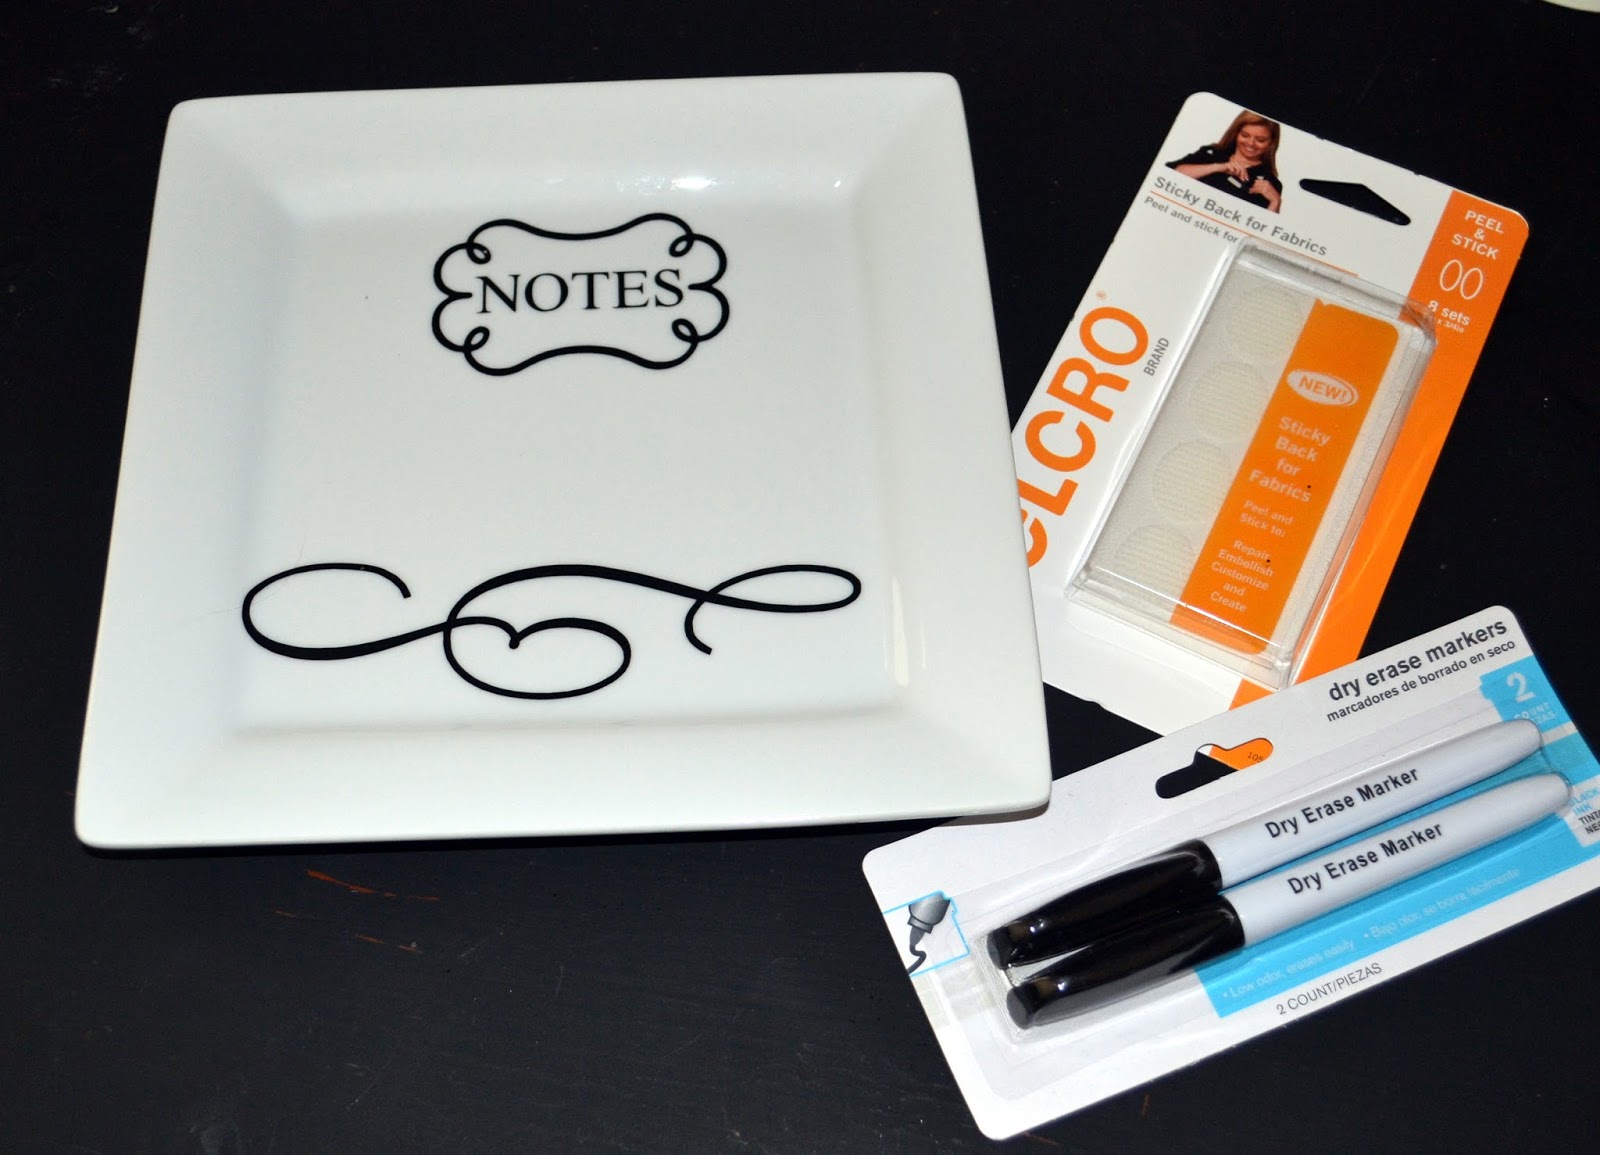
I found the square plate at Wal Mart for $3.50. I used my Silhouette machine to cut out two different pieces of vinyl and I bought a dry erase marker. I always have Velcro® brand products on hand, because lets be honest, they are a staple in crafting.
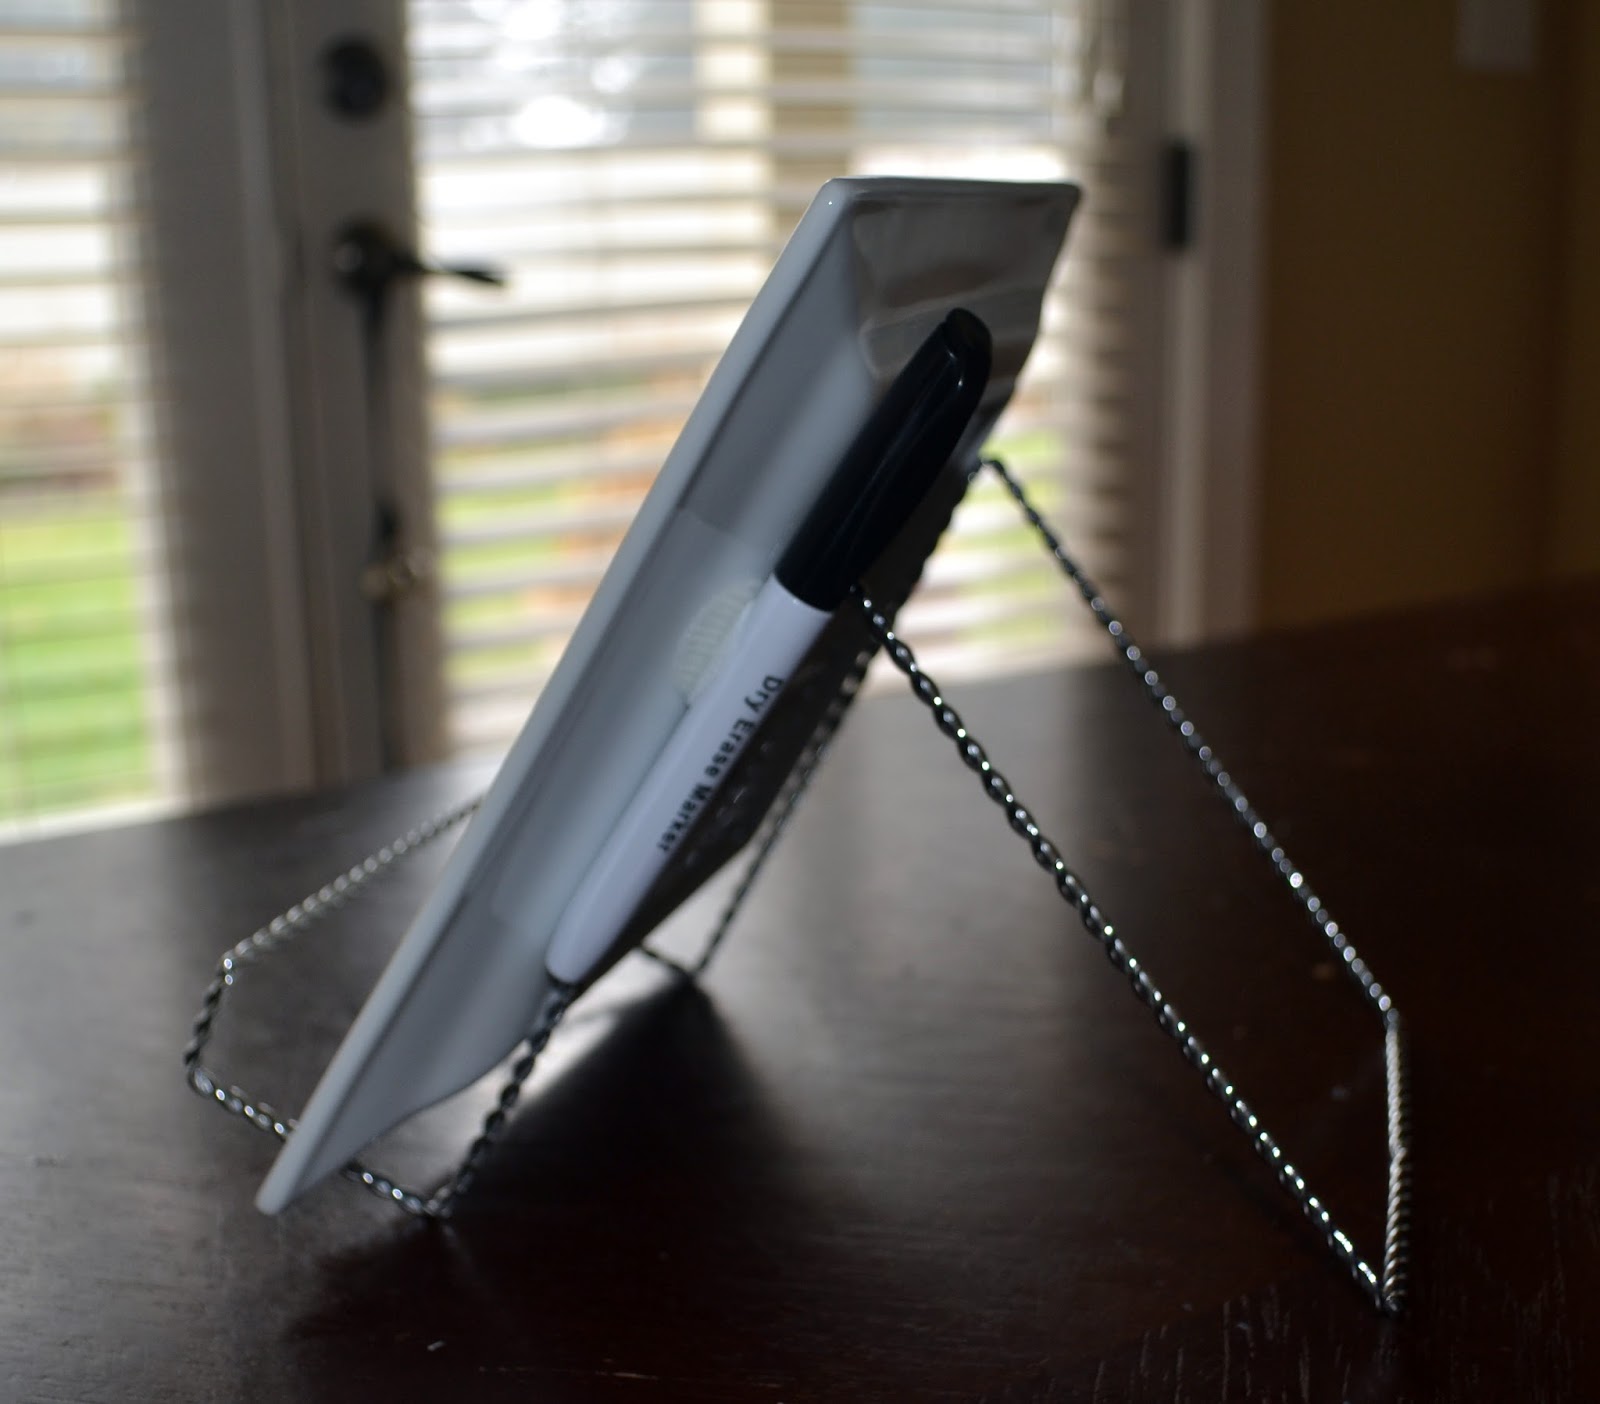
I attached the dry erase marker to the back with Velcro® brand sticky back and used a plate stand from The Dollar Store to rest the plate on.

Wednesday, October 29, 2014
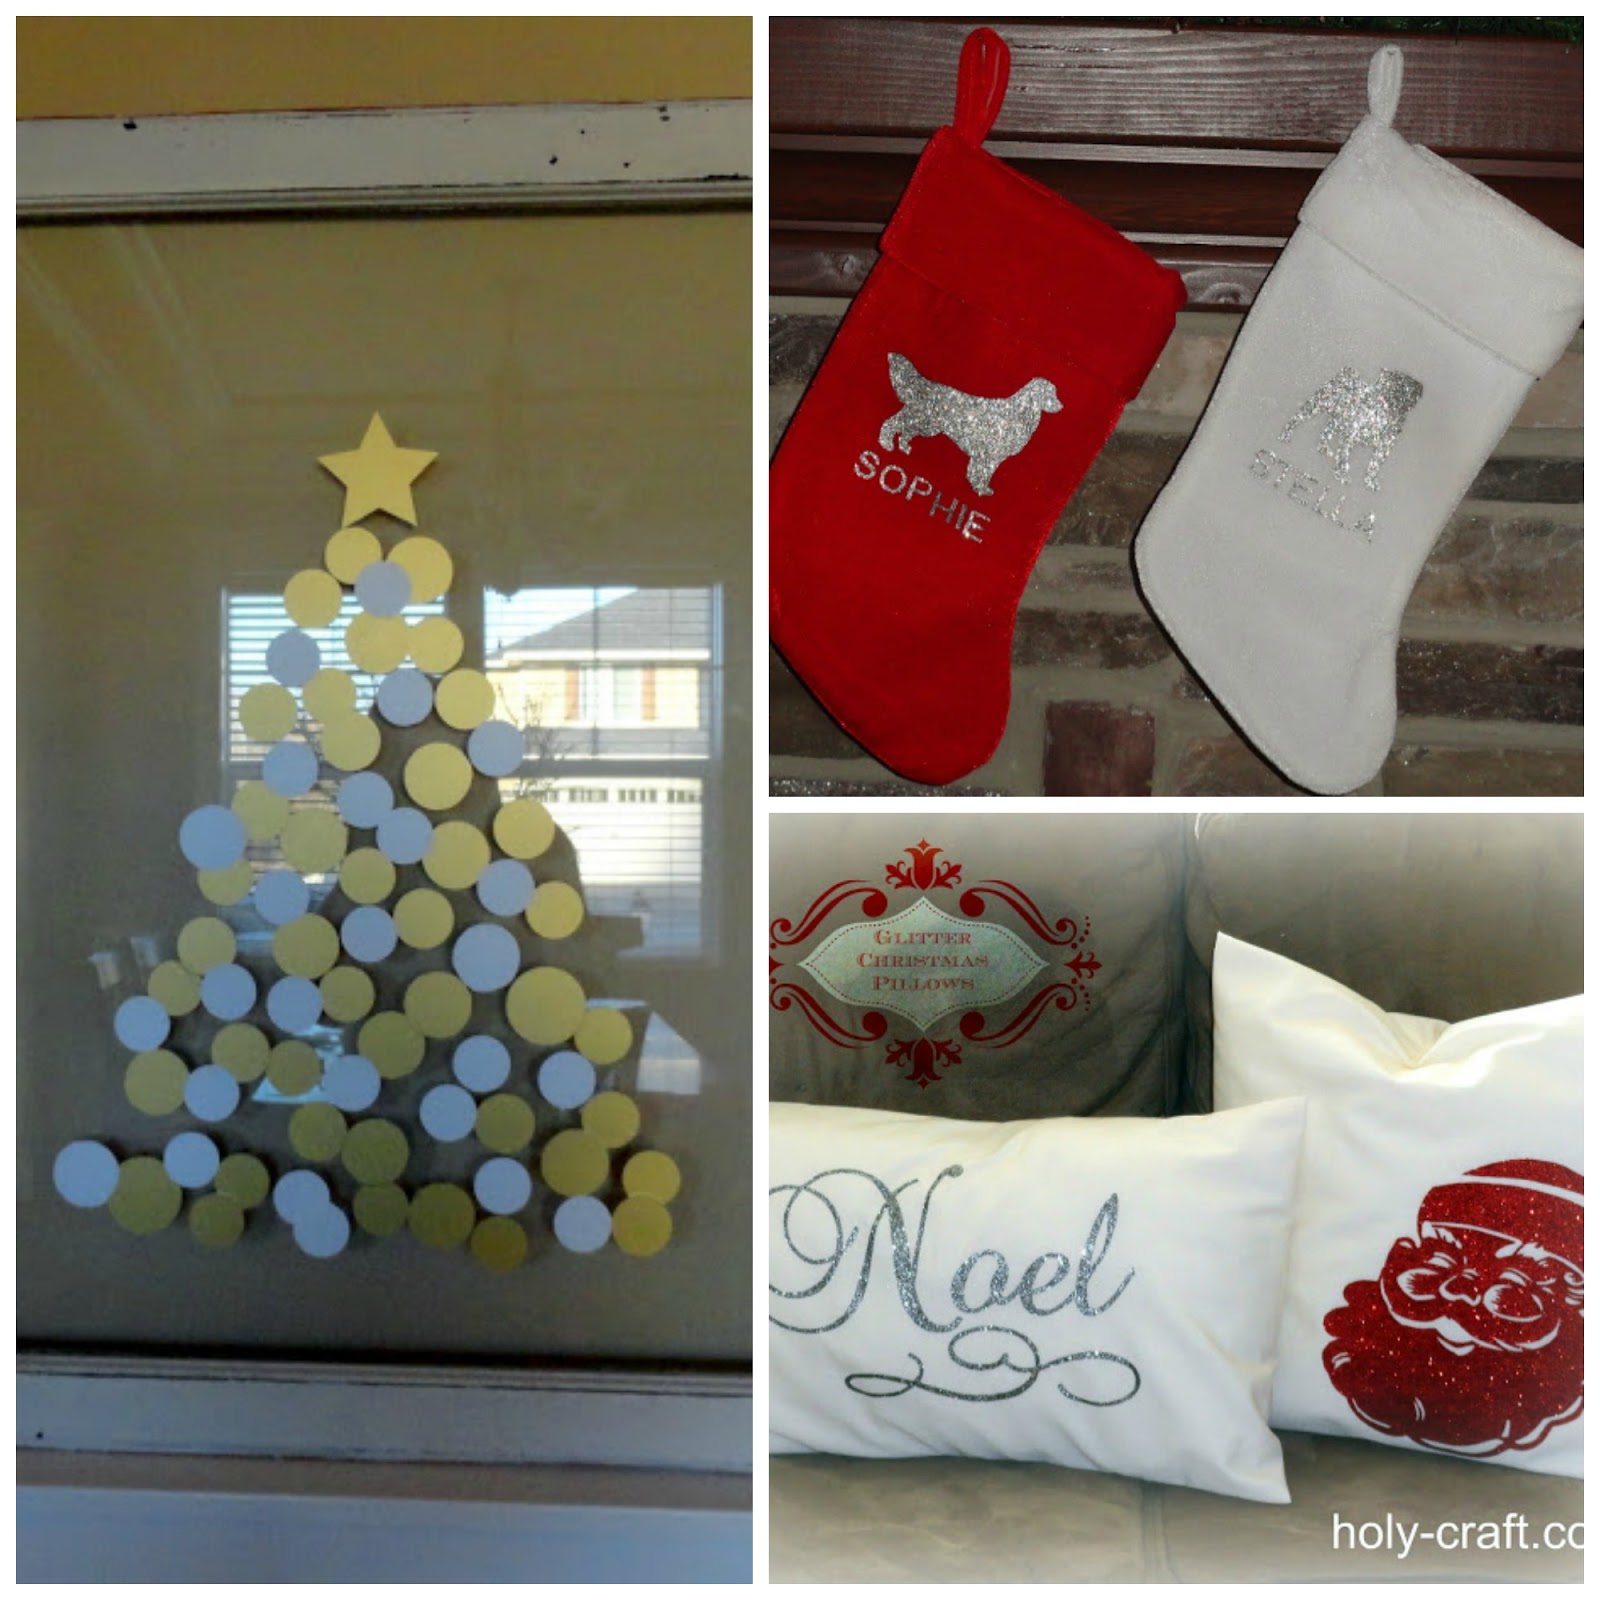
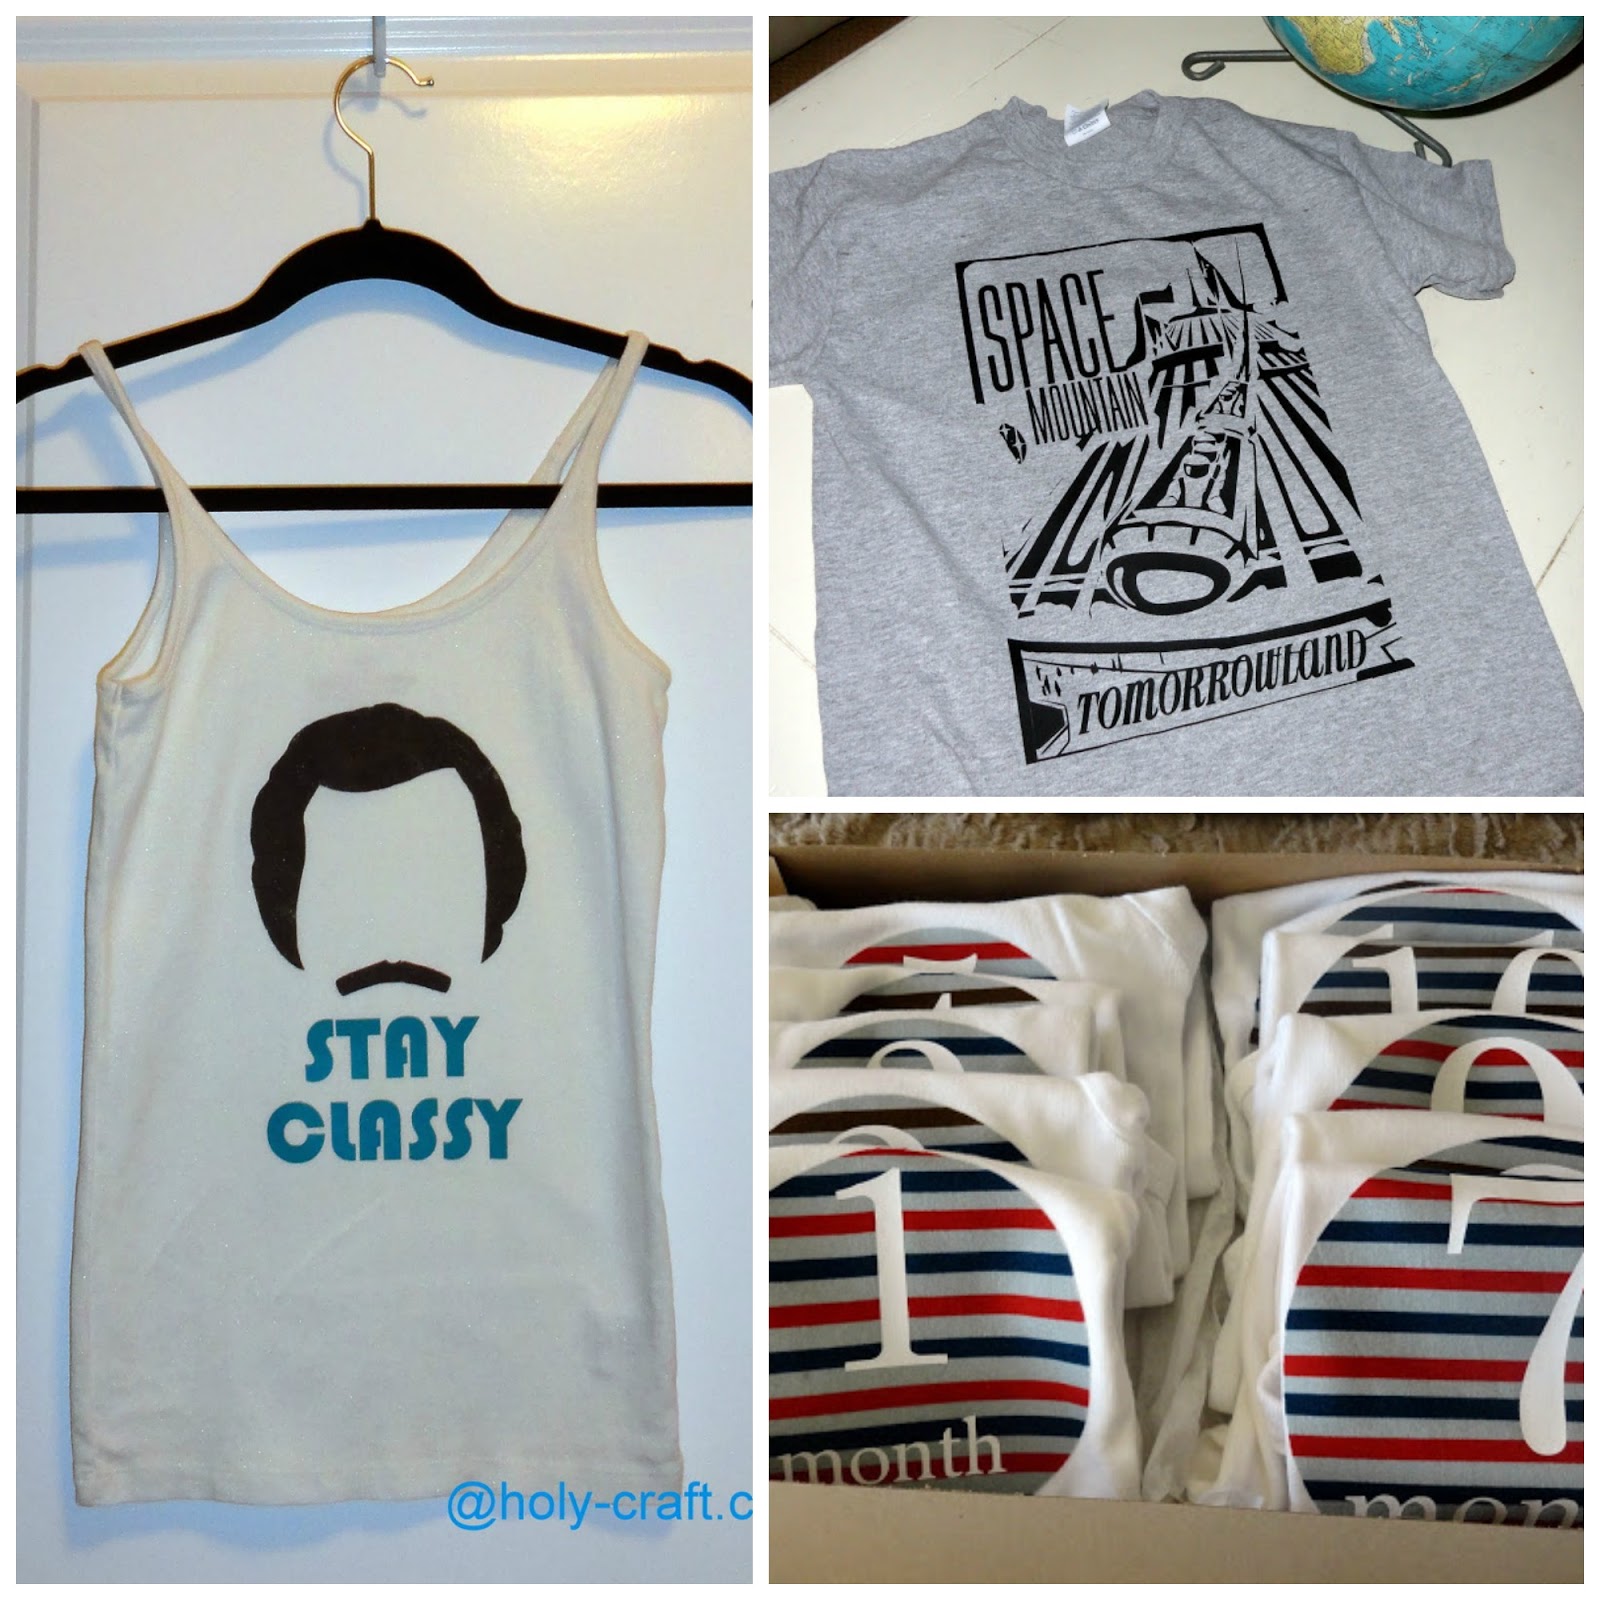
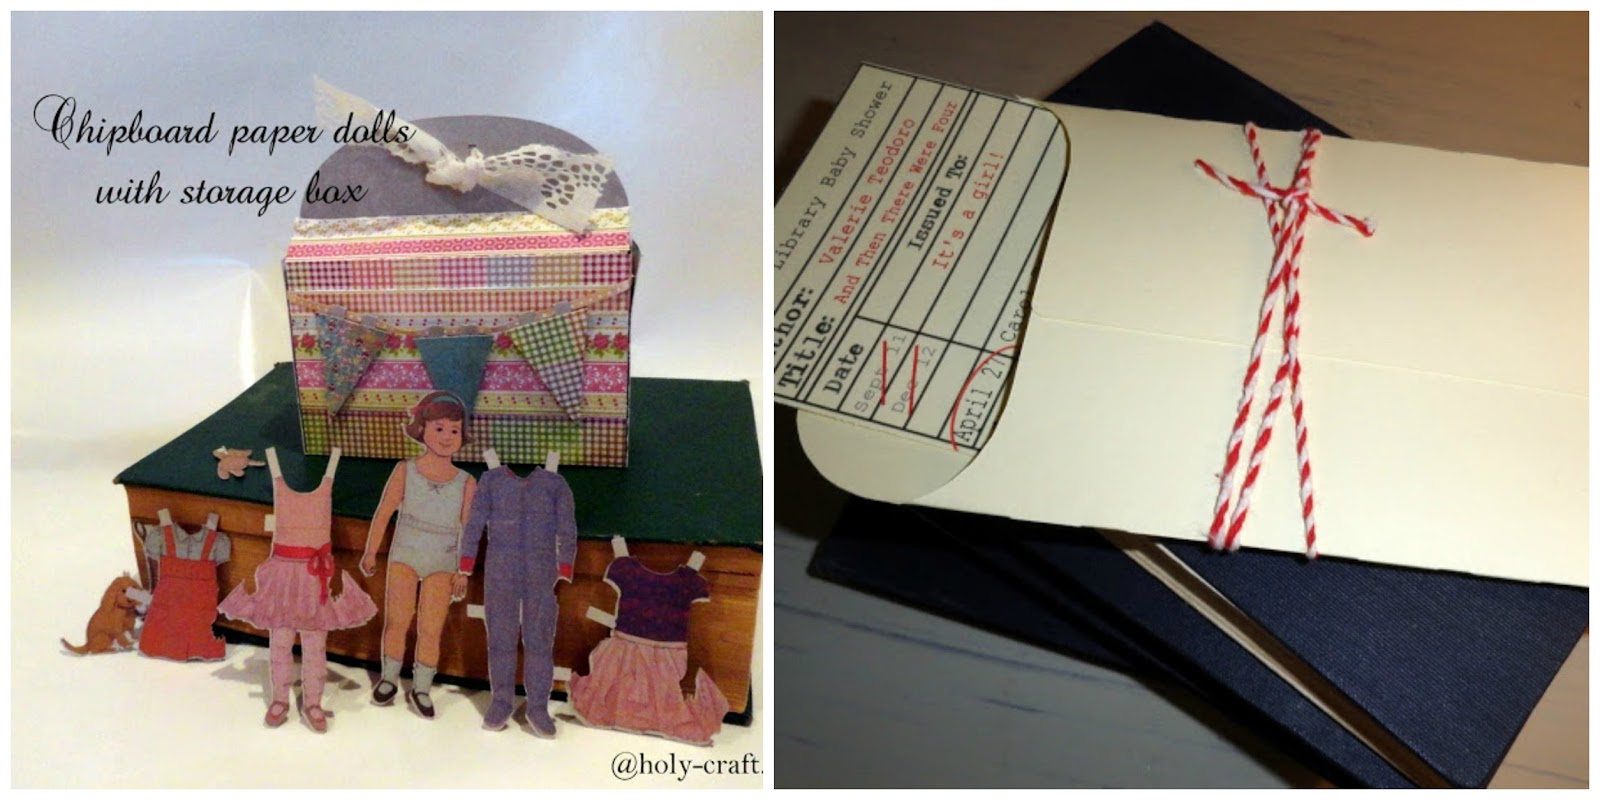
Top 10 Silhouette projects
One of my favorite crafting tools by far is my Silhouette machine.
{followed in a close second by my glue gun}
I received it about four years ago as a Christmas gift from my in-laws and I use it all the time.
I've shared a lot of tutorials over the years.
I've gathered up a list of my top 10 favorite silhouette projects.
Since Christmas is just around the corner, here are a few of my favorite Christmas crafts that I made using my Silhouette machine.
I think the thing that I have made most with my Silhouette has been custom t-shirts.
These are just a few of my favorites.
I've made paper dolls and tons and tons of custom invitations.
These library card ones are by far my favorite!
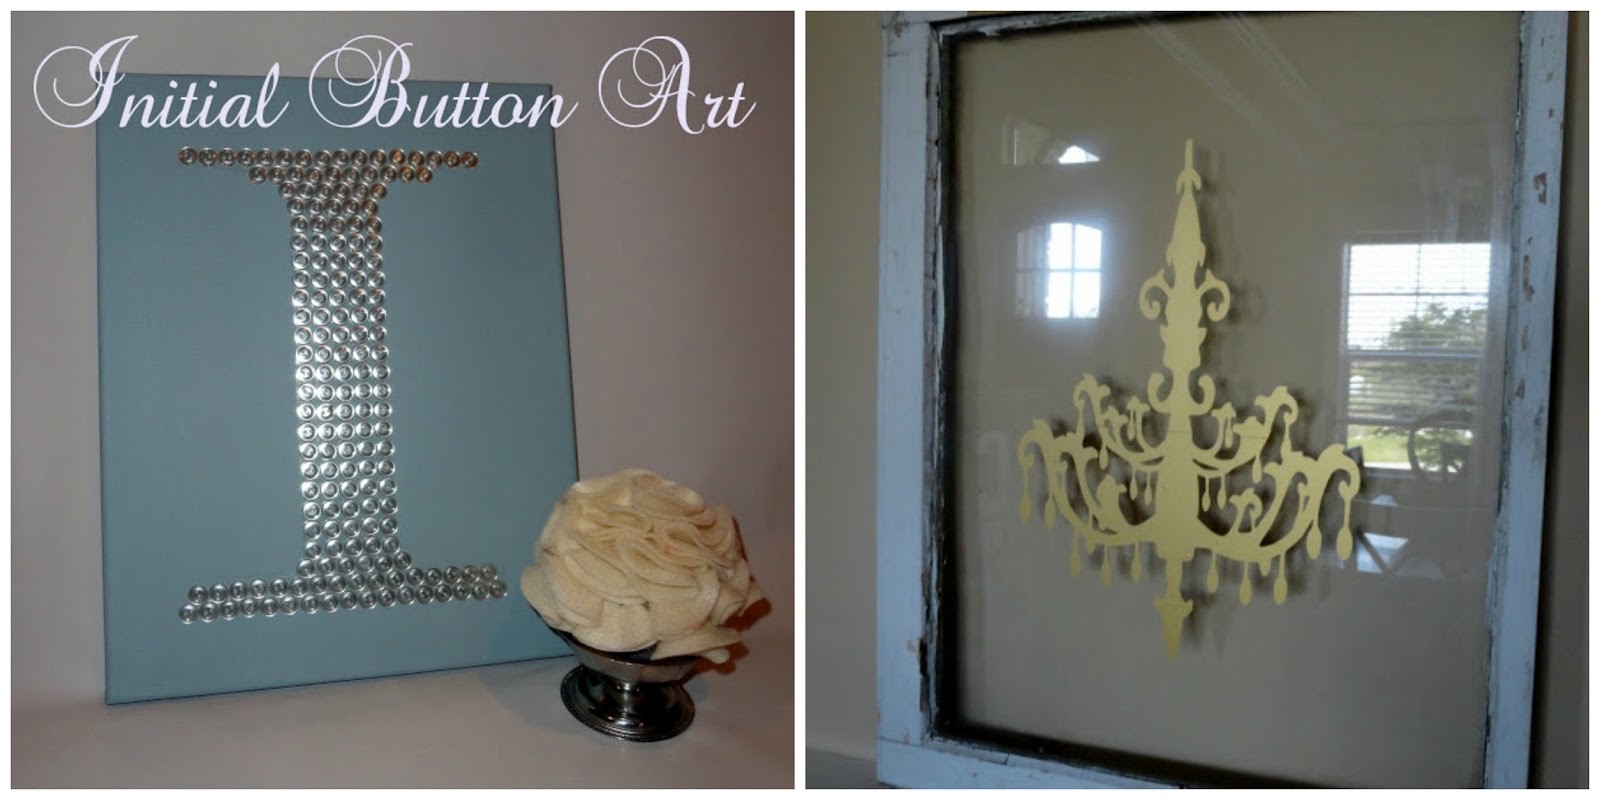
I've even made some things for our home,
like this initial button art and this gold chandelier.
Wednesday, October 22, 2014
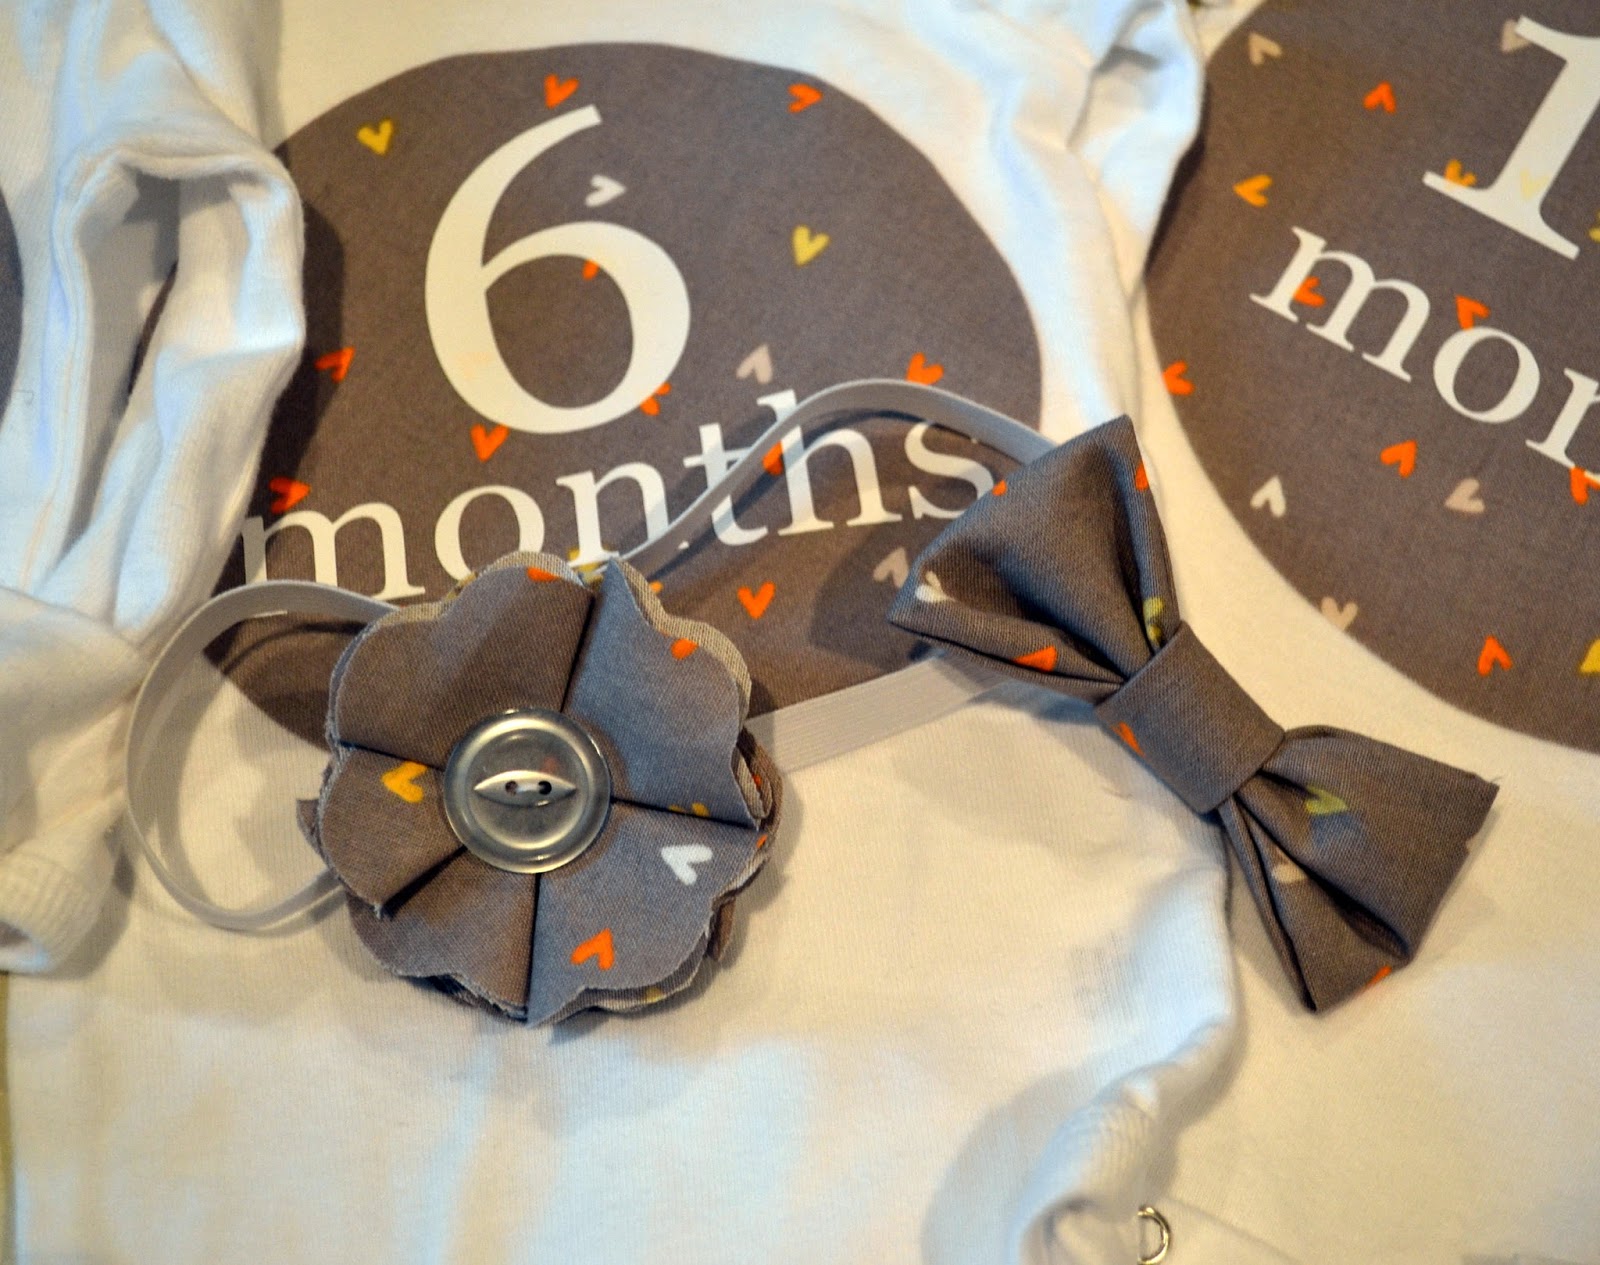
12 month onesies custom order
Earlier this month I received an e-mail from a reader who wanted to buy a set of the 12 month onesies that I created for baby shower gifts several years ago.
I don't normally take orders and I don't have a shop,
but I thought I could whip up a set for this lovely lady who was buying them as a shower gift for her sister.
I think they turned out too adorable not to share!
They are gender neutral since the mama to be doesn't know what she is having.
I always love the side by side of the smallest onesie and the largest one.
Those babies grow fast!

Since the mama doesn't know what she is having, I threw in a little gift...
a bow tie for him or a flower headband for her.
Tuesday, May 6, 2014
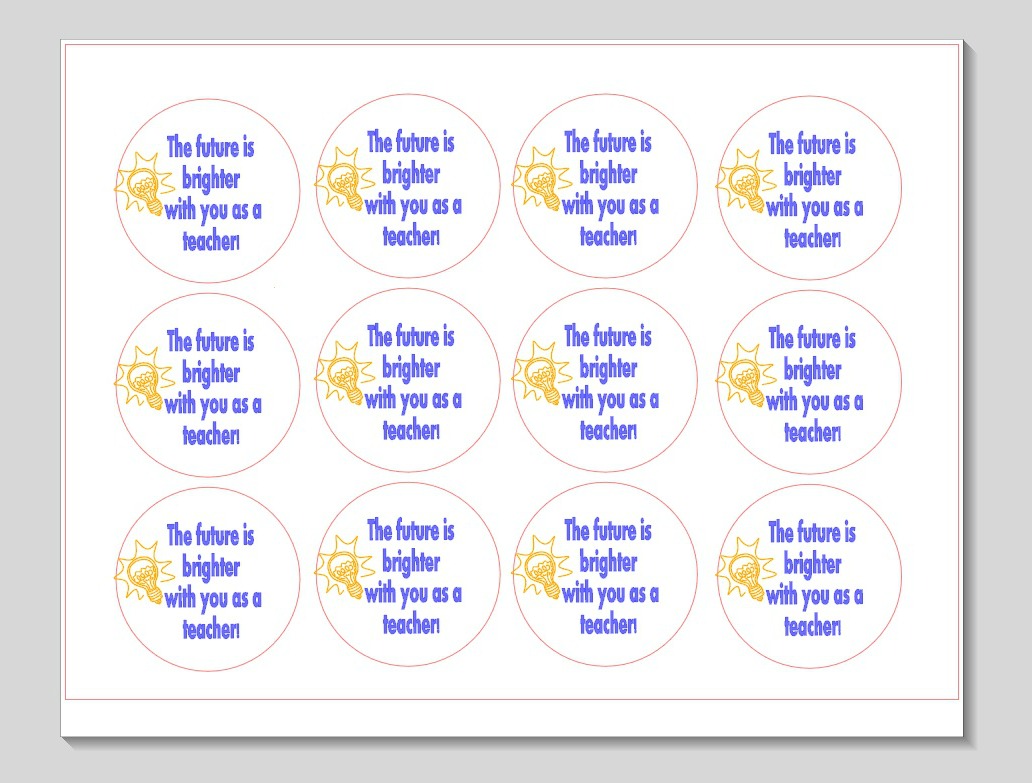
Teacher appreciation free printable
This week is teacher appreciation week.
Because our teachers work hard every day, I take this week to show my appreciation.
Every year is different depending on the teacher.
{this teacher printable has gotten hundreds of thousands of pins on pinterest}
There are a lot of ideas out there in blog land,
this just happens to be what I am giving to some of the teachers at my son's school.
Hobby Lobby had these light bulb shaped jars half off, making them 99 cents.
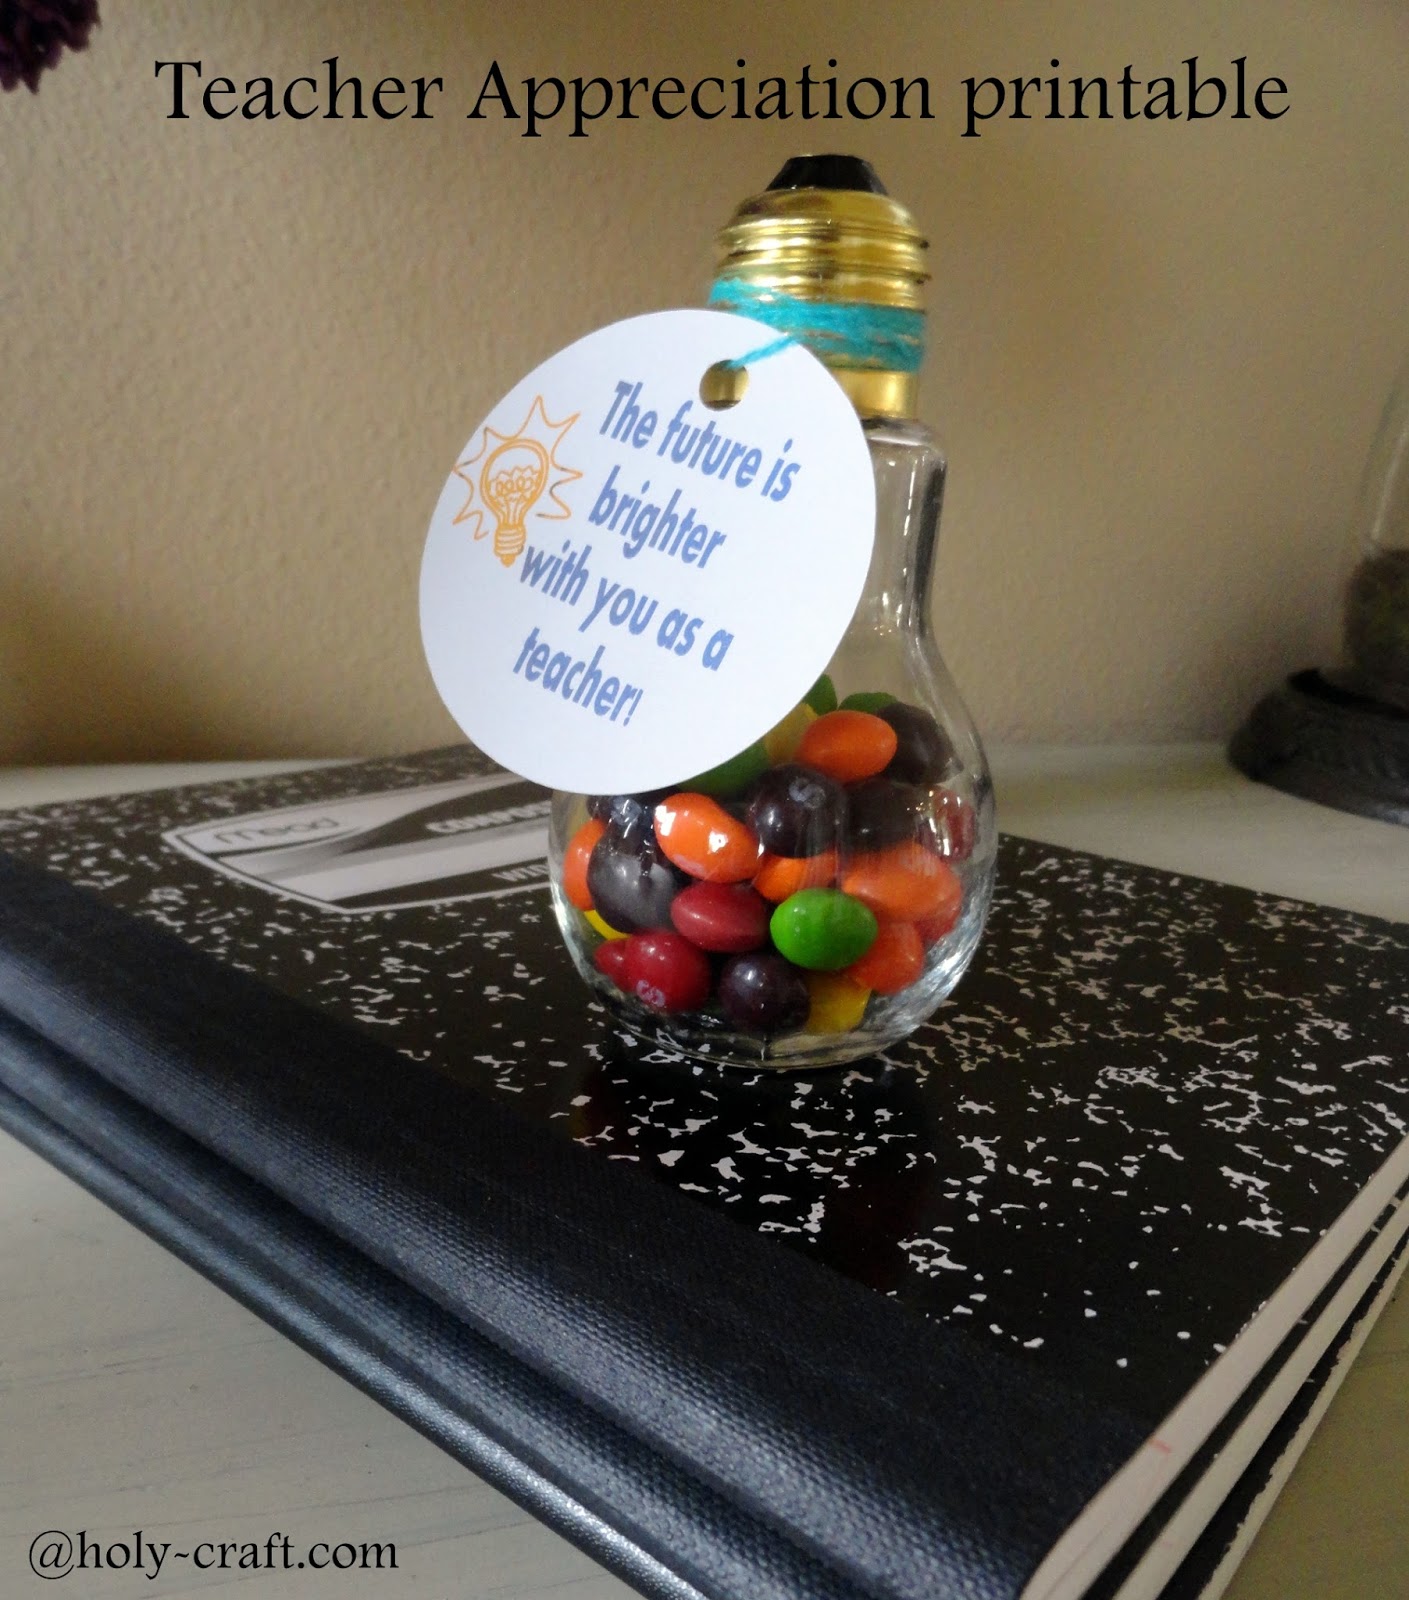
I designed these tags in my Silhouette software that you can use if you right click,
rename, save and print from your computer.
You won't have the luxury of having your silhouette cut out the circles for you,
but you can use a circle cutter to cut them out.
Fill your jars with a fun treat
{like skittles}
and use twine to tie on your tag.

Tuesday, April 22, 2014
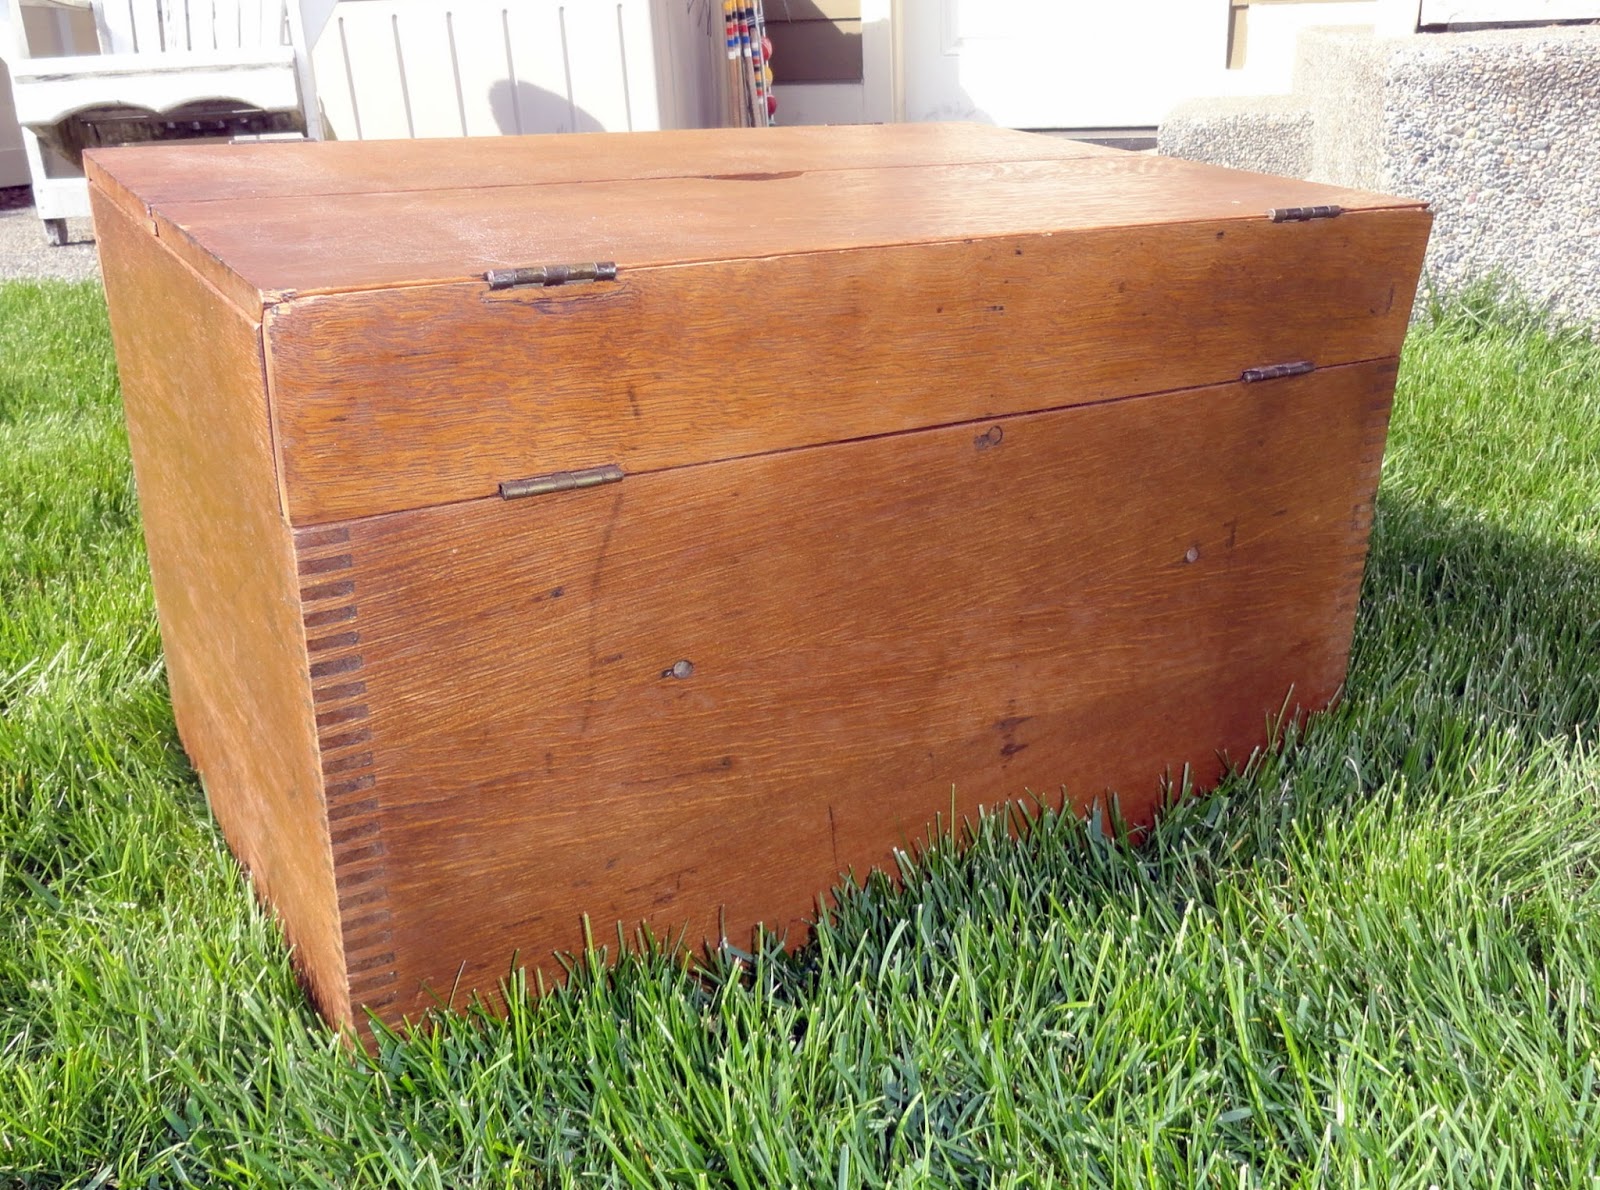
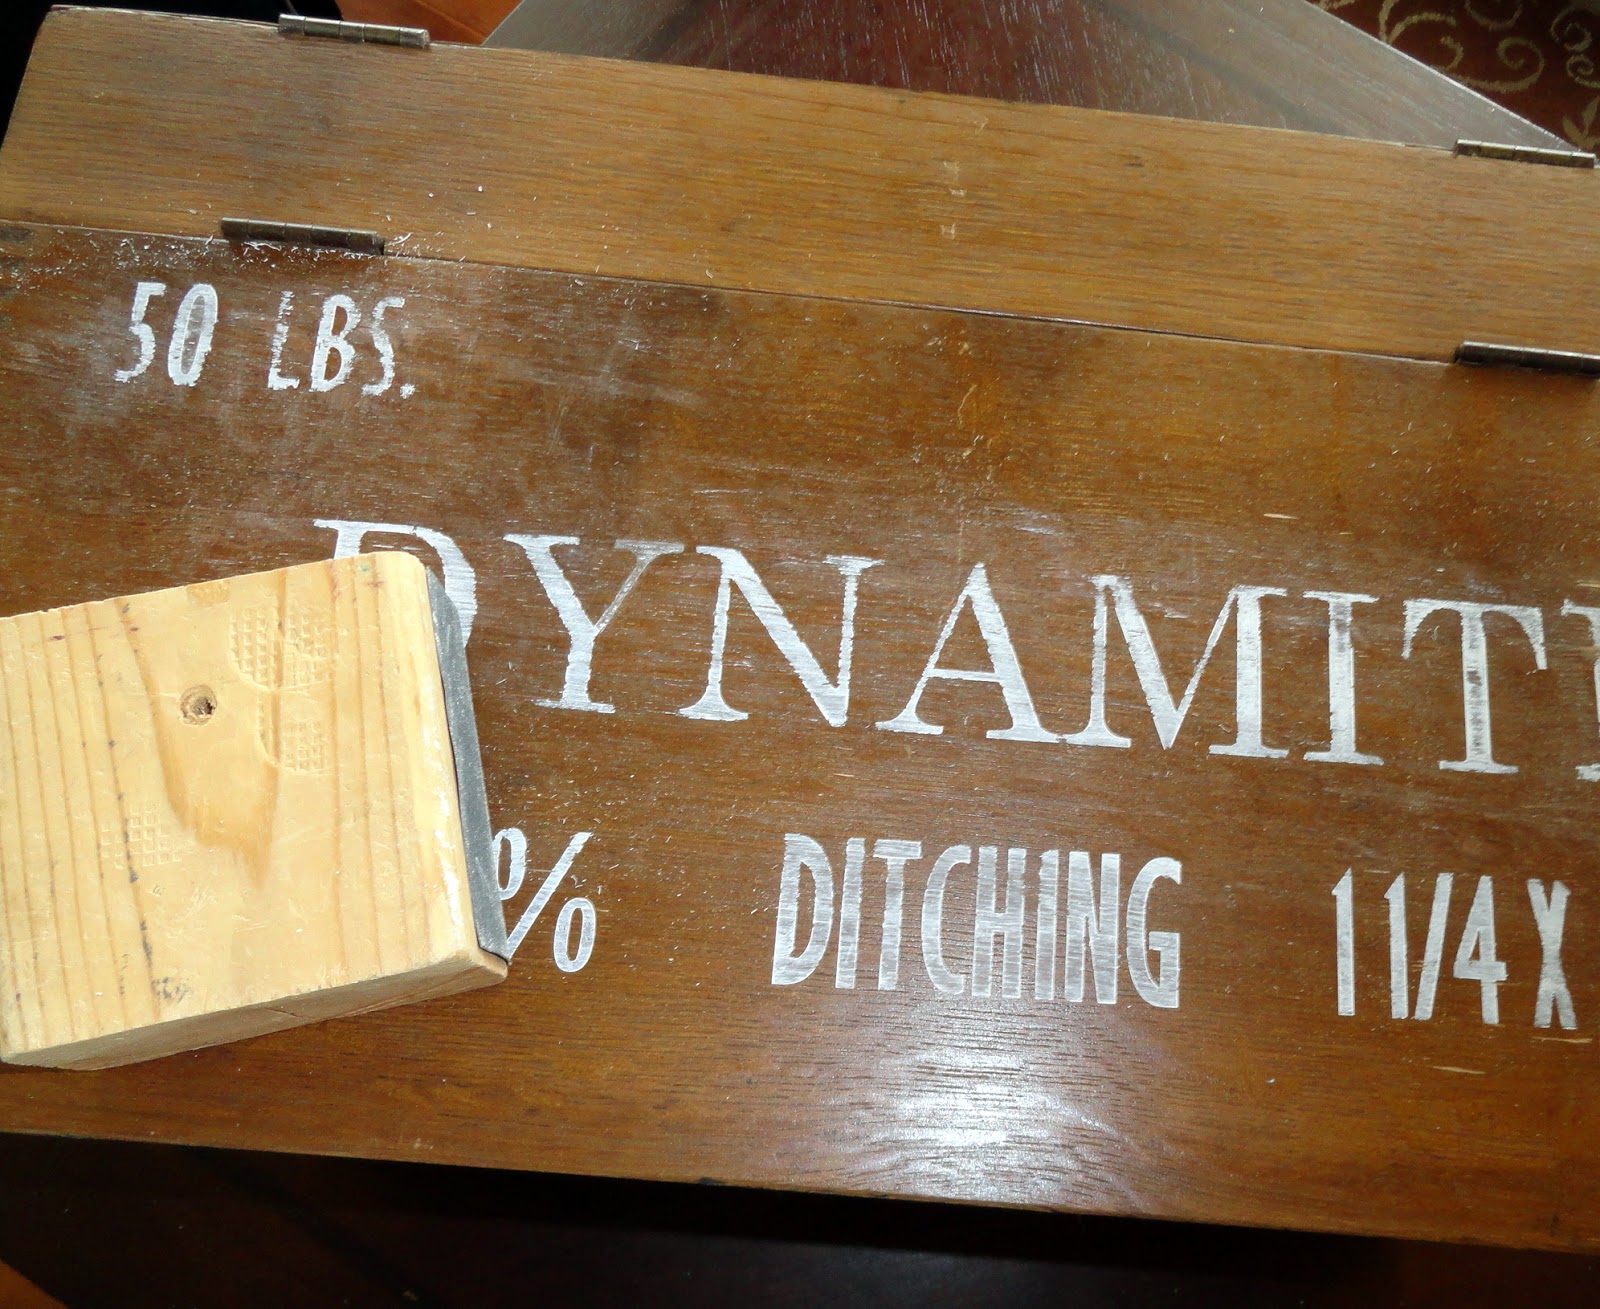
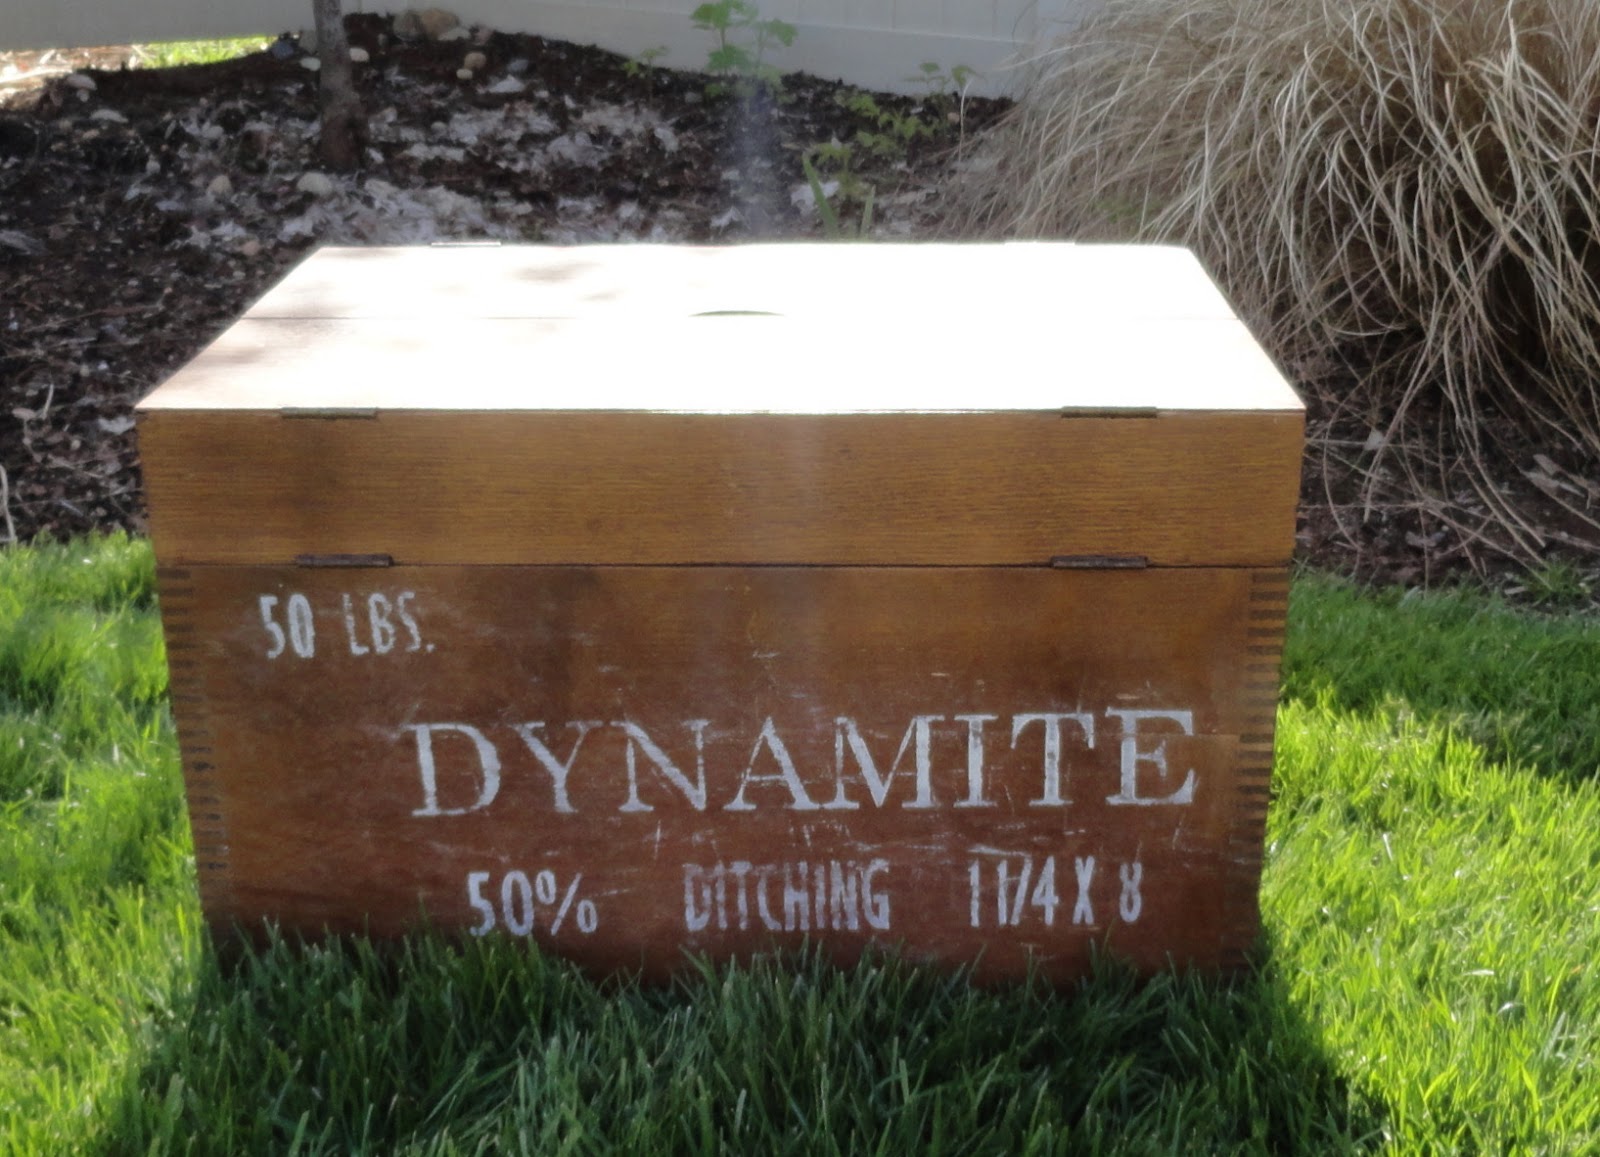
Vintage box turned Dynamite storage box with simple distressing and painting technique
It's easy to take a plain vintage find and give it new life with a little paint.
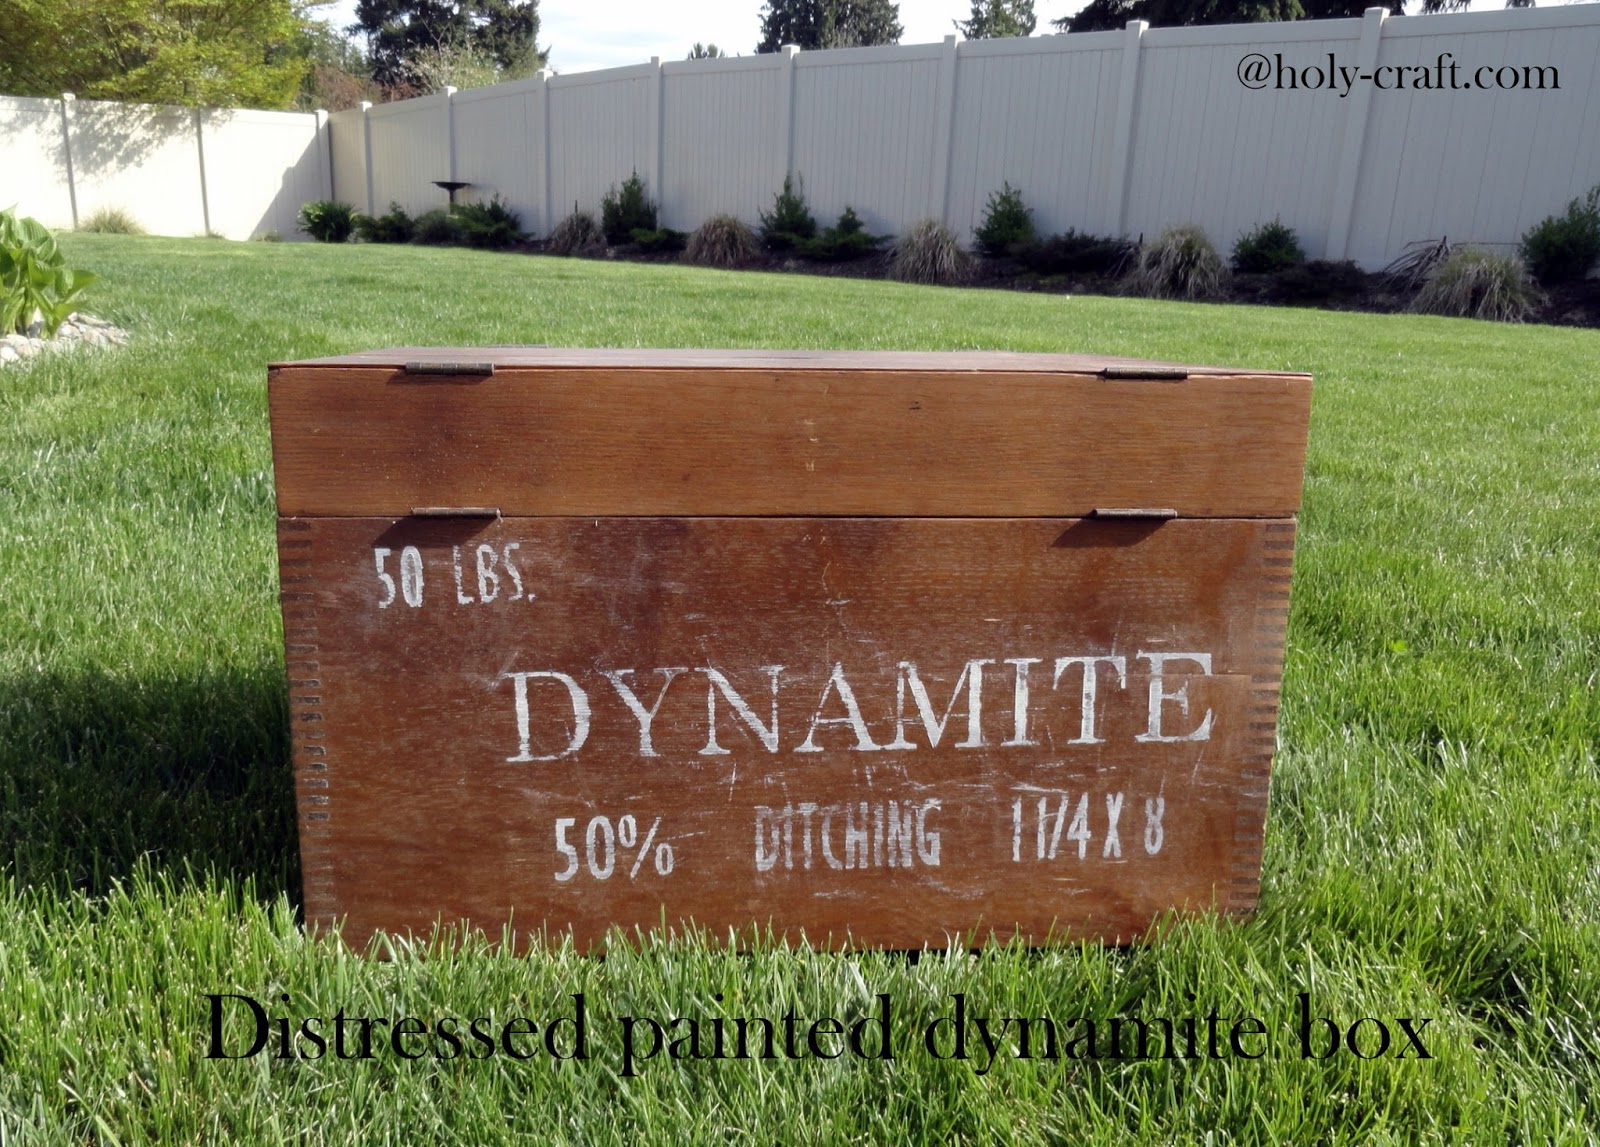
I had this nice solid wooden box that was super plain.
It was screaming for some history.
Or a back story.
Something!
I decided that it looked like an old vintage dynamite container that I have seen at antique shops and garage sales before. I used some simple techniques to give this plain box a little more charm.
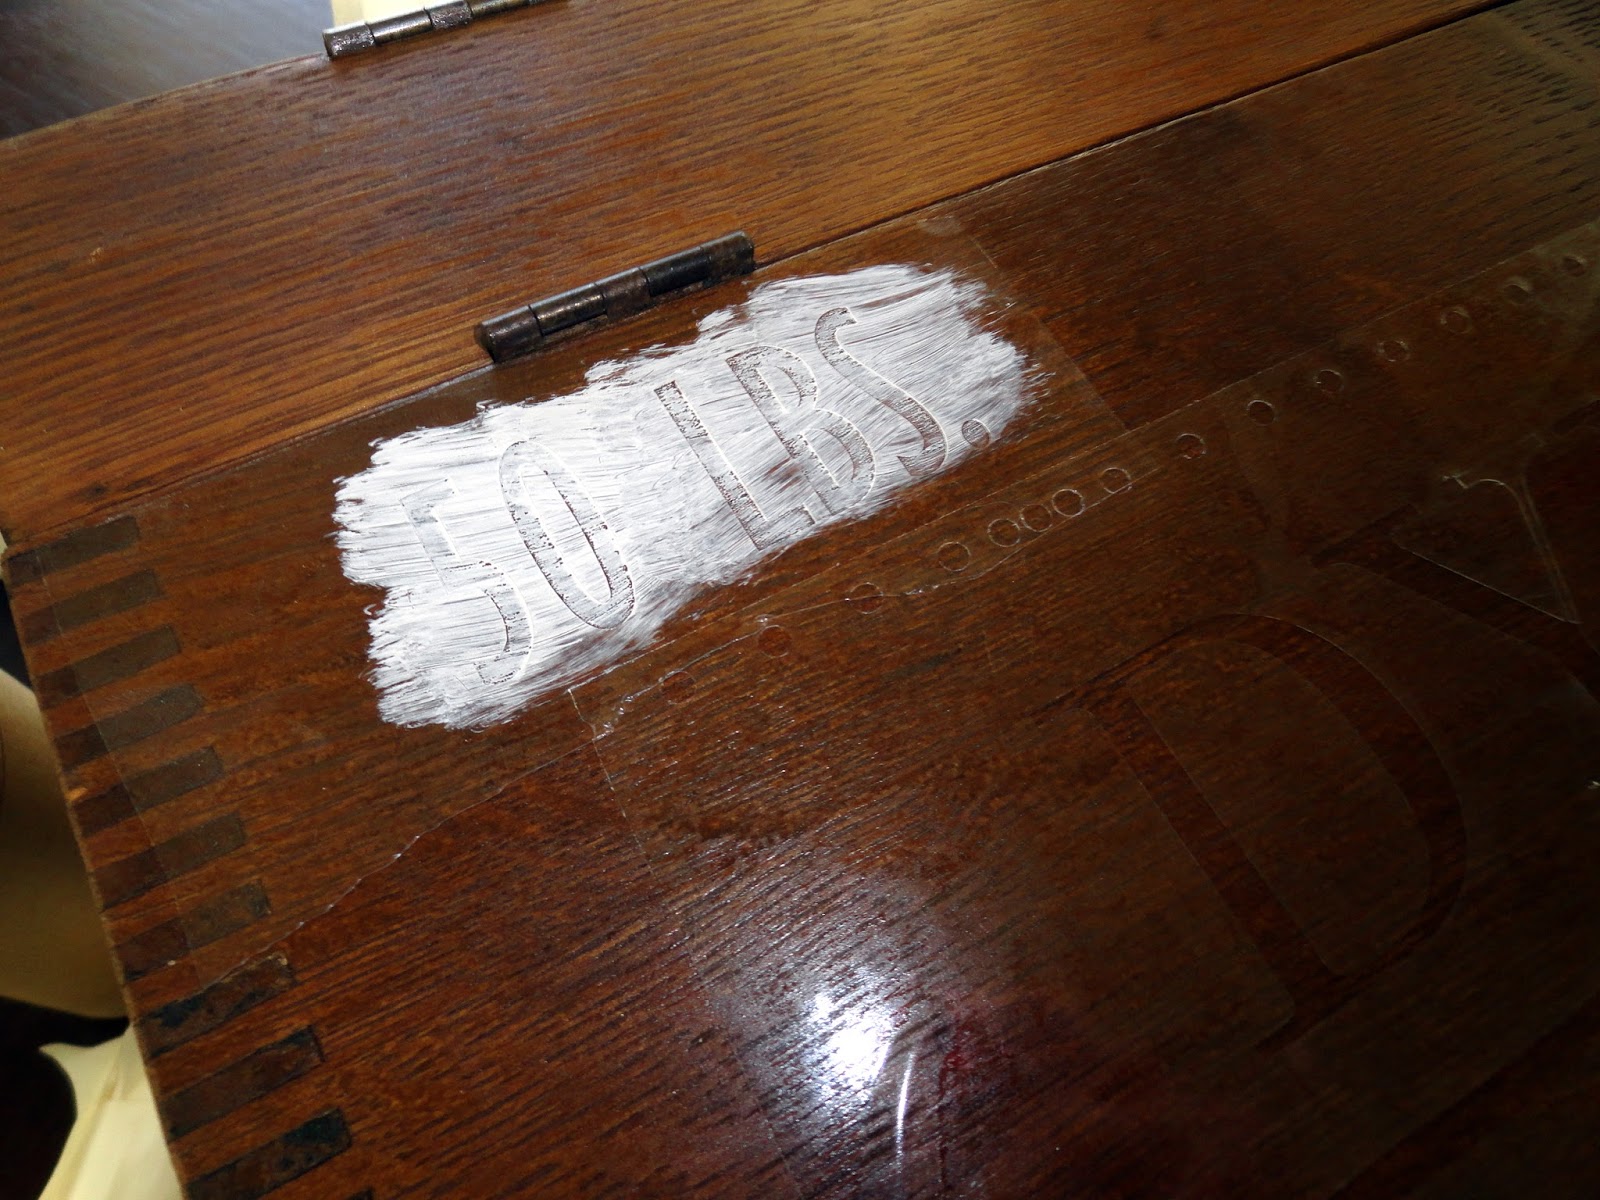
It's hard to see, but if you look closely there is a clear stencil that I cut out on my Silhouette machine.
I used transfer tape to apply the letters where I wanted
{I probably could have centered them better}
I used a very dry brush and painted over my stencil with white paint.
I didn't want a nice crisp line,
I wanted this box to look like it had some history so I used as little paint as possible to make it look authentic.
If you are a perfectionist, this isn't the kind of craft that will be good for you!
Once you have all of your stencil painted,
let it dry.
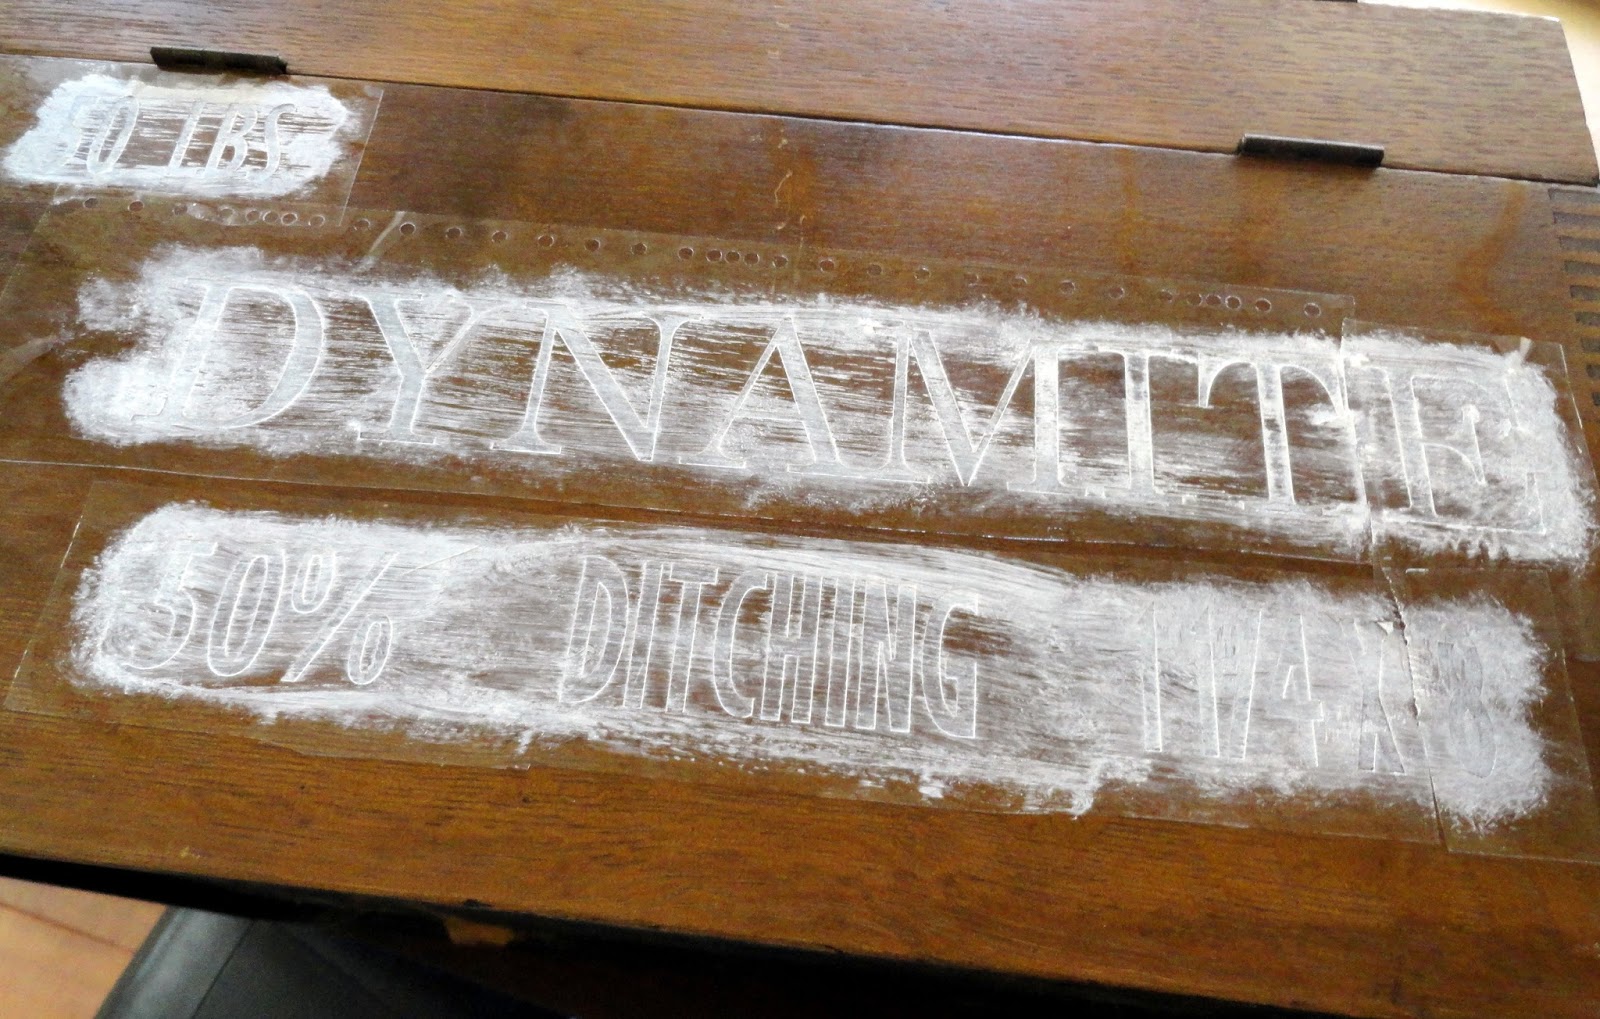
Remove your stencil and use sand paper to distress the letters and painting even more.
What do you think?
Think it was always a dynamite box?
Think it was always a dynamite box?
Friday, April 18, 2014
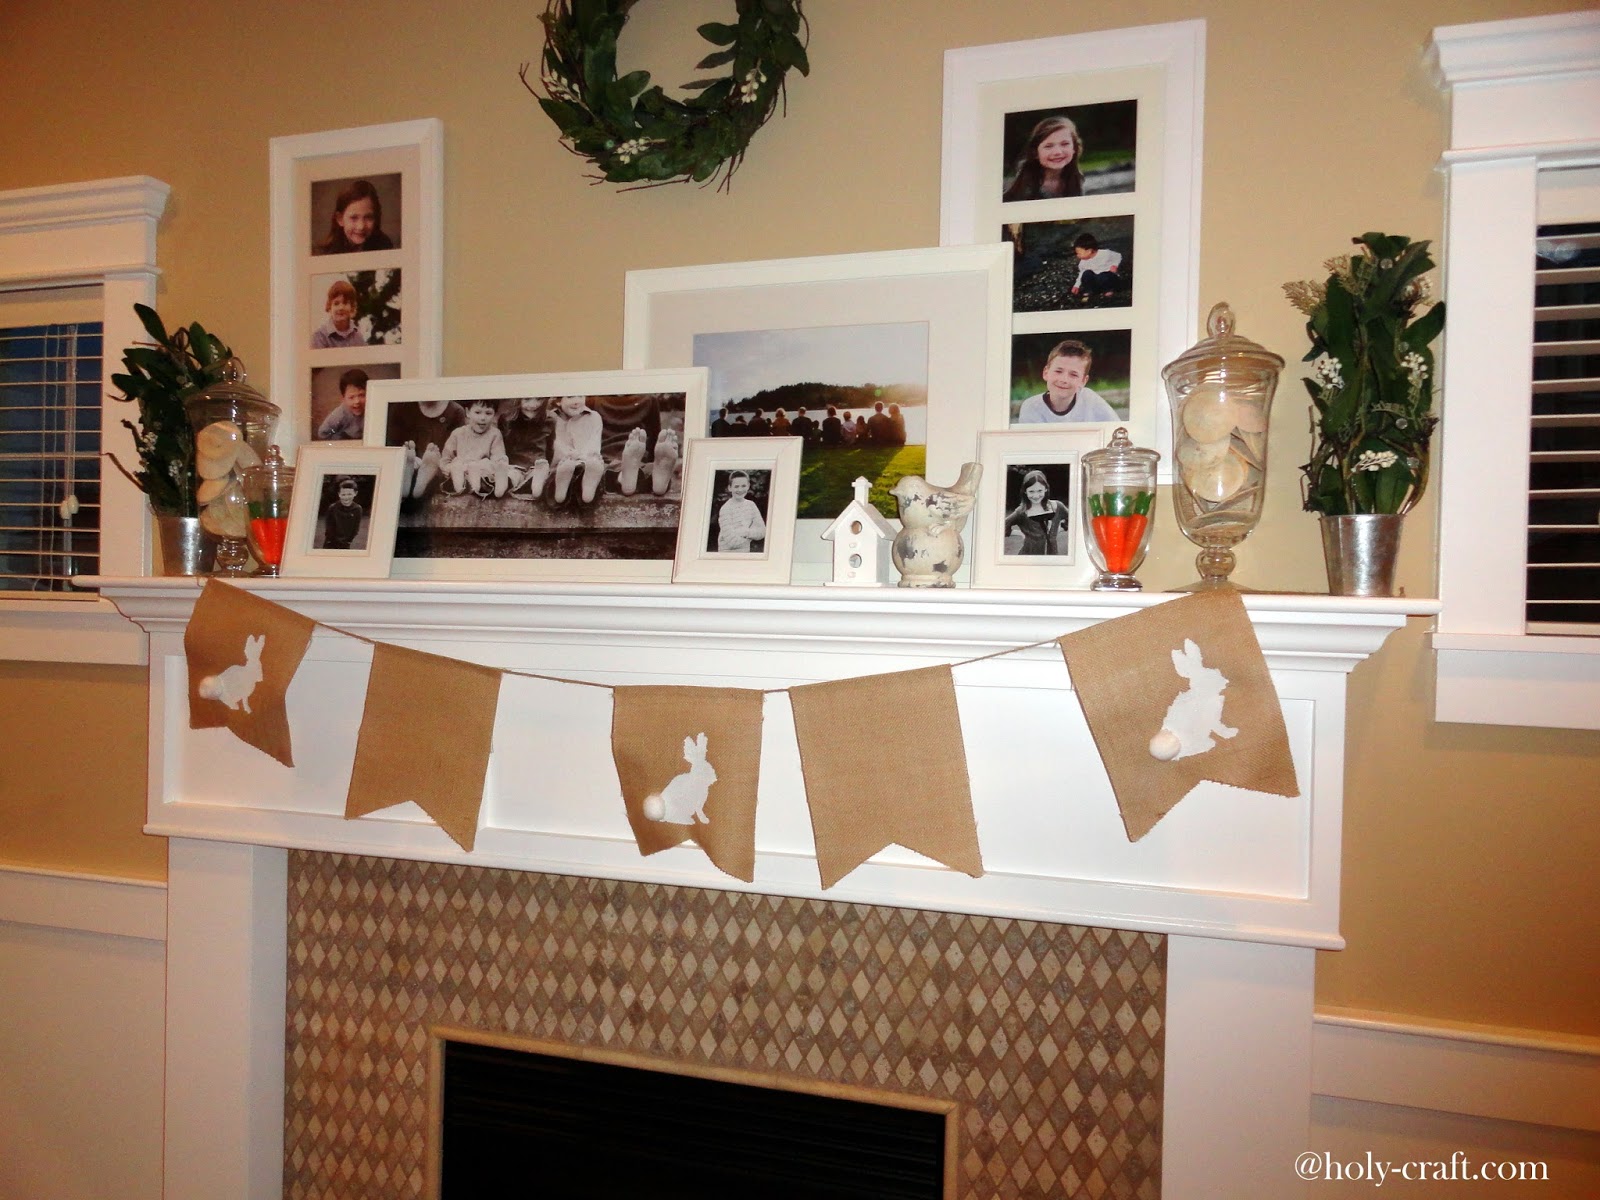
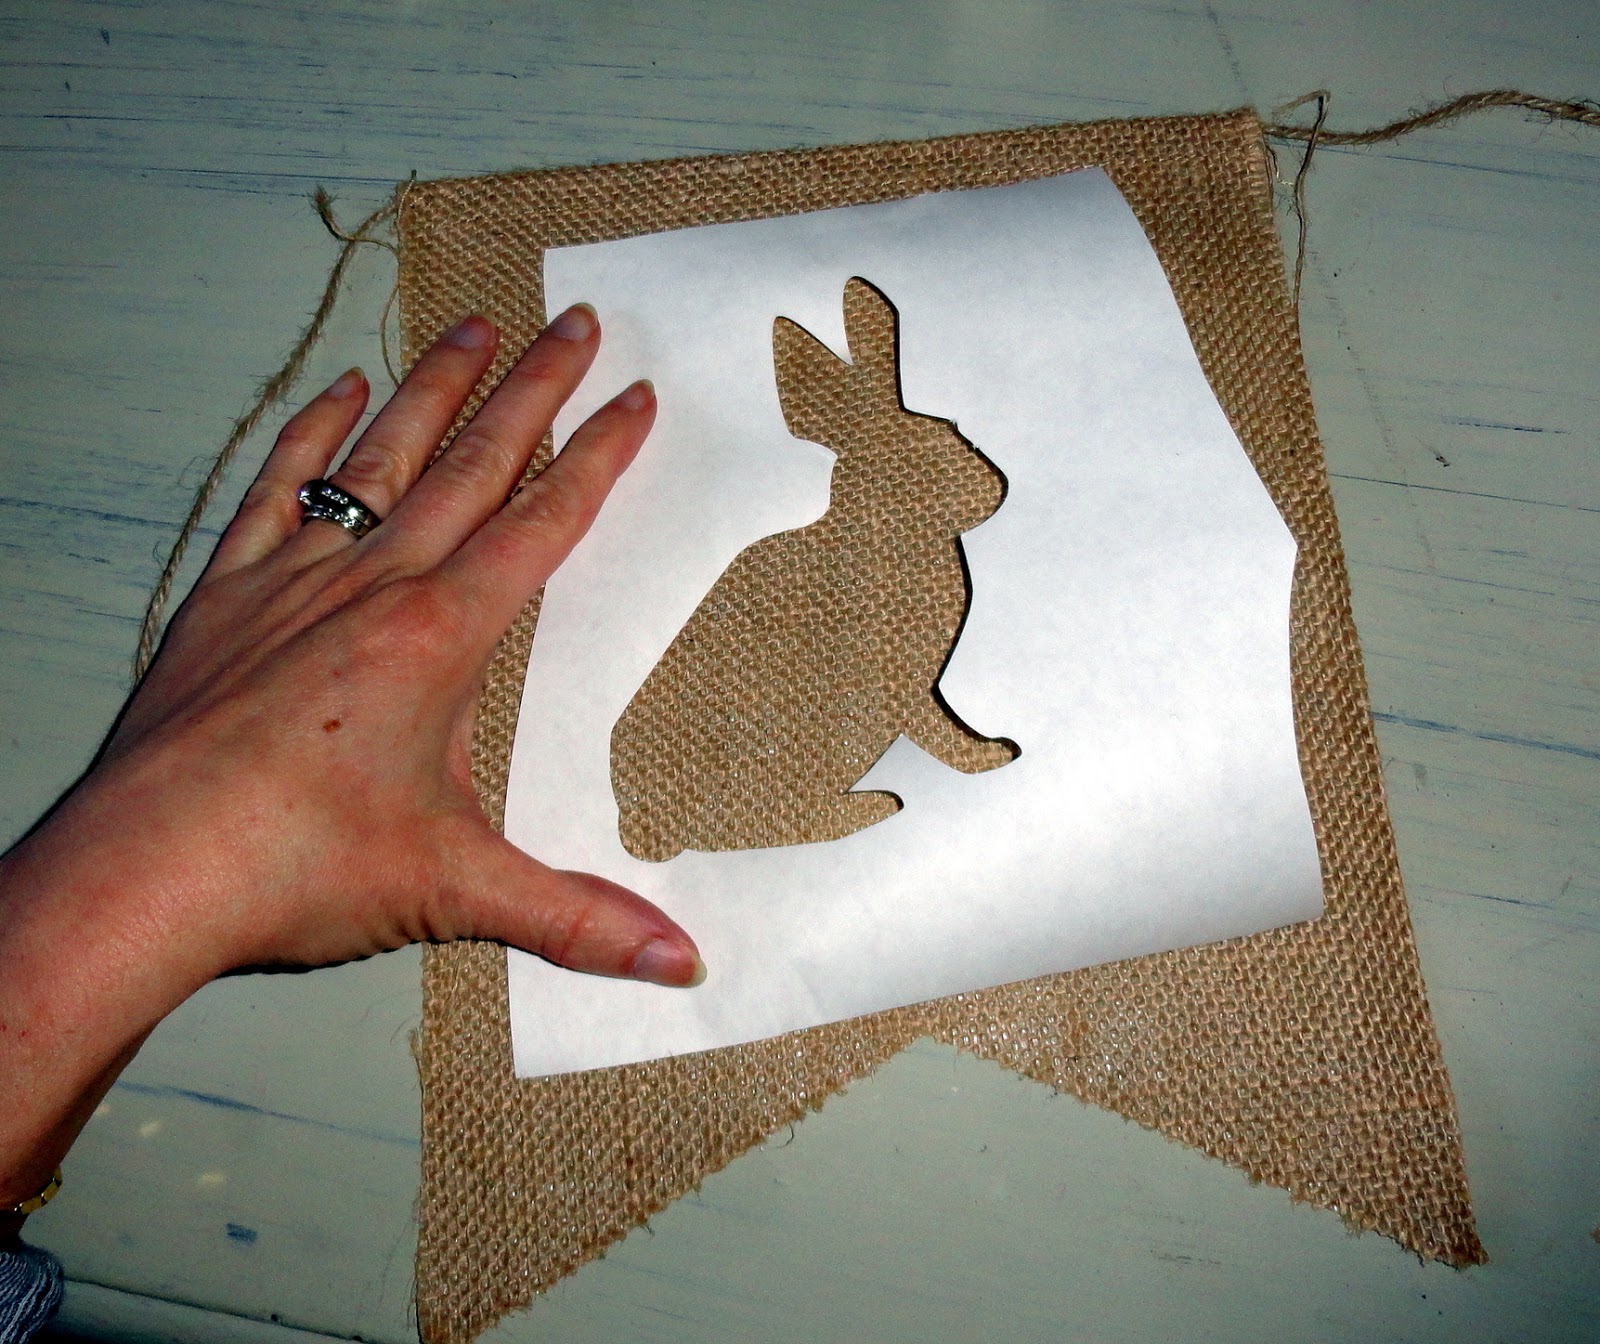
Bunny burlap banner
I have been a little busy working on the one room challenge, crafting for the craft fair I participated in last weekend and prepping for my daughter's 12th birthday {where did the time go?!}.
I didn't want to let the time fly by without stopping to make an Easter craft though.
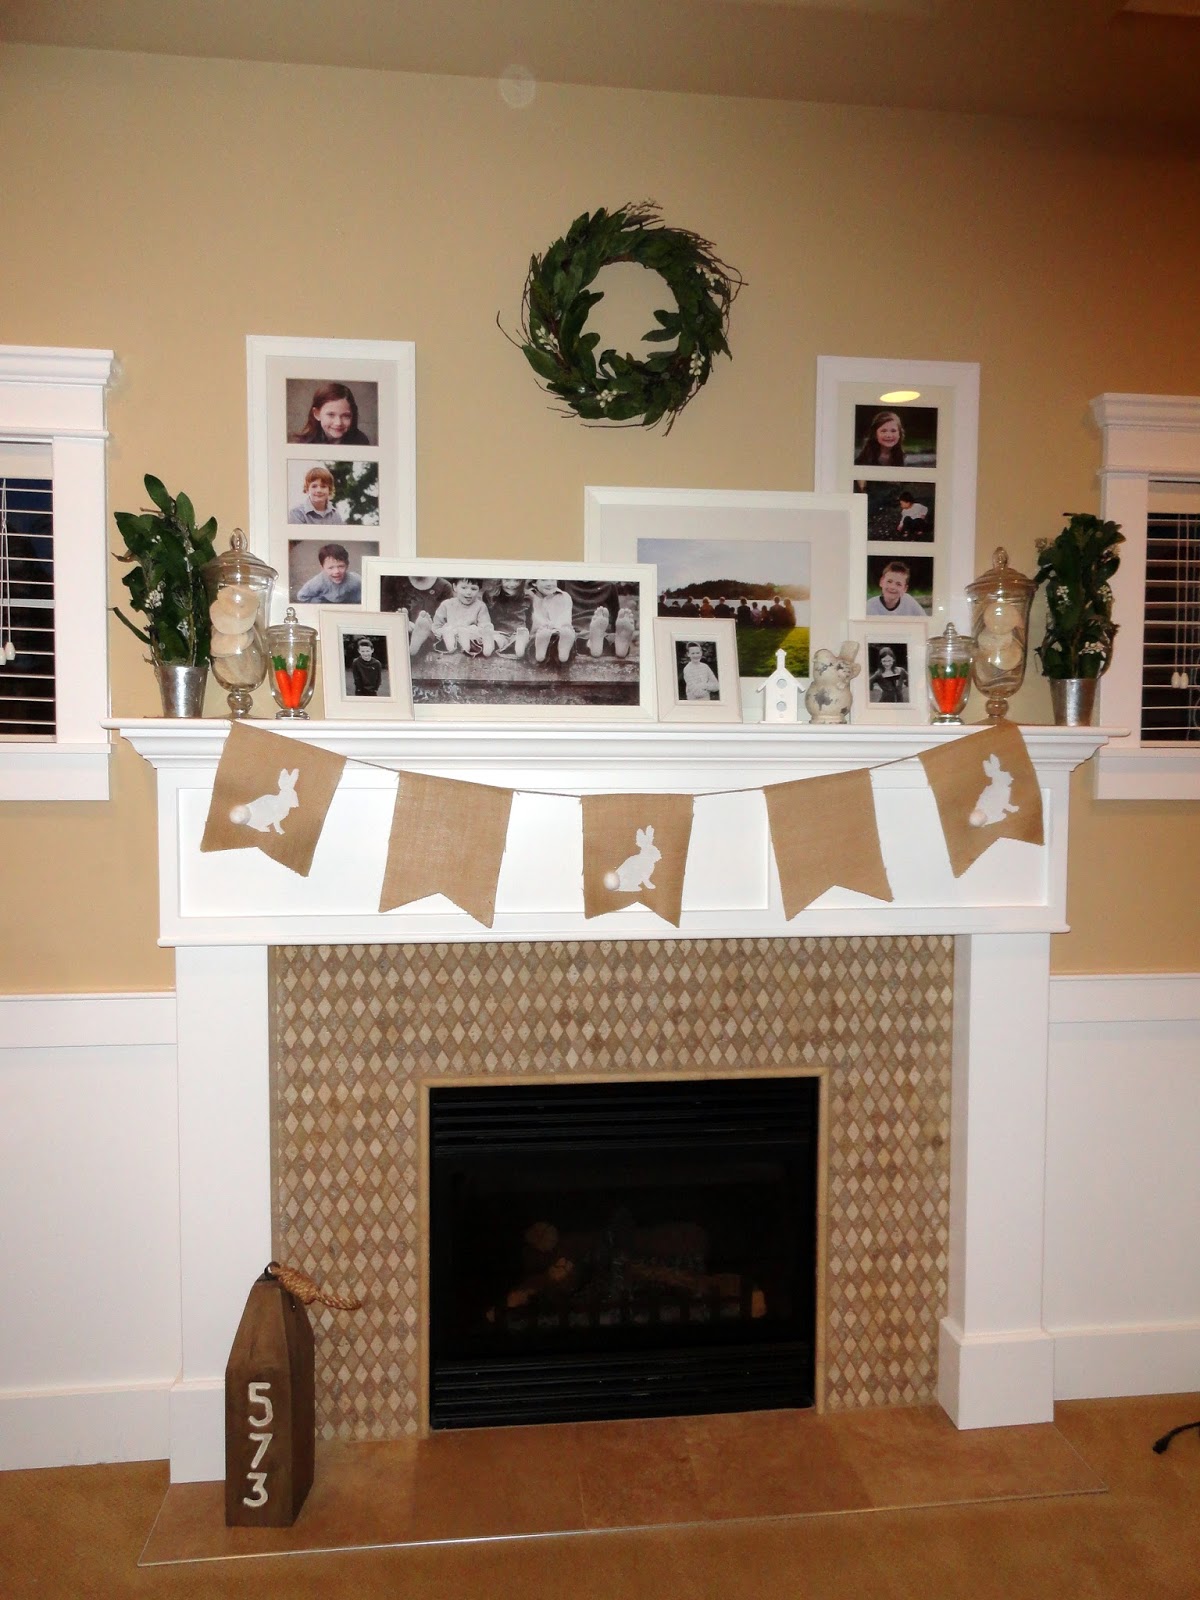
Since I work in my den, I like to decorate that mantle in there for the holidays.
I think this burlap bunny banner makes the perfect Easter decoration.
I started with this burlap banner
{on sale now for only $3.99!}
from burlapfabric.com
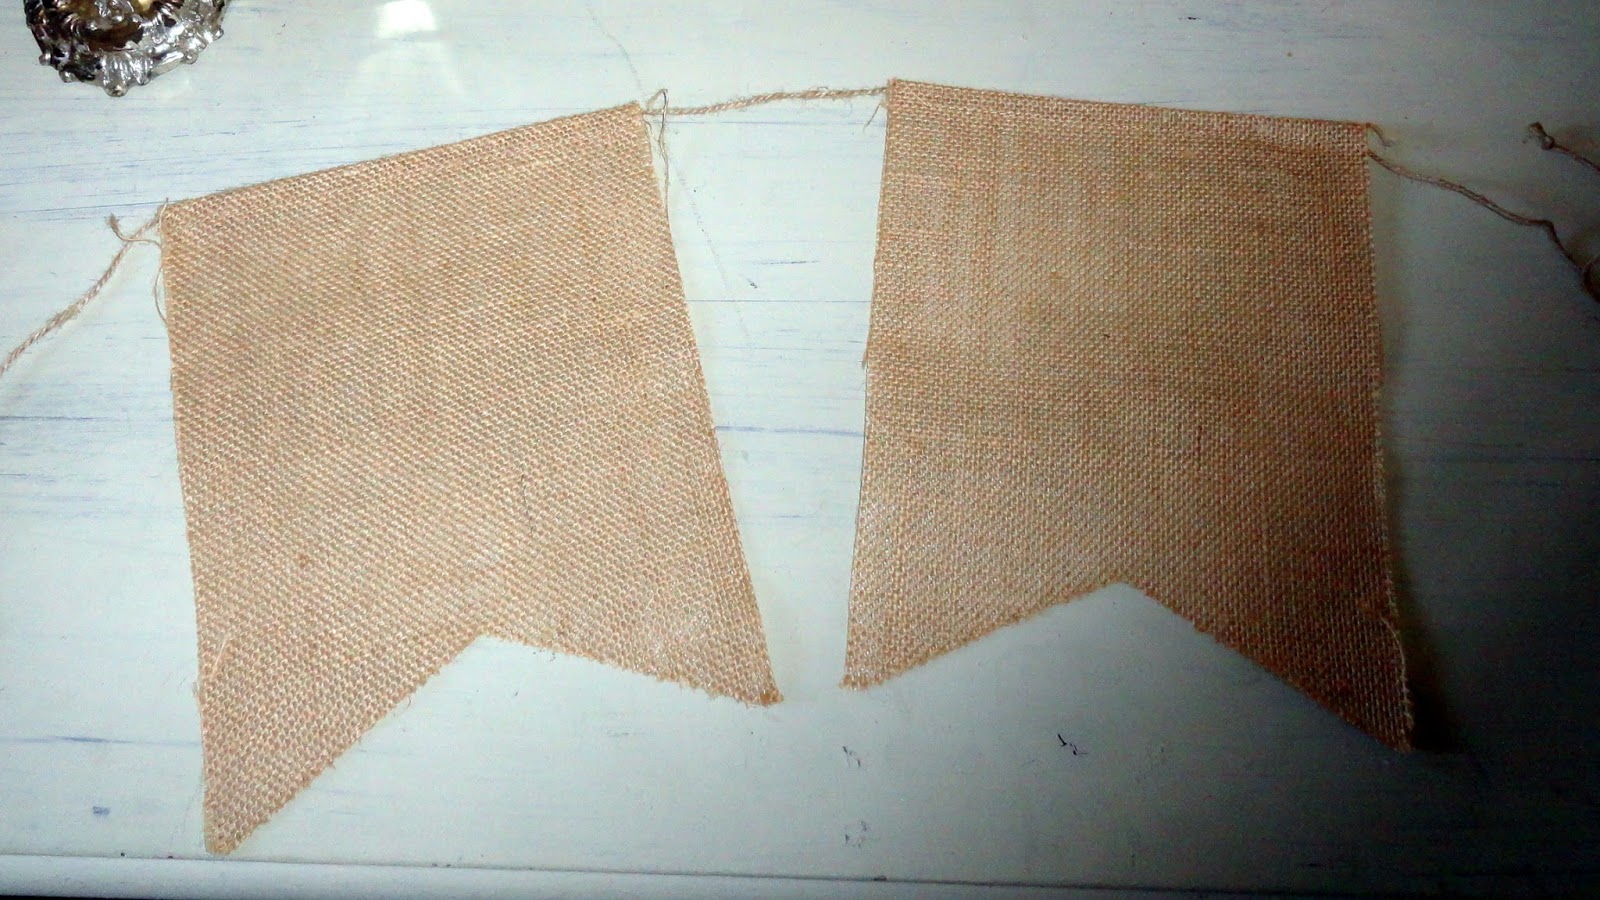
I used my Silhouette to cut this bunny silhouette out of freezer paper.
You can see a more detailed tutorial for using freezer paper as a stencil here.
Iron on your stencil

and paint using craft paint.
I ended up doing three coats of paint on this stencil.
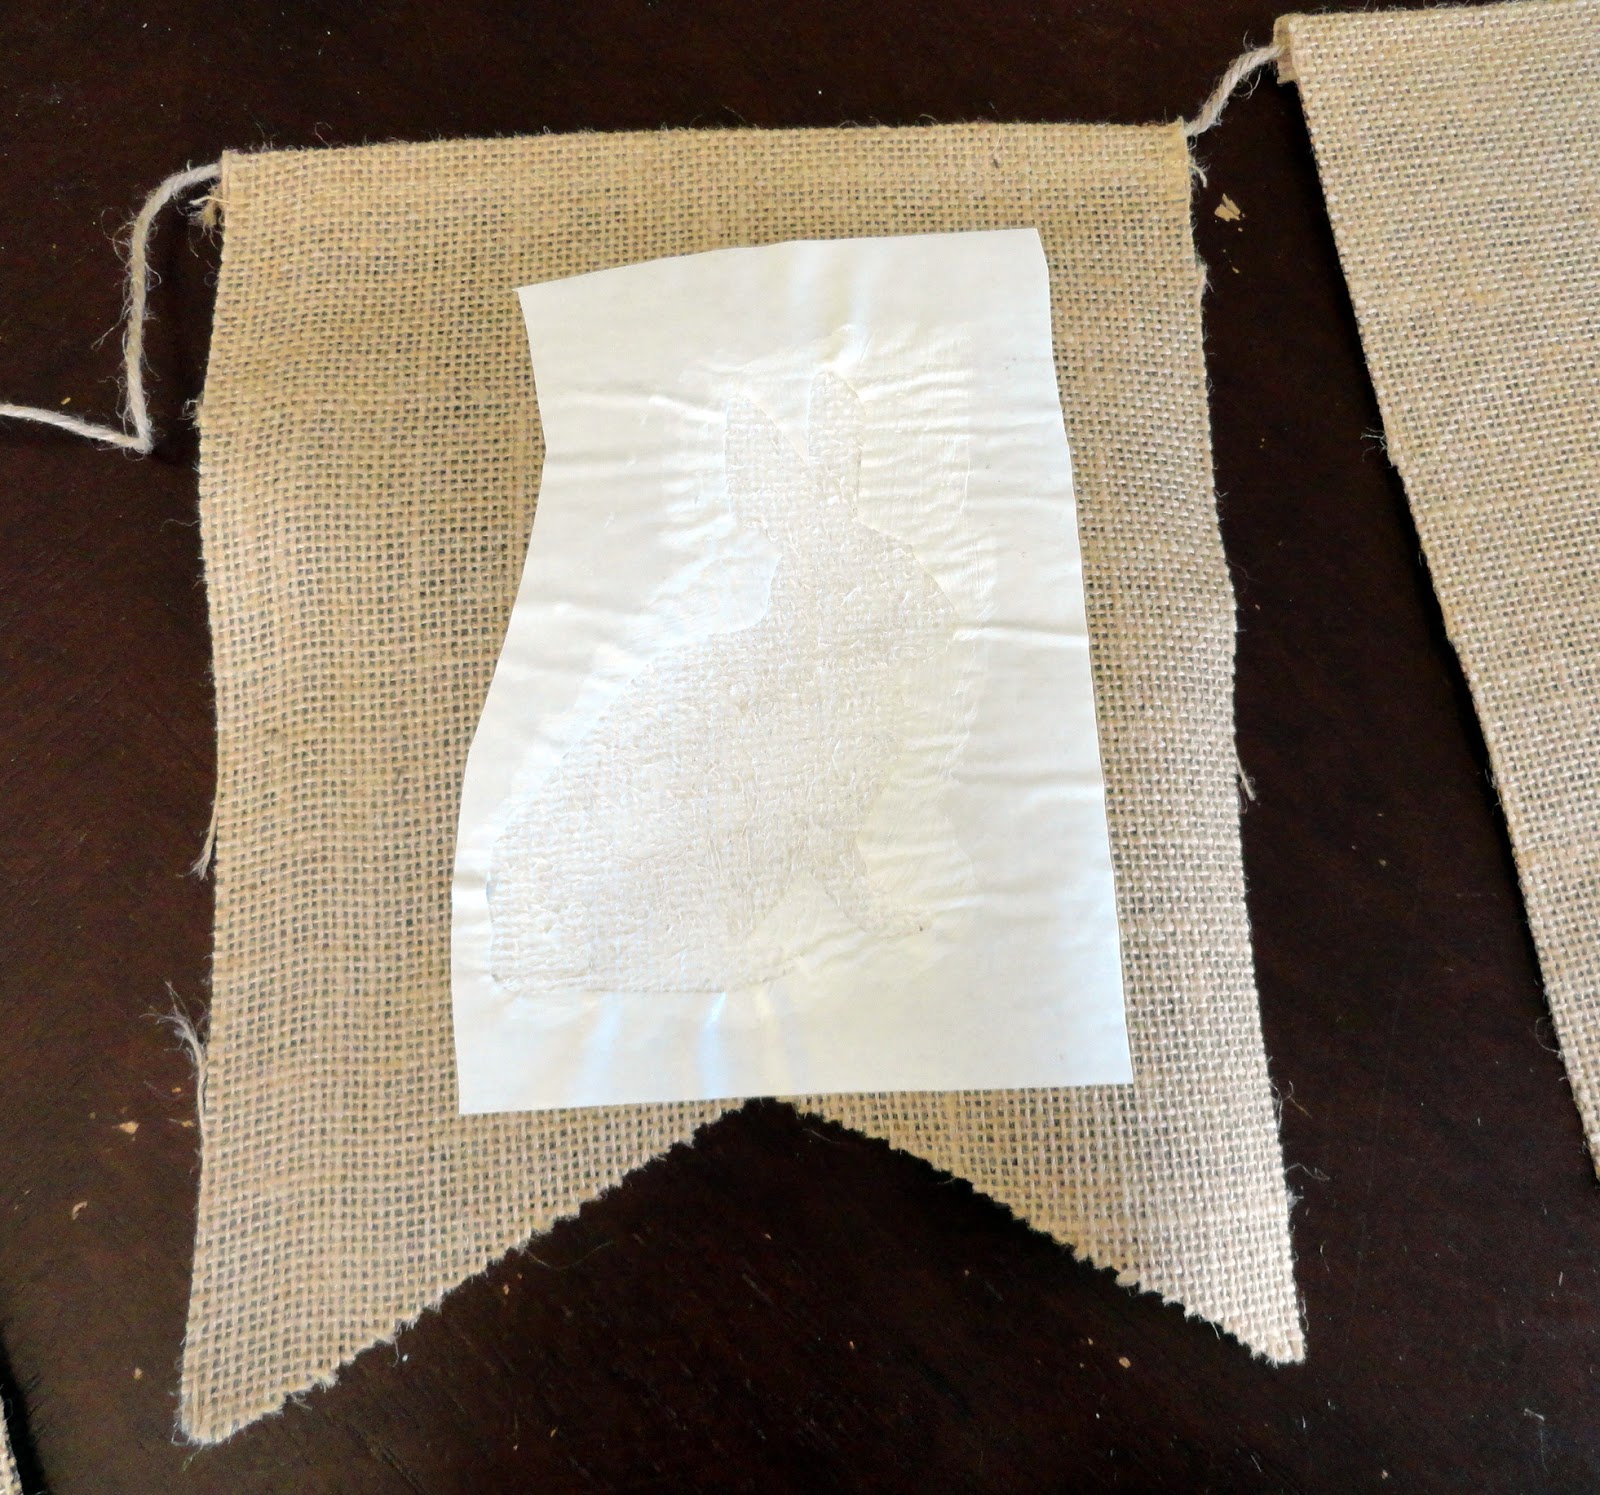
Once your paint is dry, peel your stencil off.
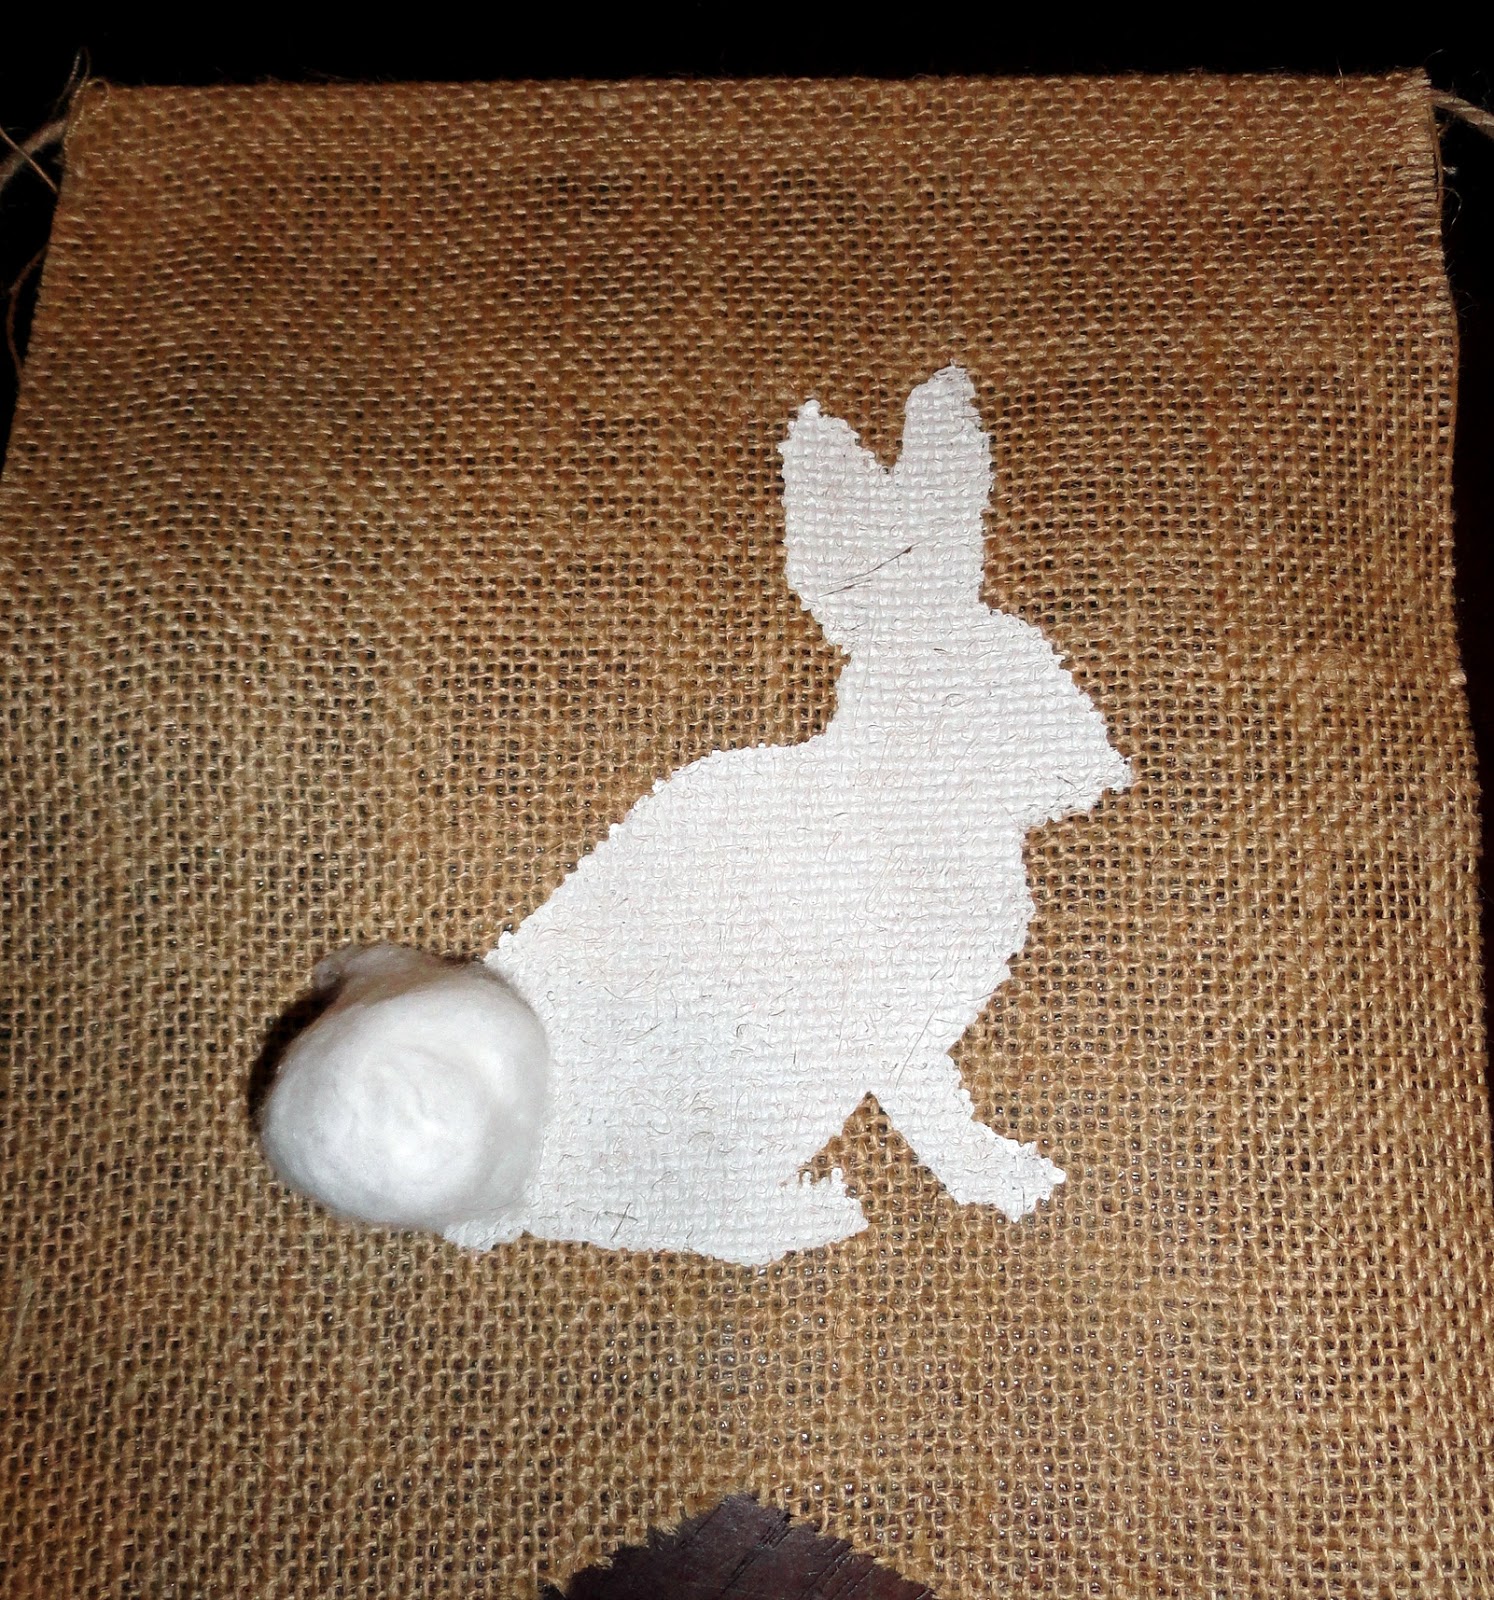
Of course, bunnies need cotton tails!
I hot glued on this cotton ball.
I am obsessed with banners and this burlap banner is super easy to use and already made for you!
That's the hardest part!
The decorating is the fun part.
Think fun and order your banner.
Thursday, December 12, 2013
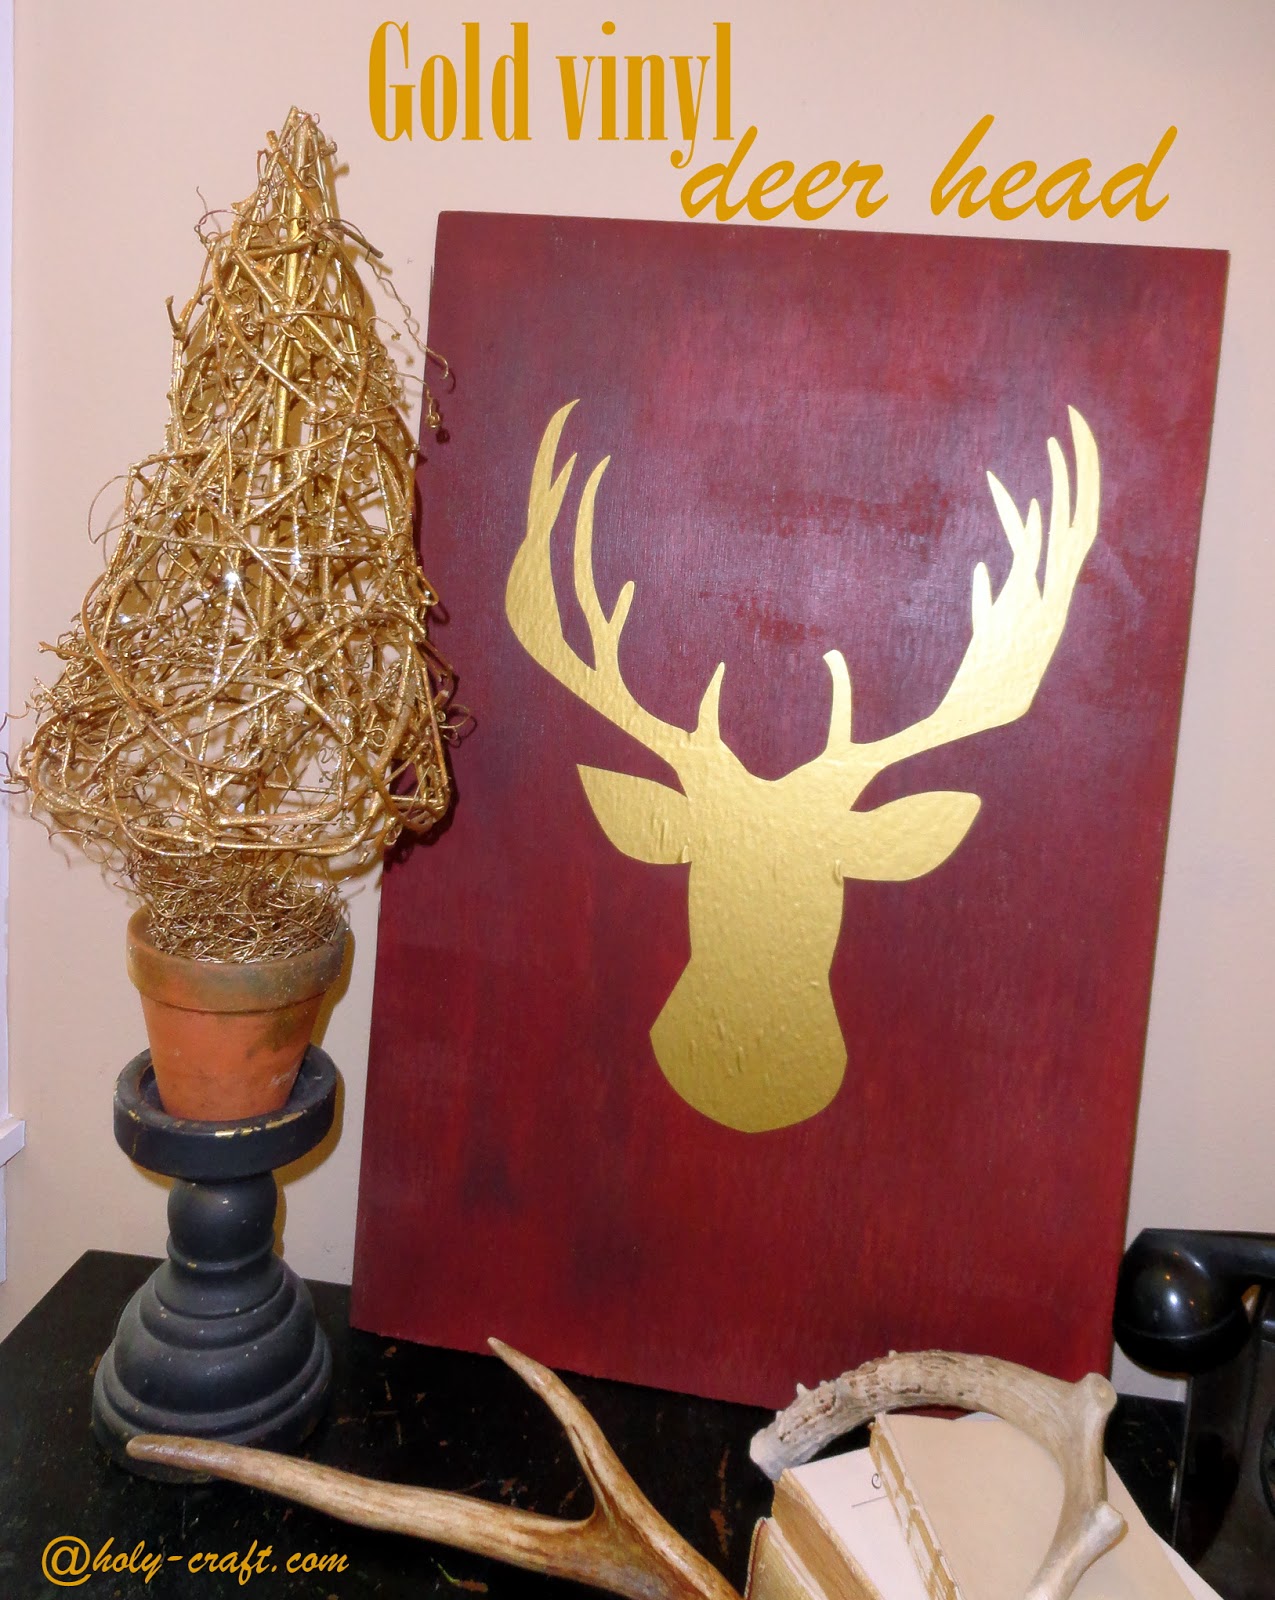
Gold vinyl stag head tutorial
Gold is hot this season so I whipped out several gold crafts this month.
This gold vinyl deer head is one of them.
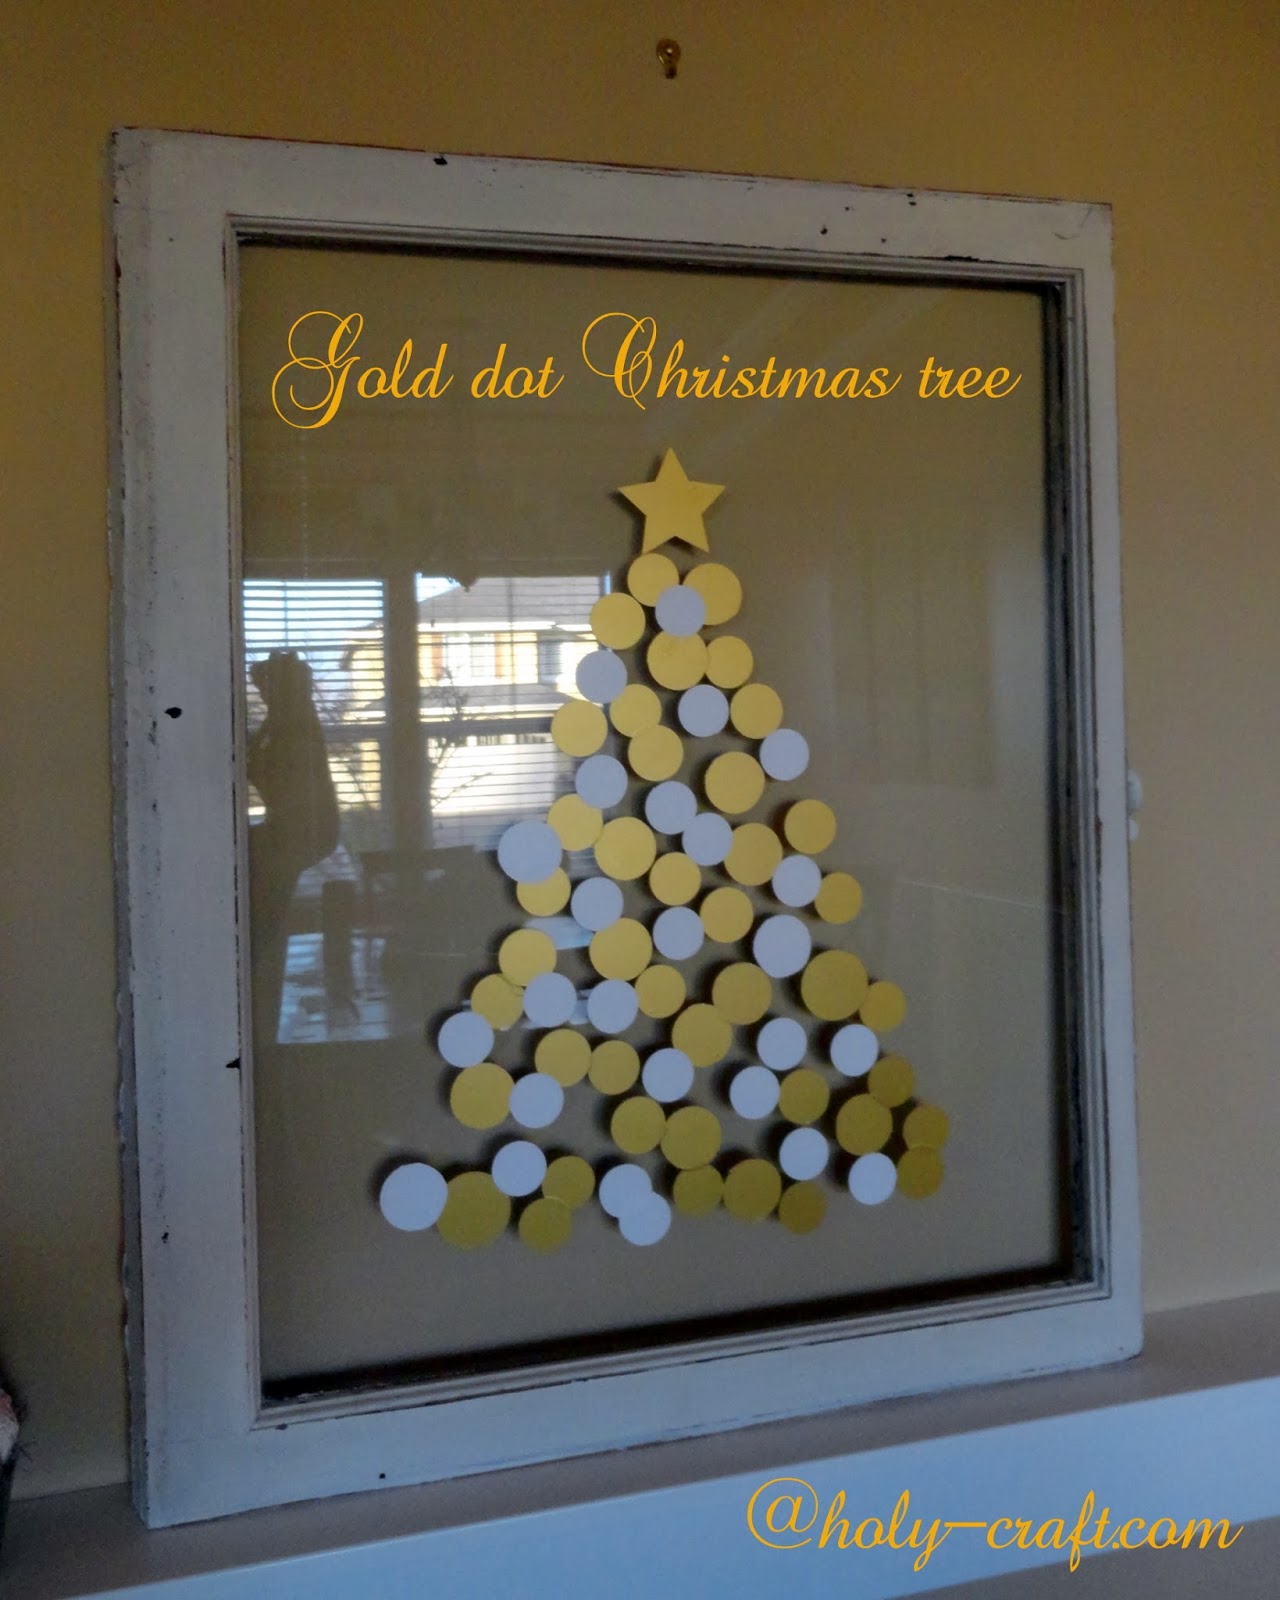
When I showed you my Christmas tree dot window, I told you I used the scraps from a project.
This was that project.
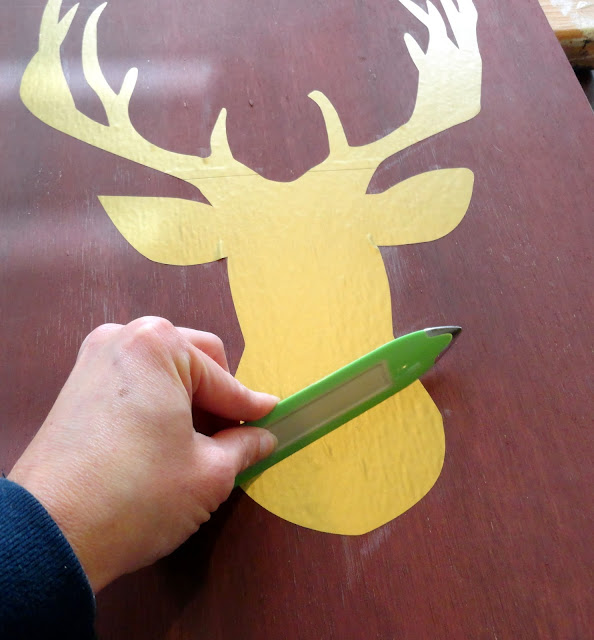
I started by finding an image
and I enlarged it in my silhouette software.
I knew that I would need to make two cuts
{mostly because I have the older and smaller version silhouette machine}
As you can see, the antlers don't fit in the white cut space.
I cut the head first, the antlers second.

I used transfer paper to pick up my cut image and transfer it on to a pre painted board.
If you look closely you can see the seam on the antlers,
but only if you look closely.
I smoothed the vinyl image down to the board and got out the bubbles.
To make sure the image didn't peel off, I used mod podge to seal the seams.
Just brush it on the whole board so that you don't get weird glossy dry lines.
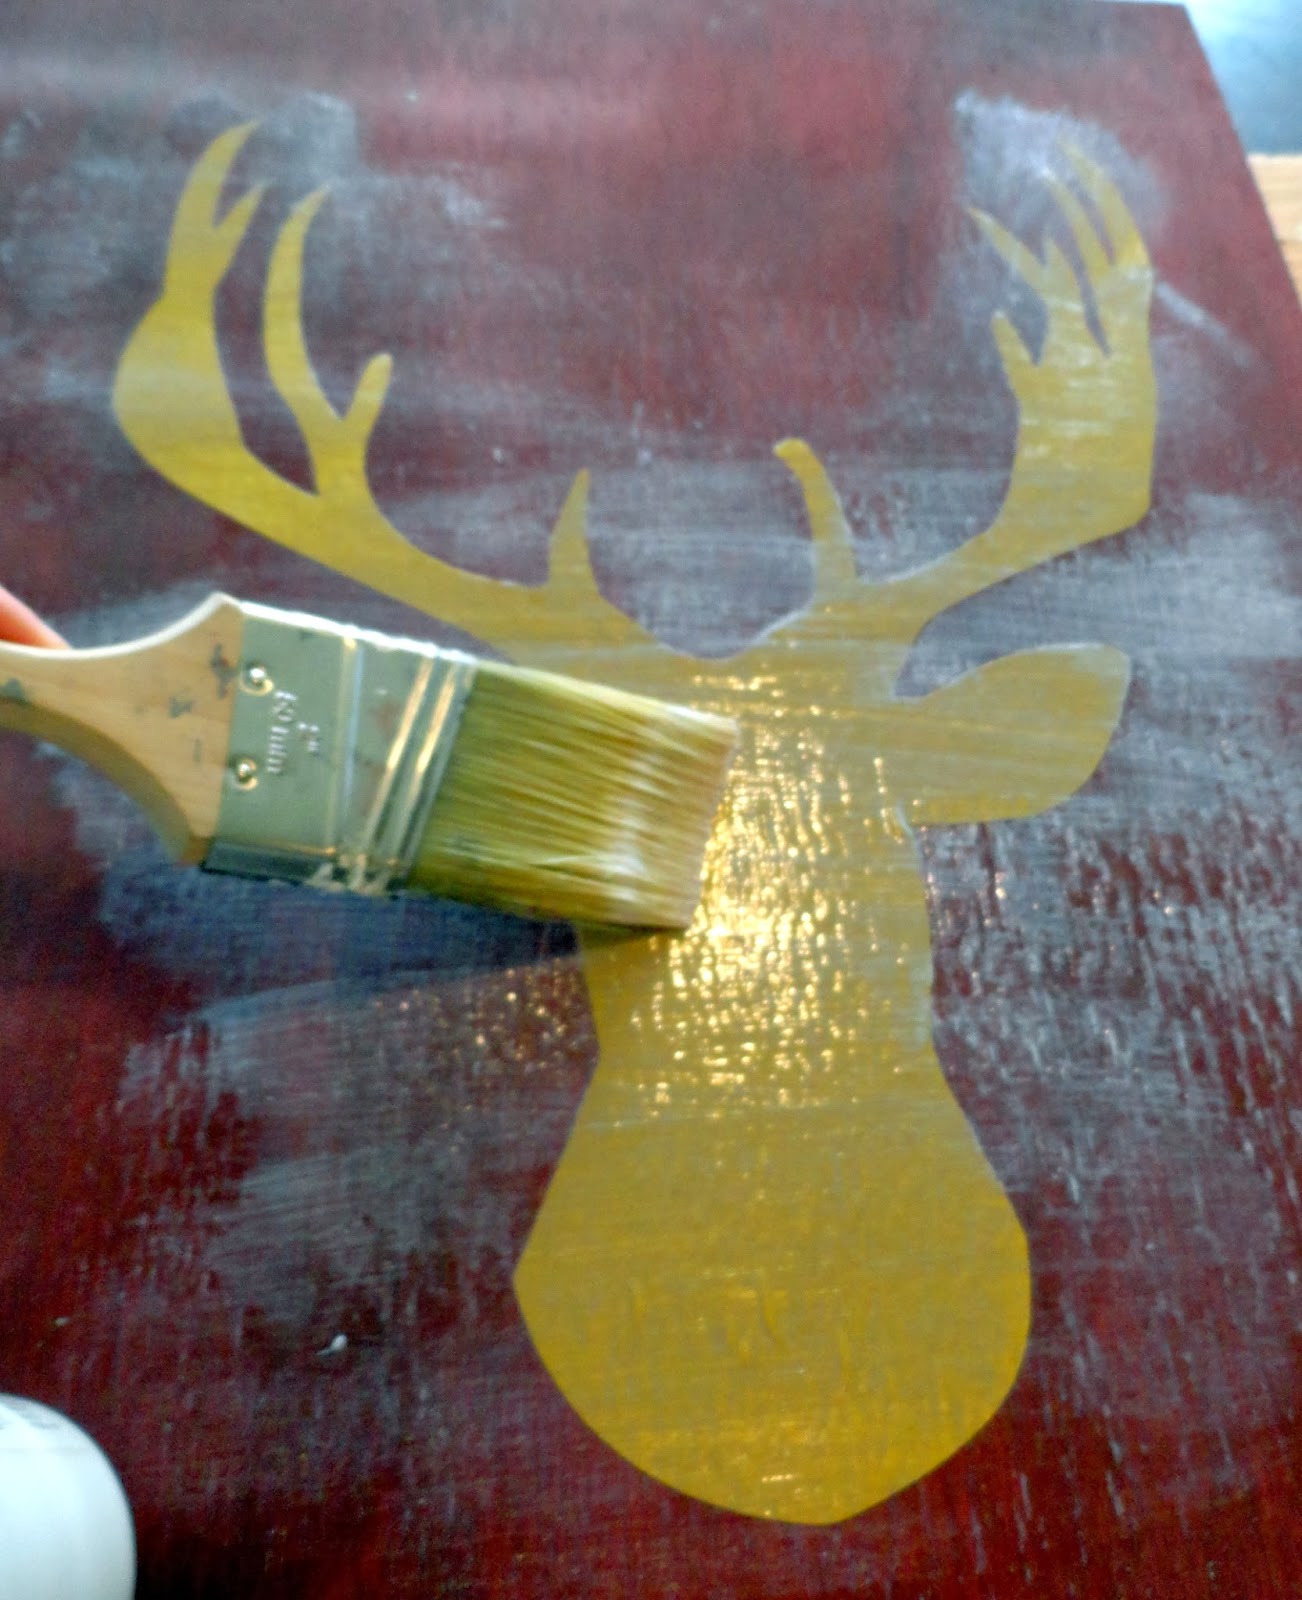
Let it dry.
Now your Stag head is ready for display year after year!

Subscribe to:
Posts (Atom)